Category Archives: Abstract

“Vortex” by David Kilpatrick. Single Continuous Line and Alternate Overdraw colouring.

Vortex, David Kilpatrick. flat,1000x1000,075,f.u1

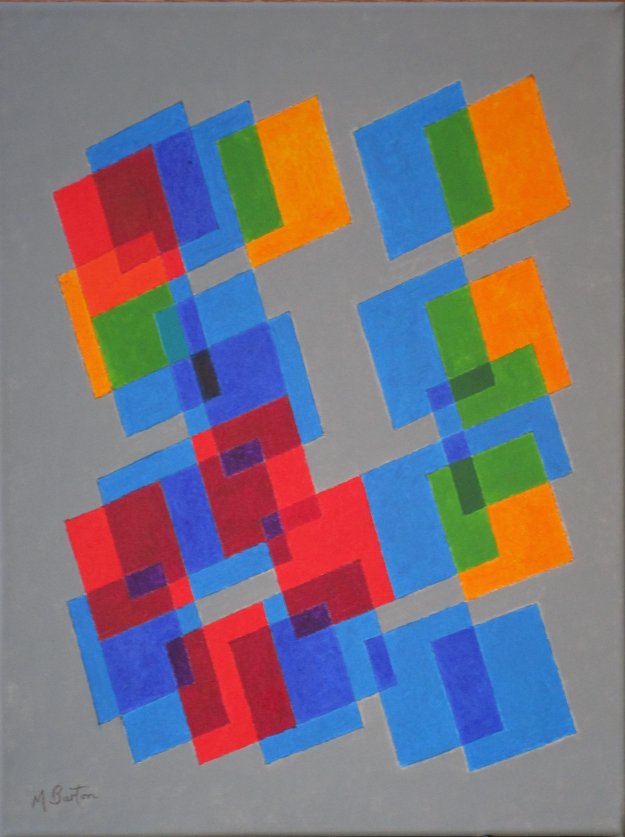
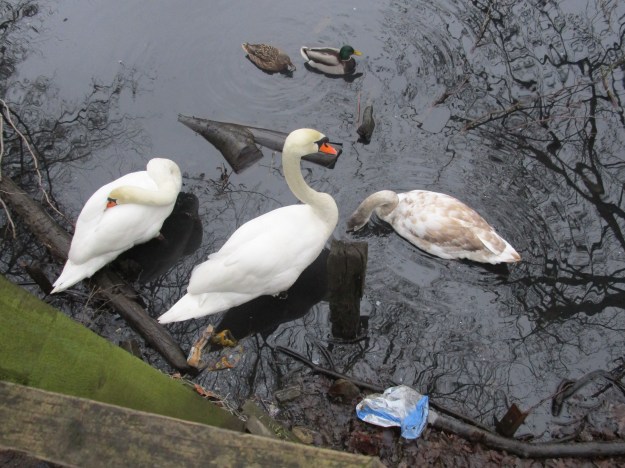
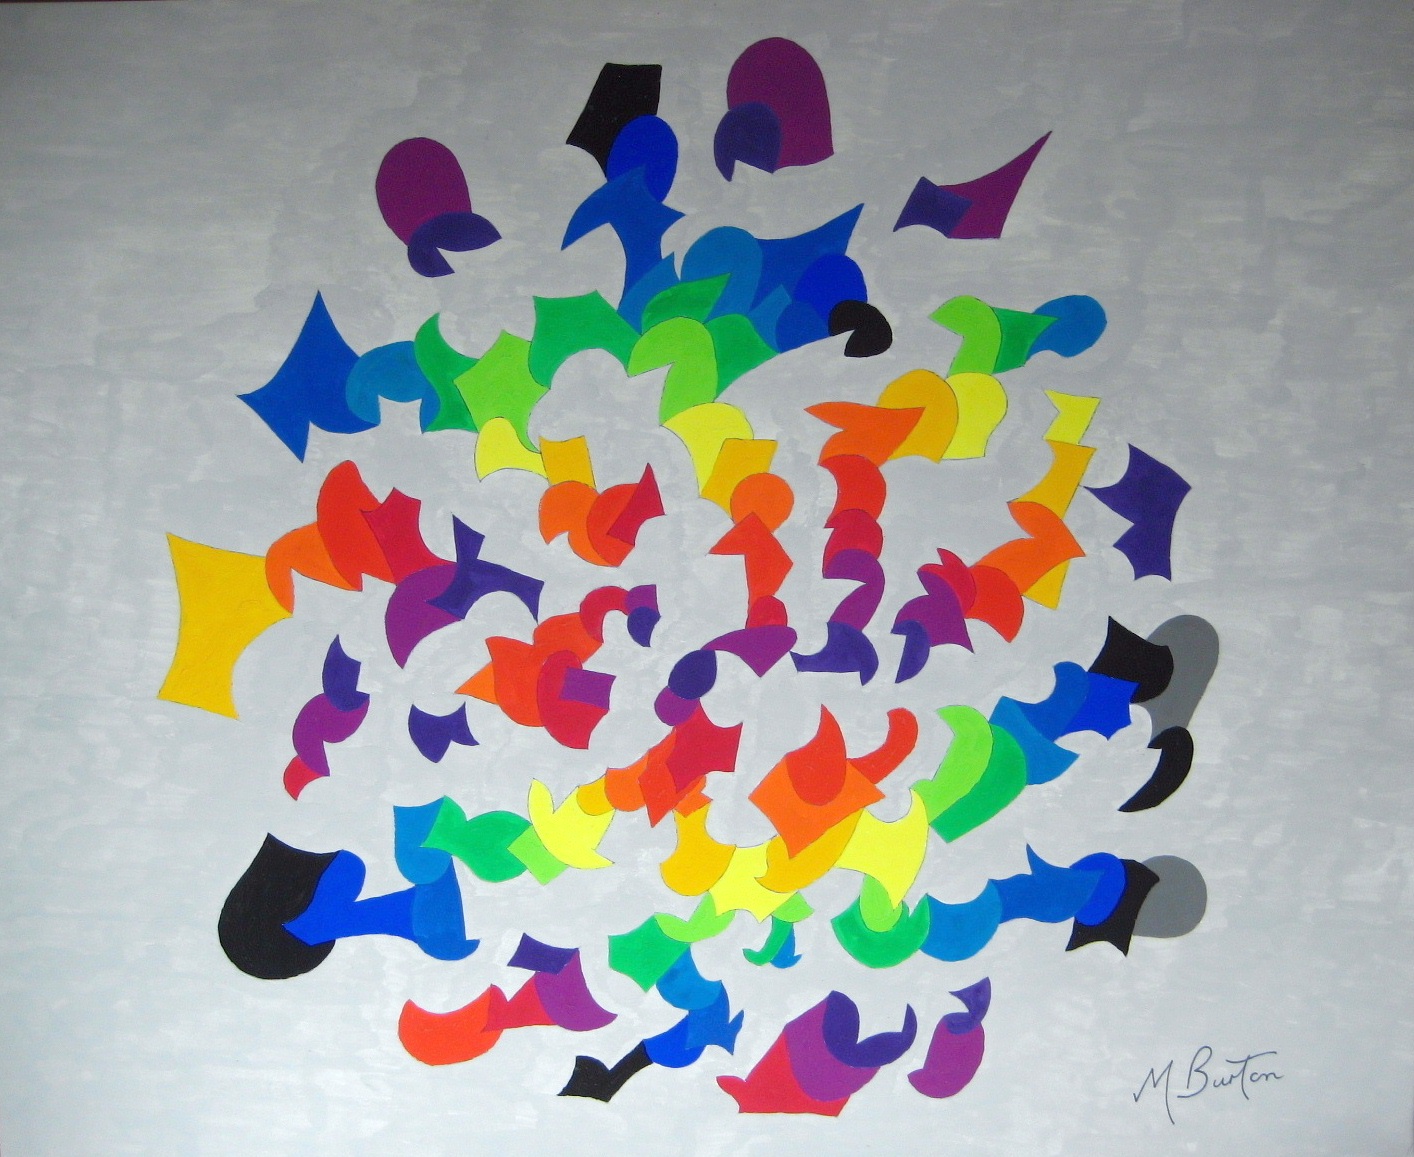
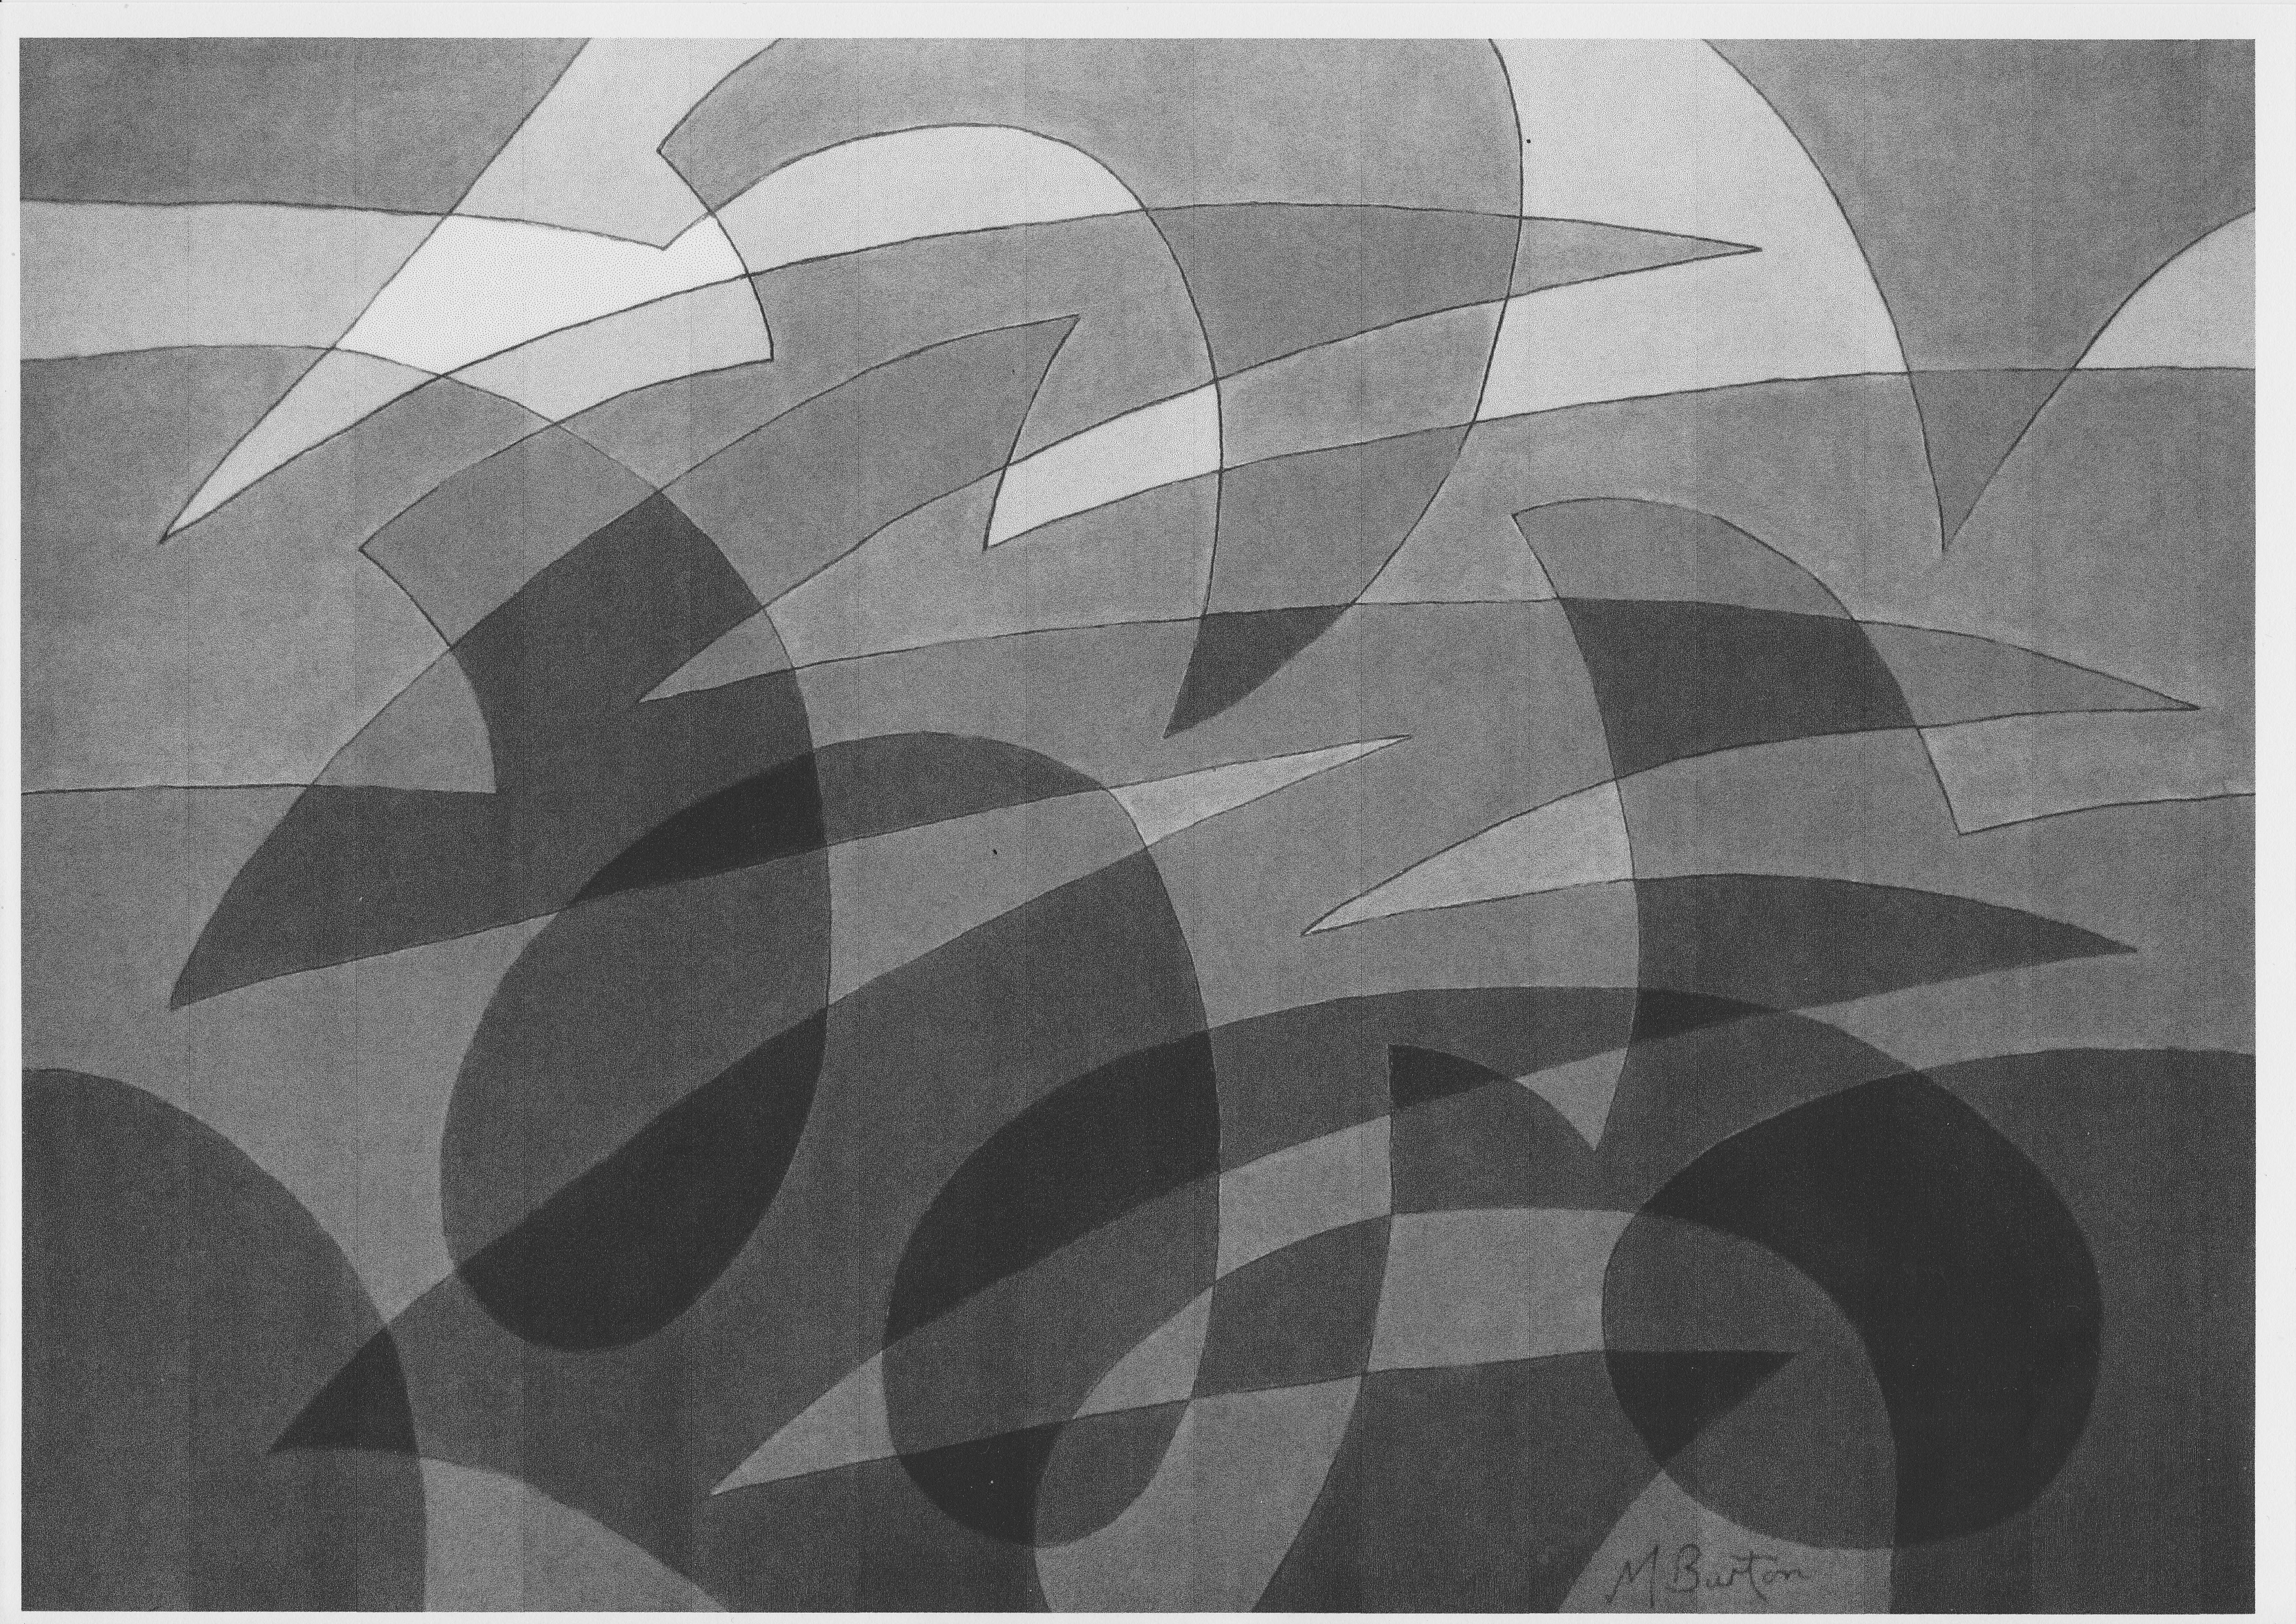
“Vortex” by David Kilpatrick, artist from Atherton, Australia.   Single Continuous Line using the Alternate Overdraw method to allocate colours.   March 2017.   Mick Burton blog.

I have been exchanging ideas with David Kilpatrick recently and he has agreed to let me put some of his pictures in my blog.  “Vortex” stands out to me, as I have been a fan of Vorticism for many years.  He has used Alternate Overdraw to allocate colours in sequence and it has worked well.

David’s design gives the impression of a sheet of plastic, coloured green on one side and red on the other, and each twist showing the other side.  With overlaps you get darker greens or darker reds.  Four internal areas let the background shine through.  The whole thing is very natural, including David’s own style of patchy colour radiating outwards.

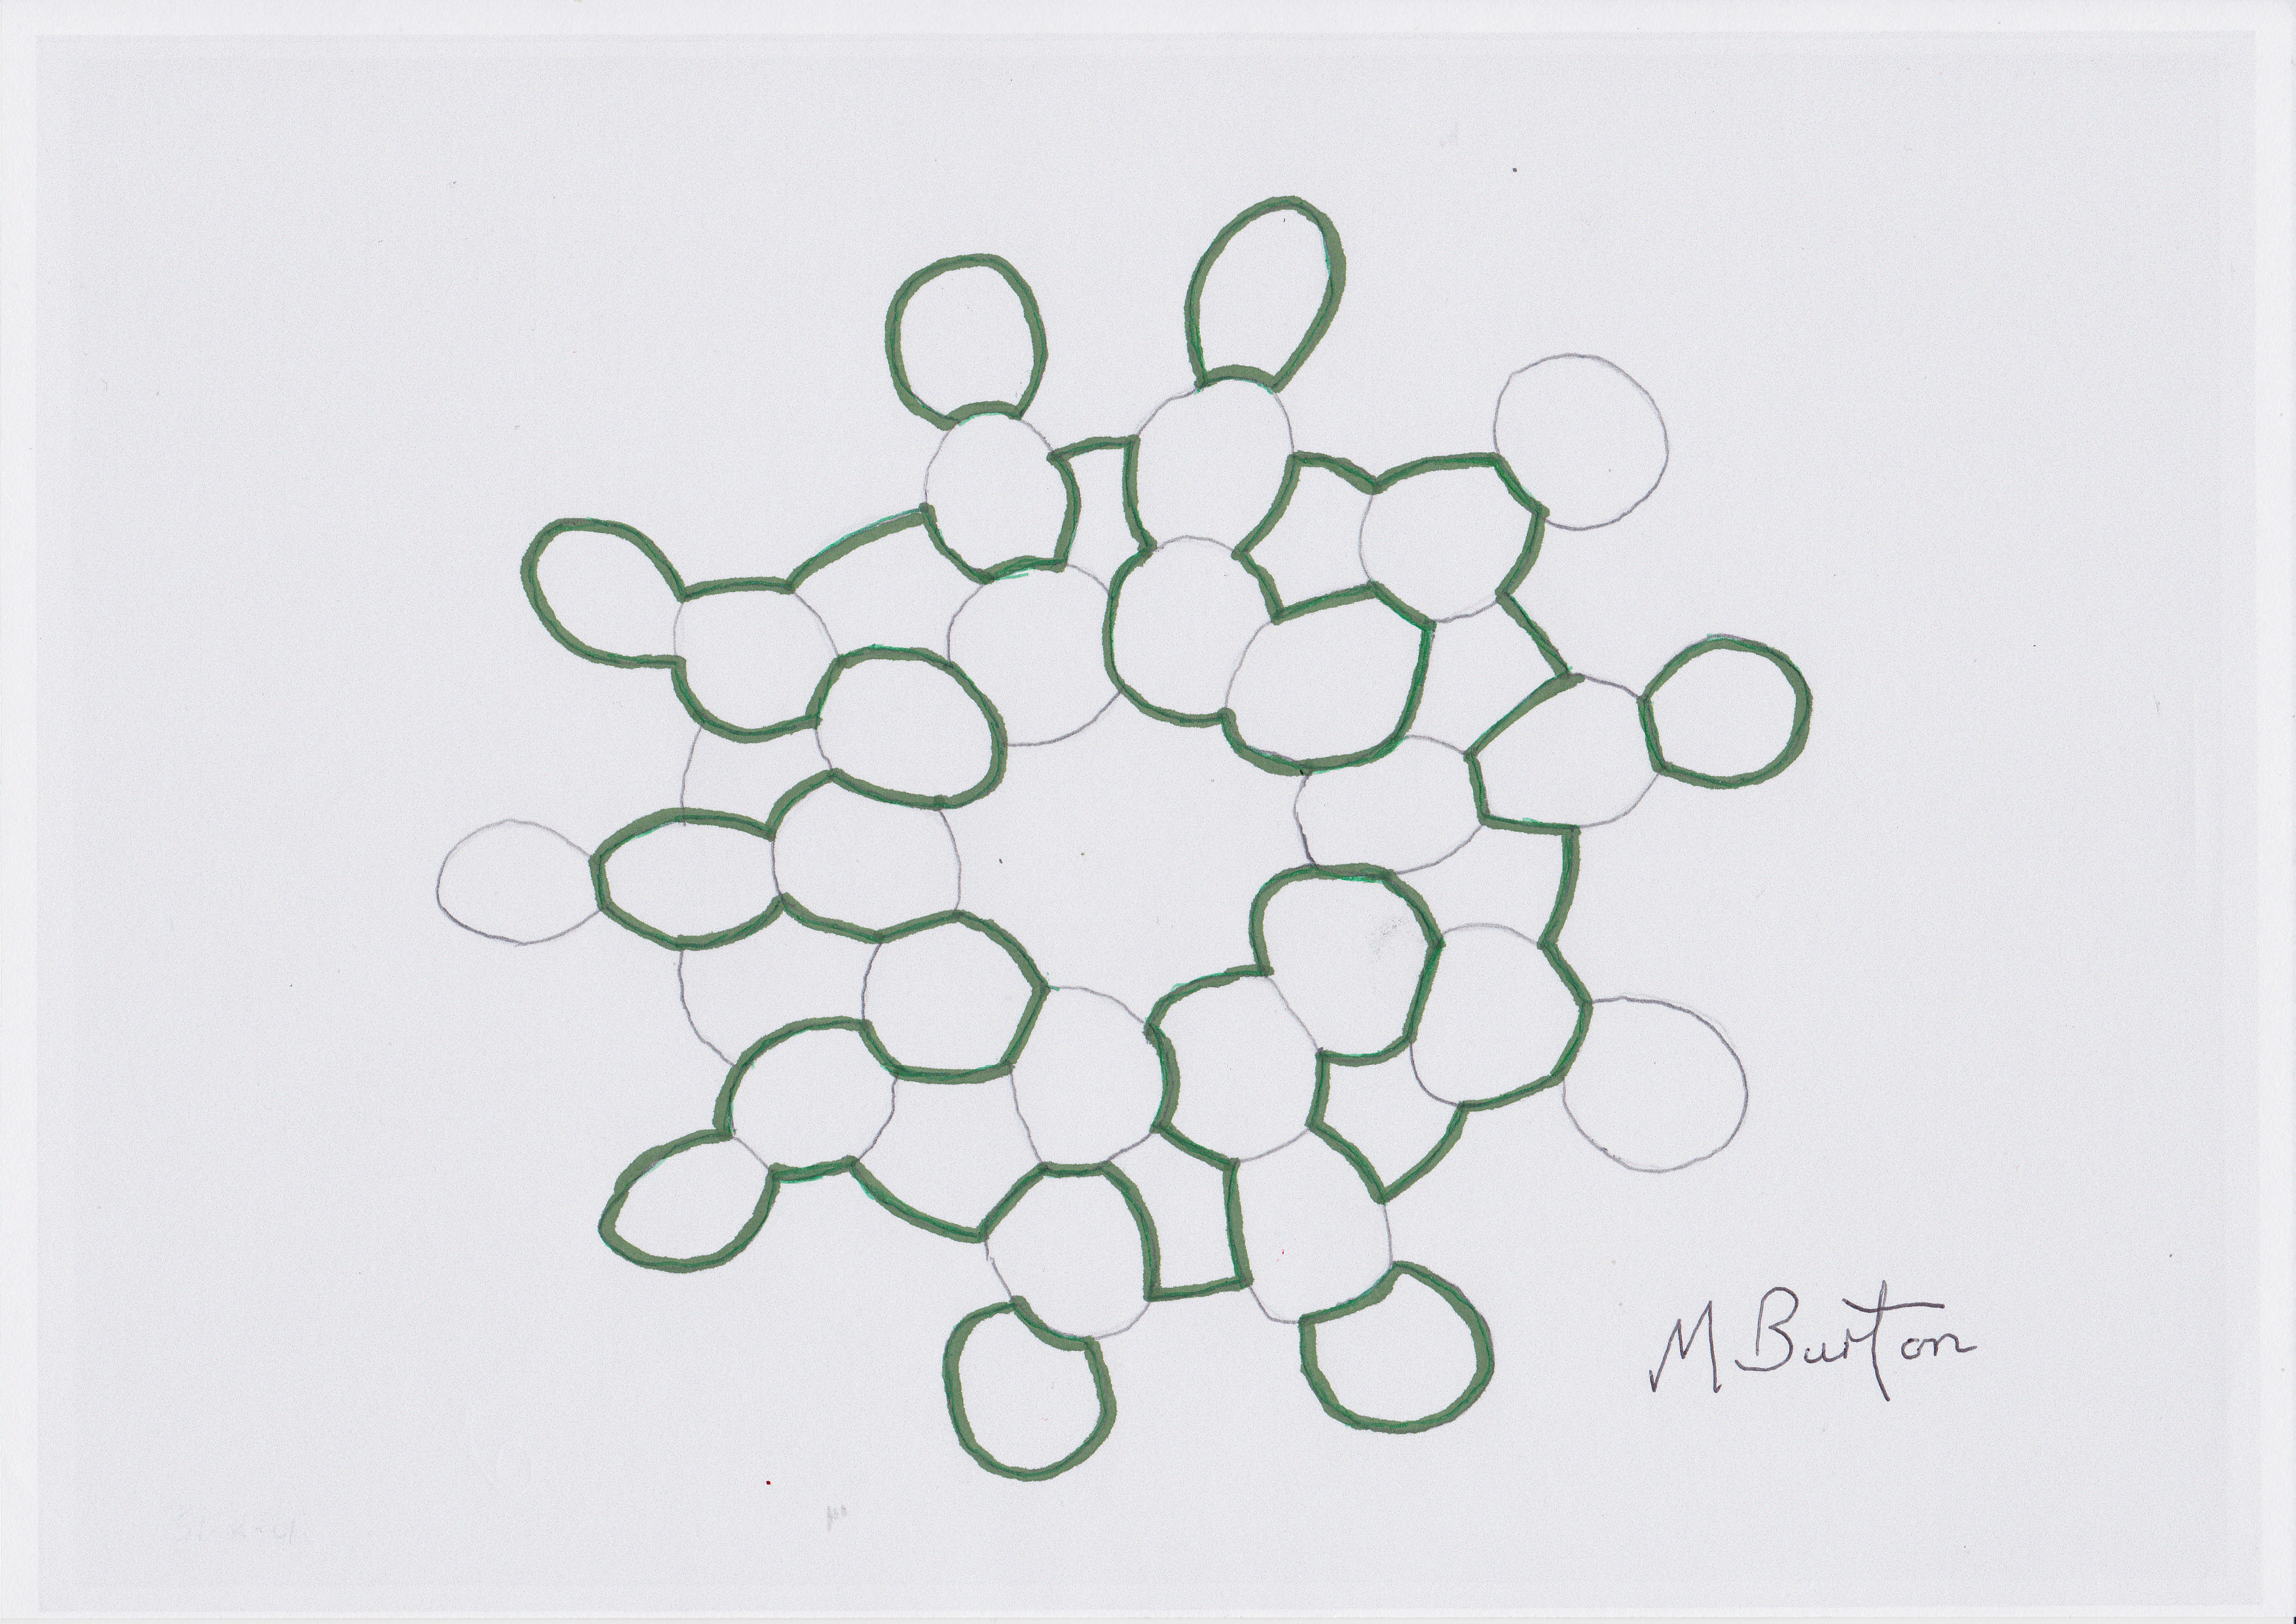
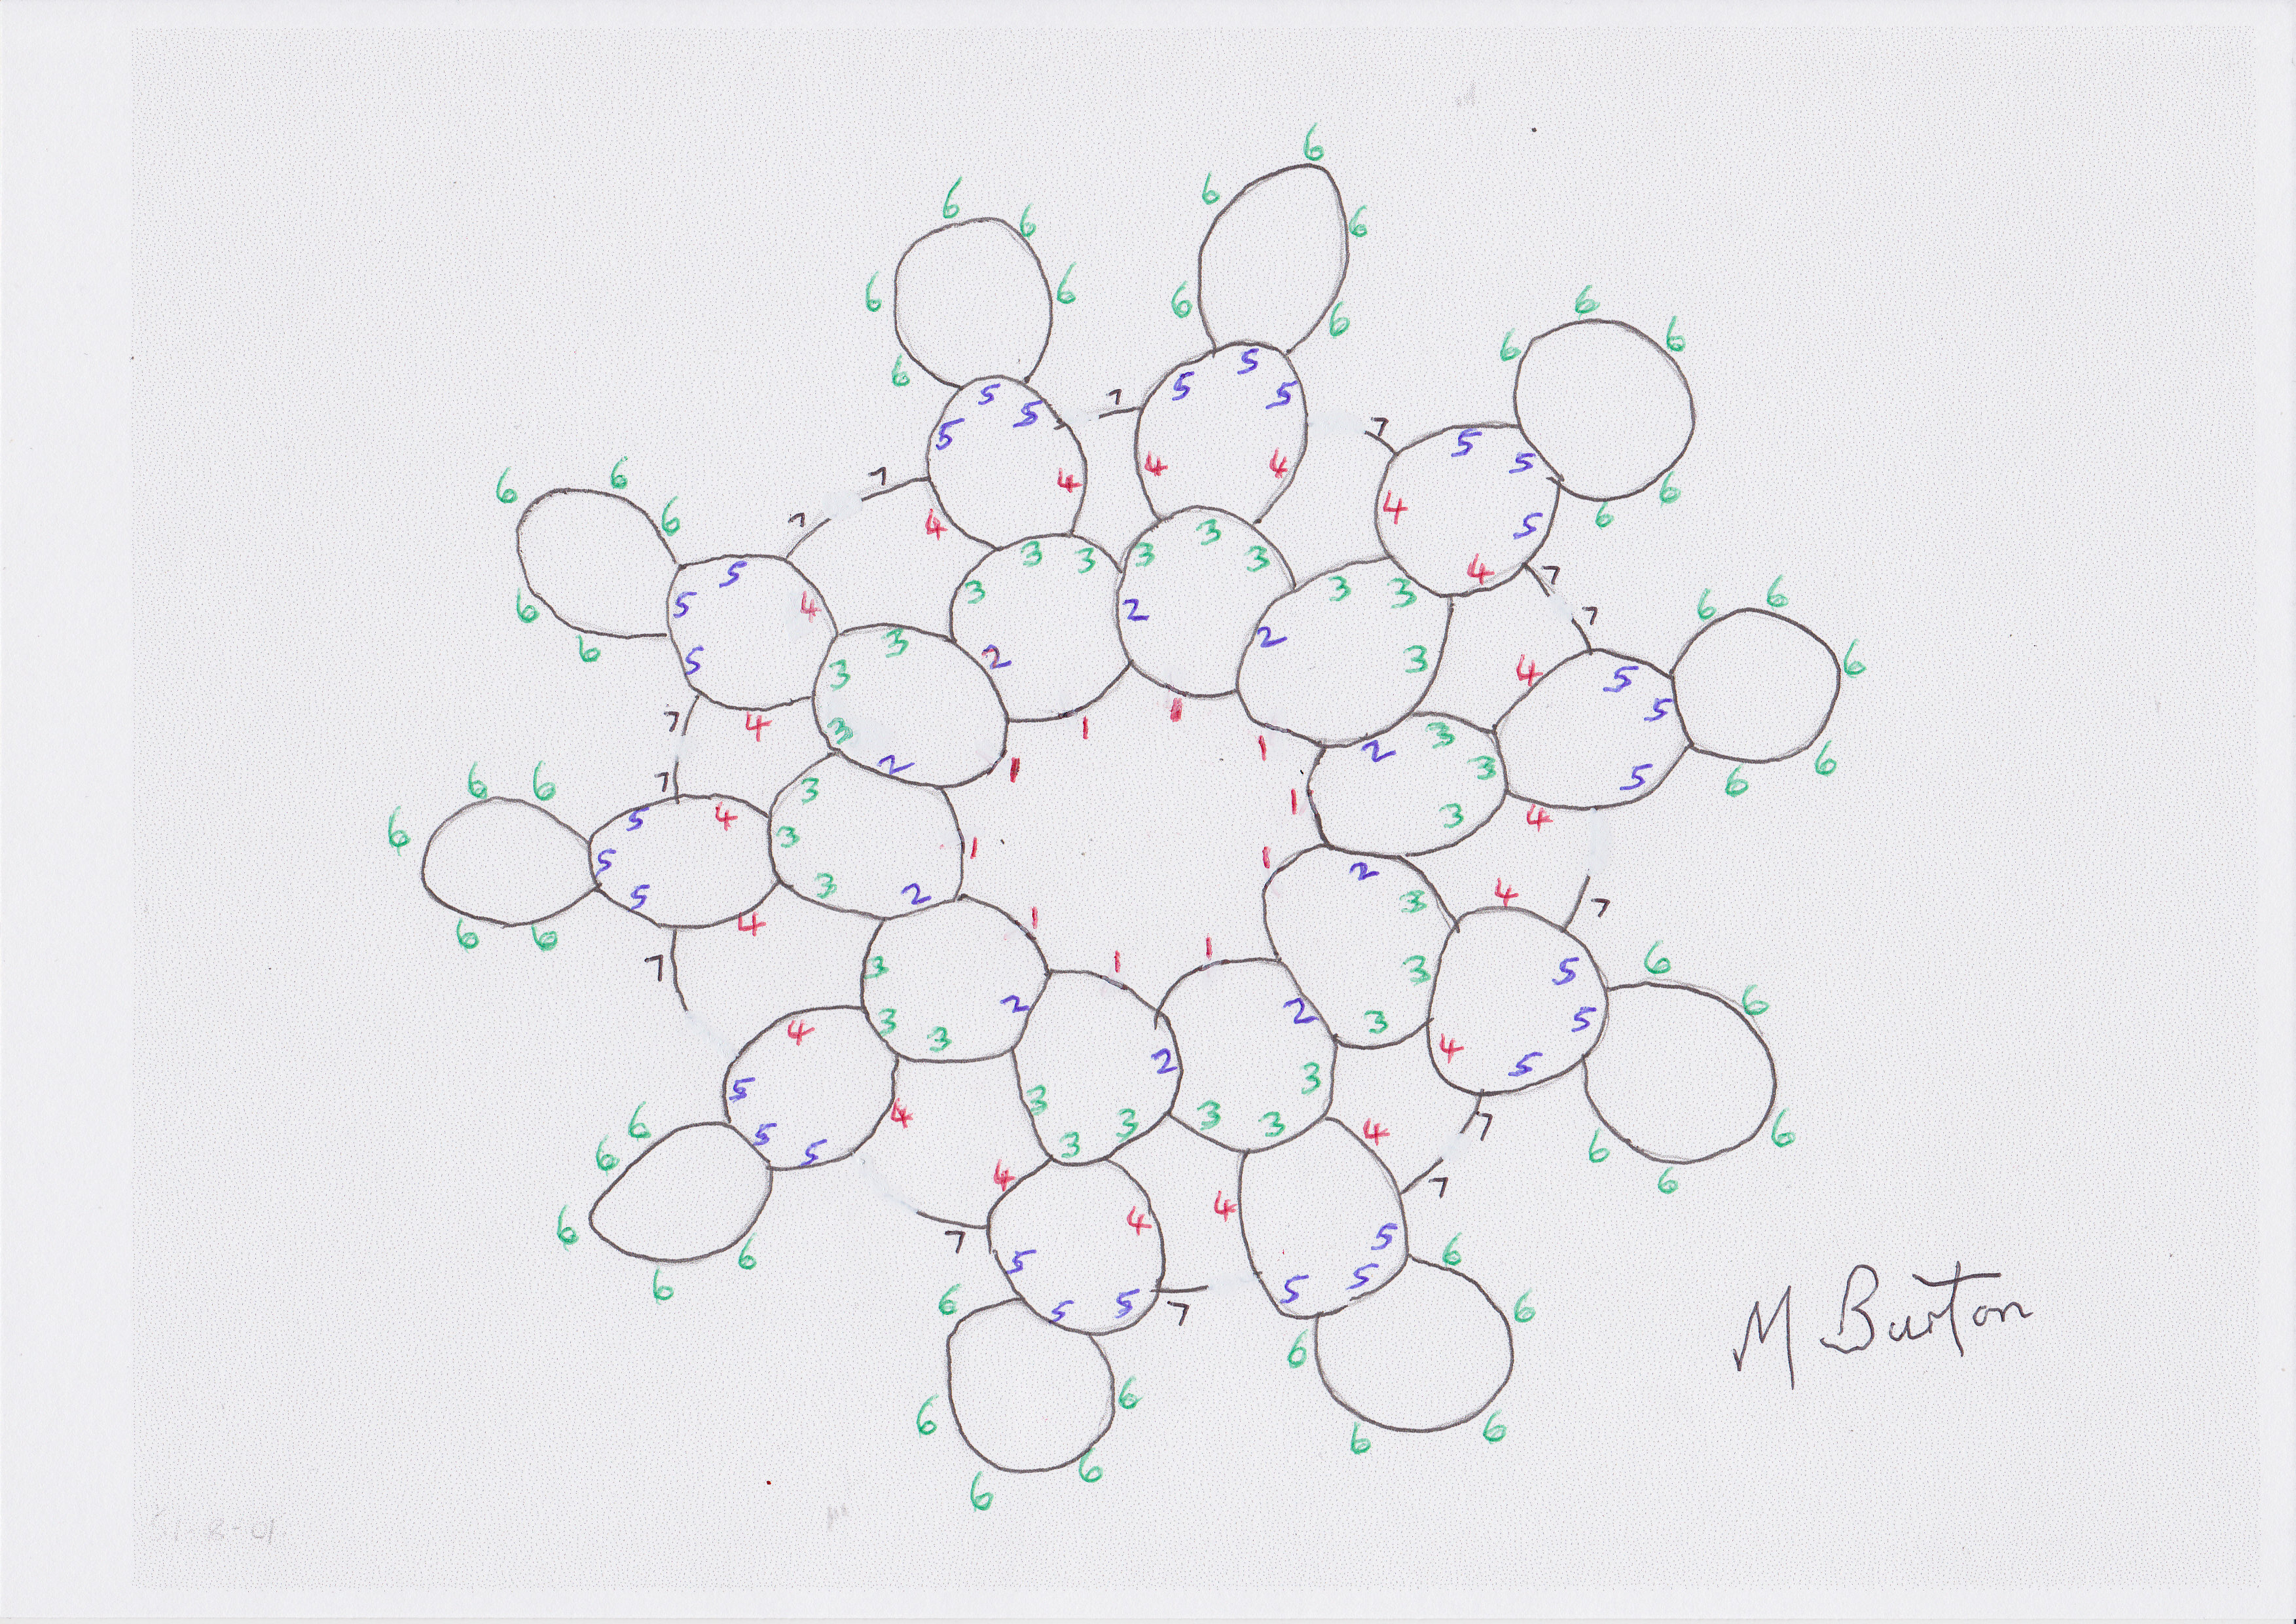
Next is David’s “Knight’s Tour” which he is still working on.

David Kilpatrick knights tour. image011

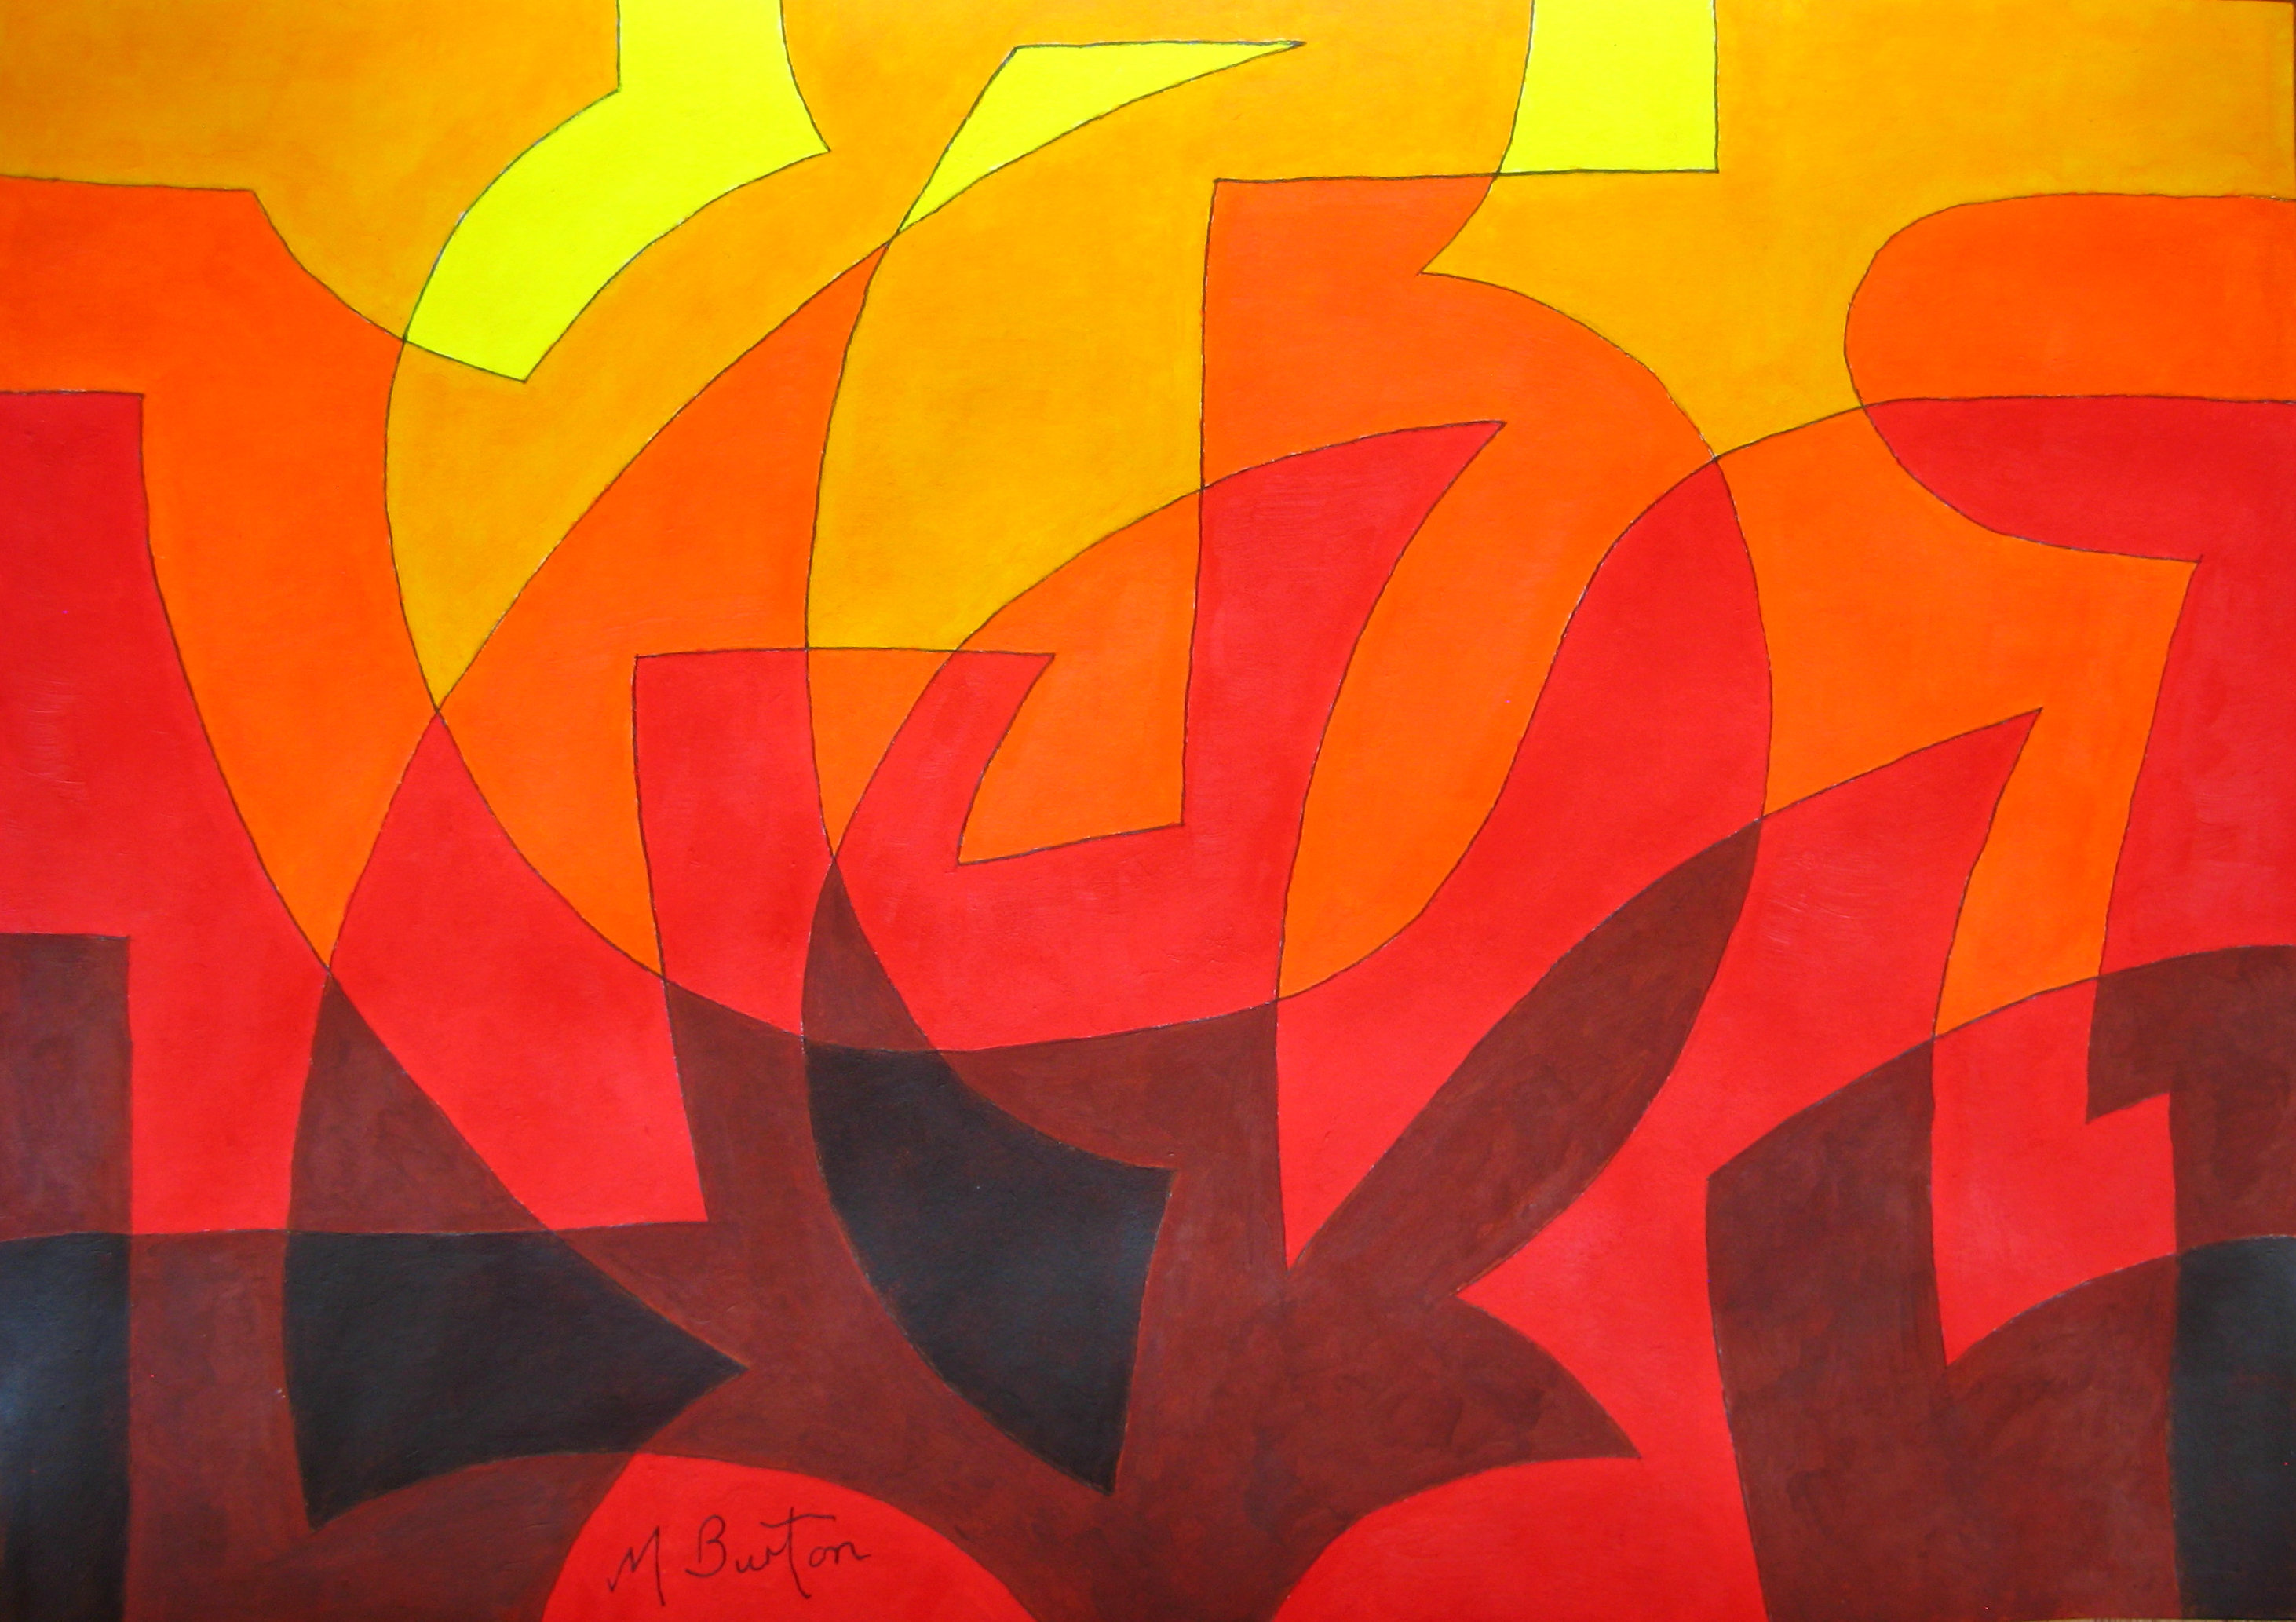
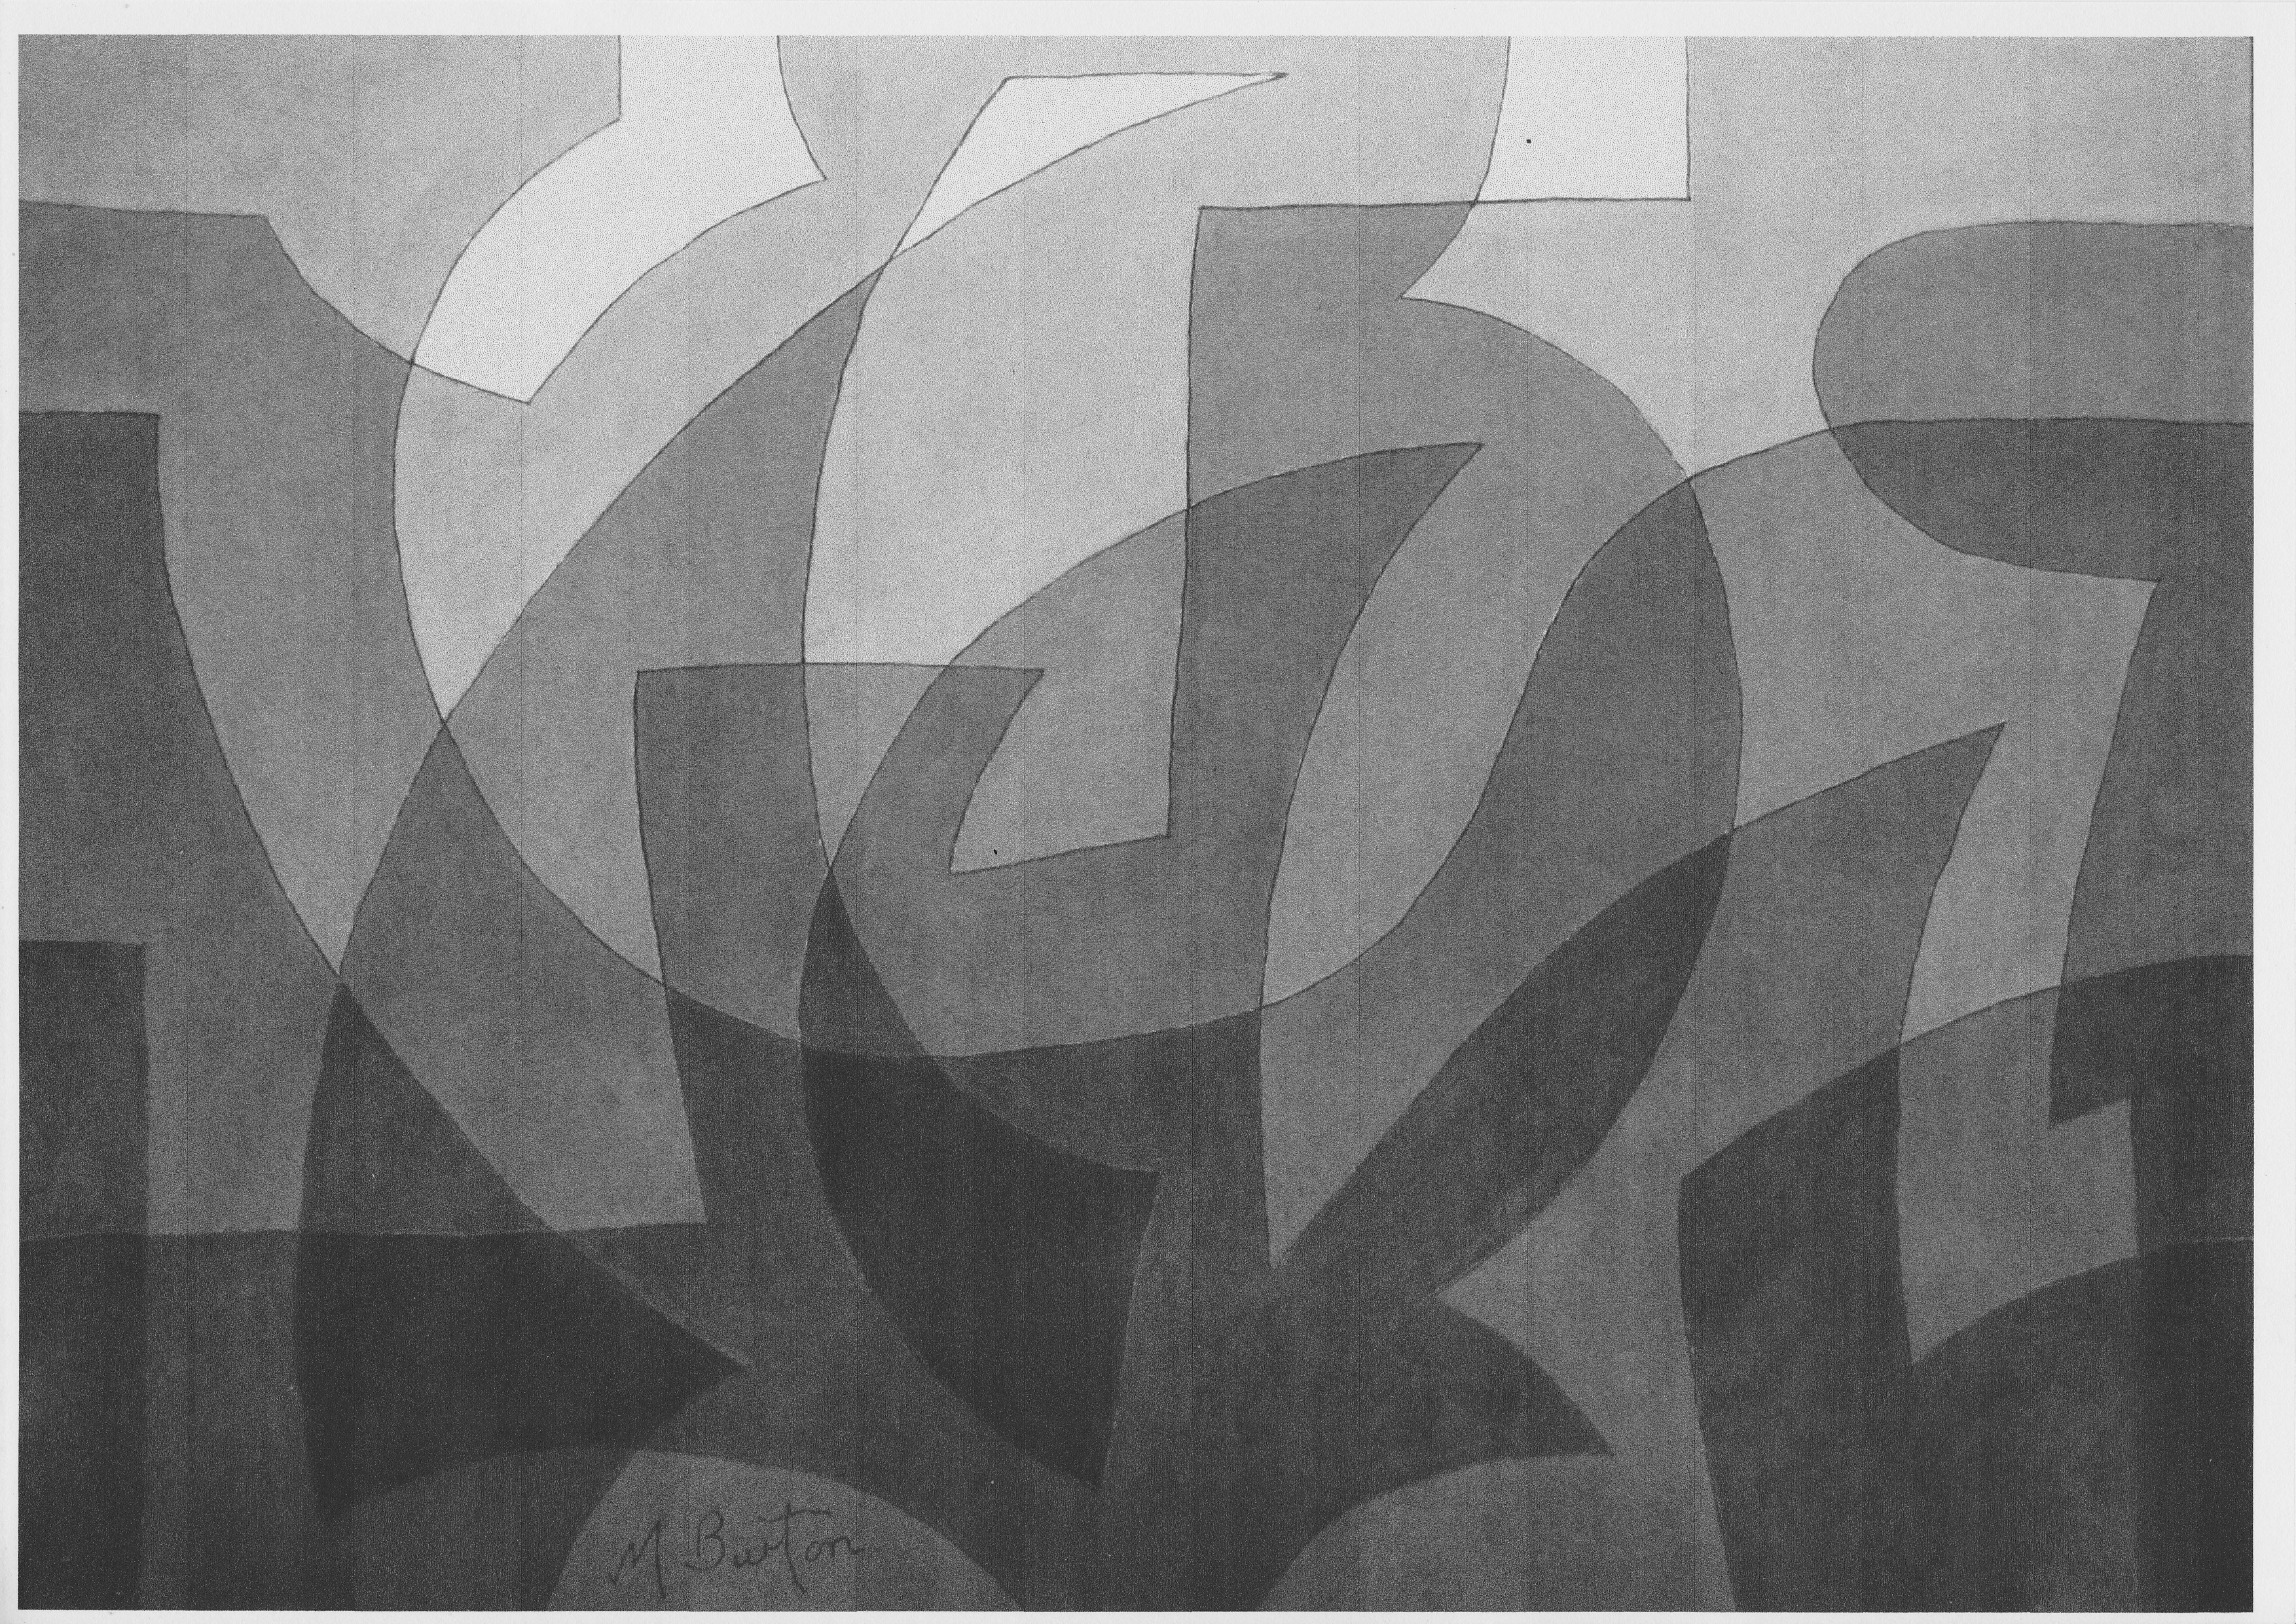
“Knights Tour” by David Kilpatrick, artist from Atherton, Australia.   Single Continuous Line based upon moves of a knight and using Alternate Overdraw to allocate colour sequence.   April 2017.  Mick Burton blog.

I did a Single Continuous Line “Knight’s Moves on a Chessboard” in 1973 (see Gallery 1965-74) with the intention of colouring it, but never tackled it properly.  One of the problems was the number of fiddly small areas.  It led to my “Knight’s Tour Fragments” instead (see my previous post on 16.2.2017).

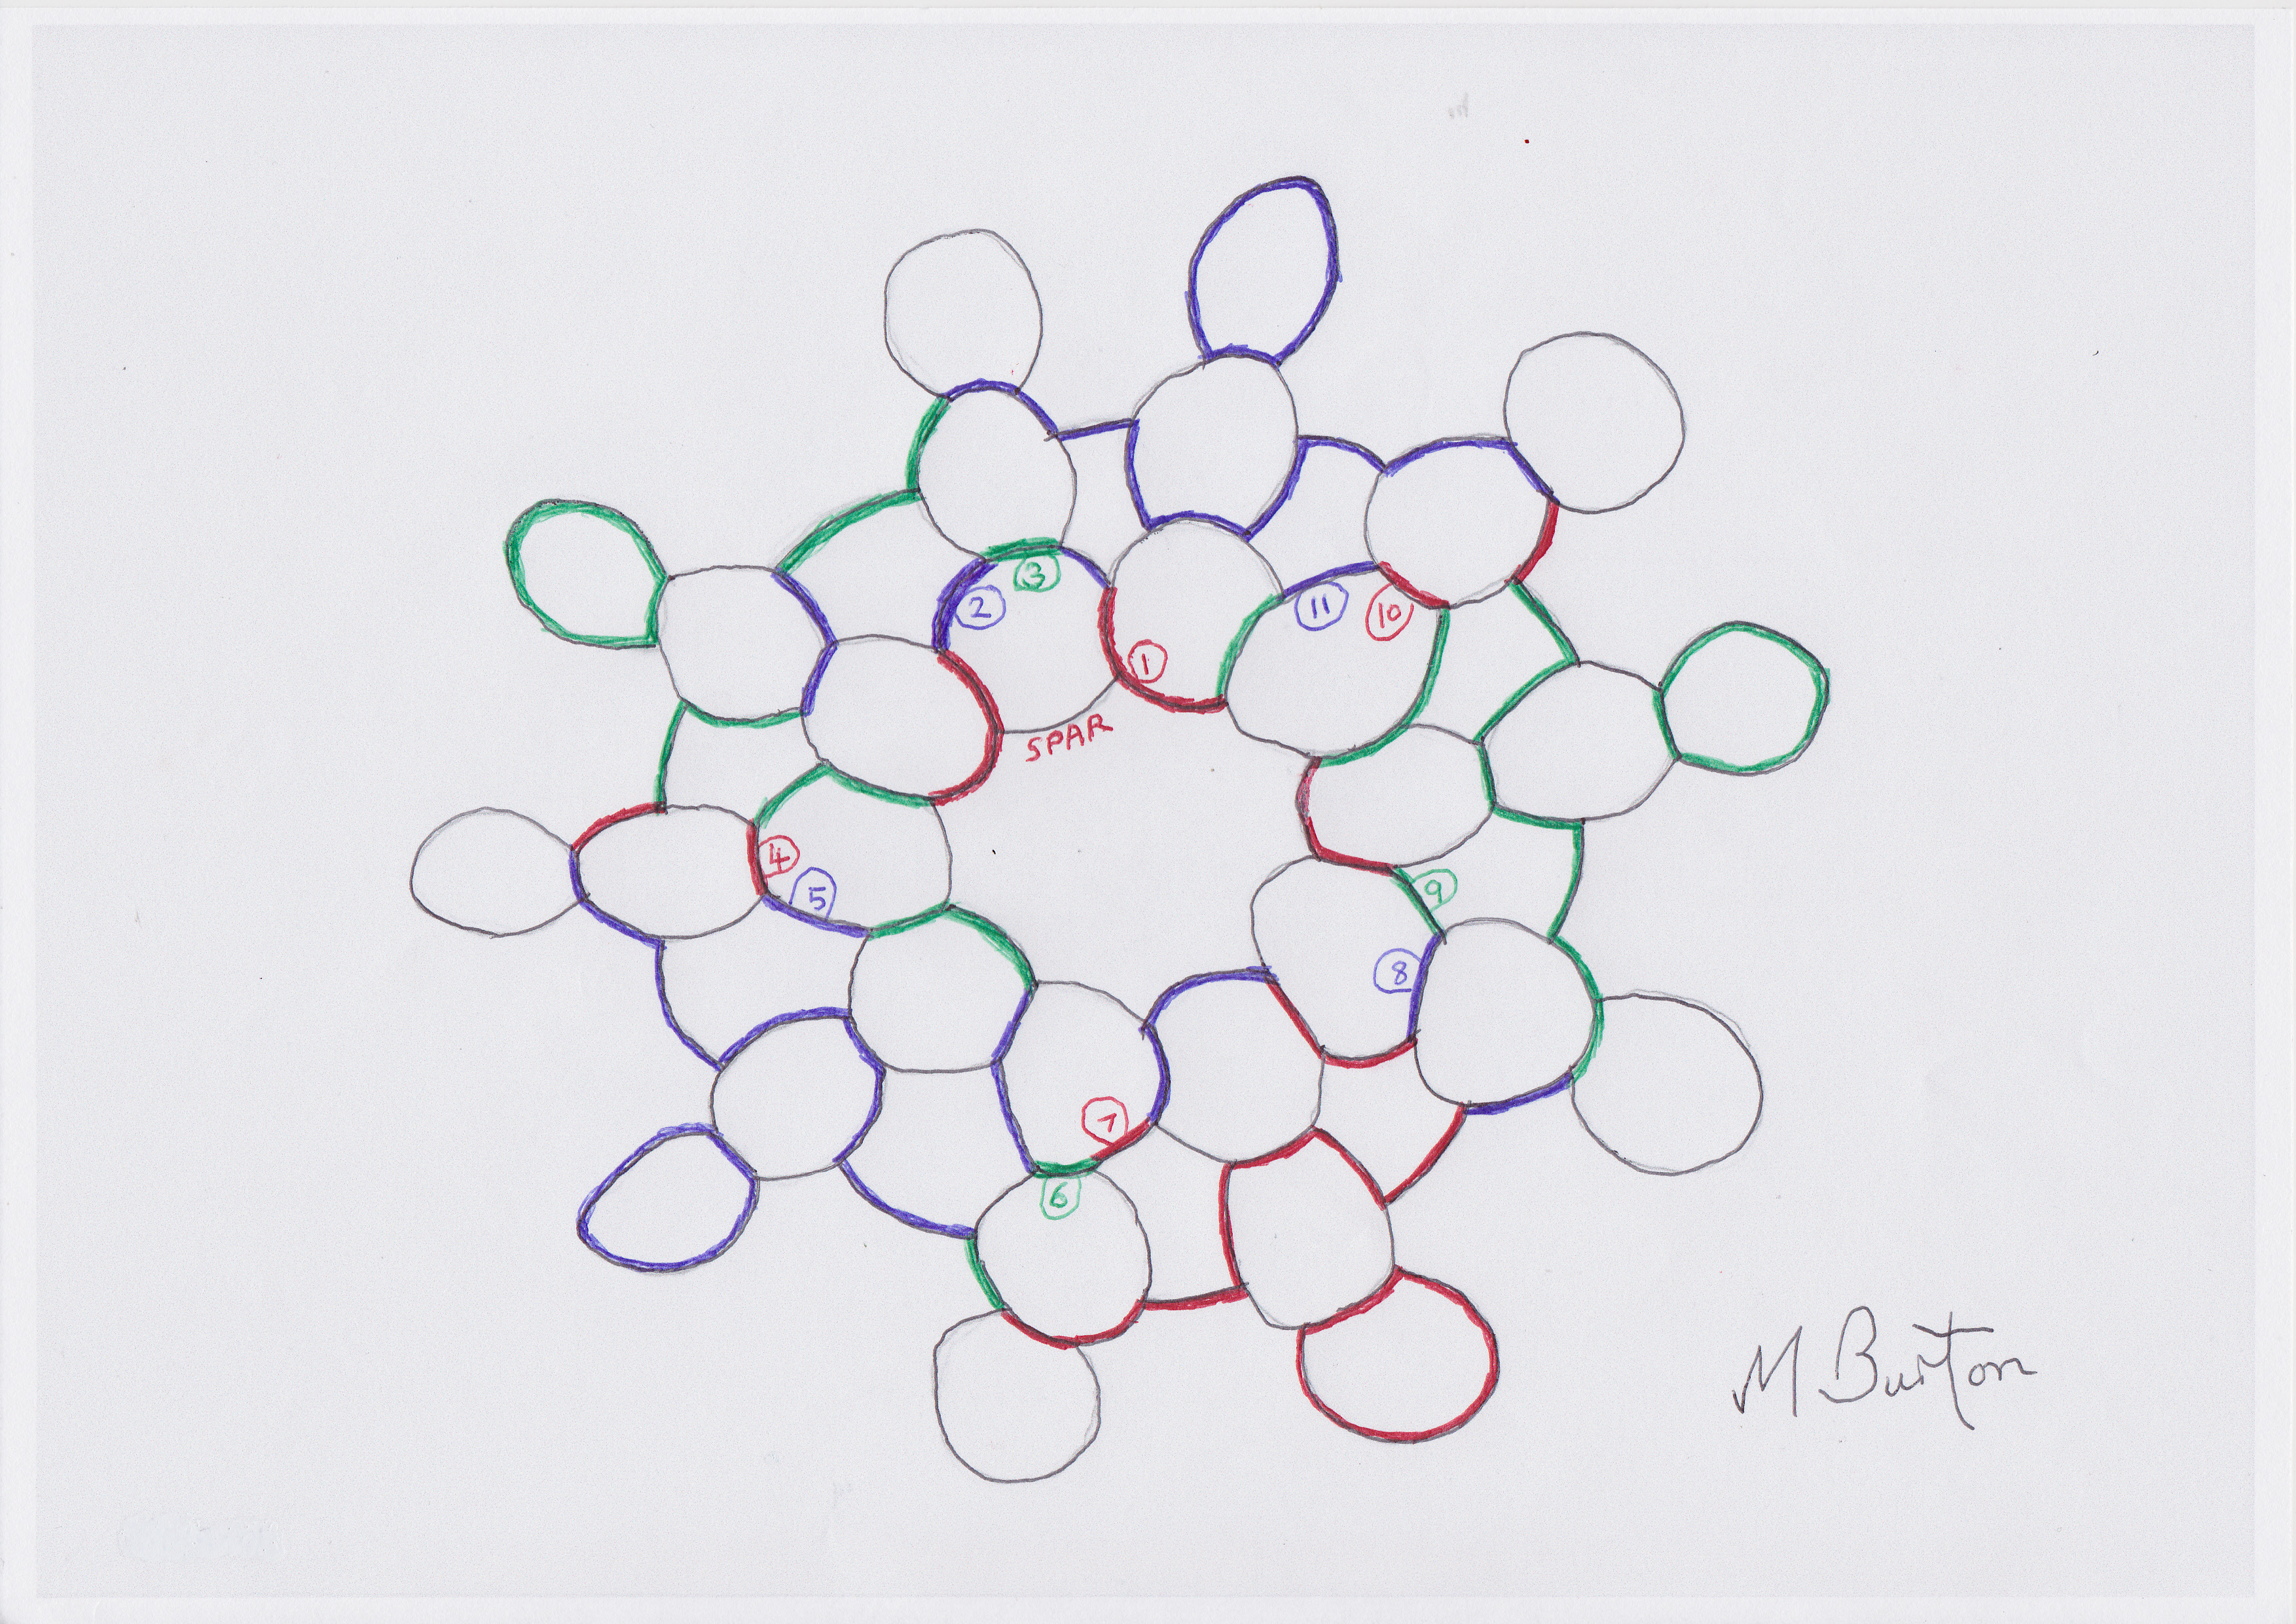
But now we have GIMP!  David said that he used this to move the lines about on his “Knight’s Tour”.  I googled GIMP and it means “GNU Image Manipulation Program”.  Some areas are still fairly small but he has produced a vibrant structure.

David says that these are trial colours (I presume from GIMP) and he intends to work out an improved scale of colours in his own style.

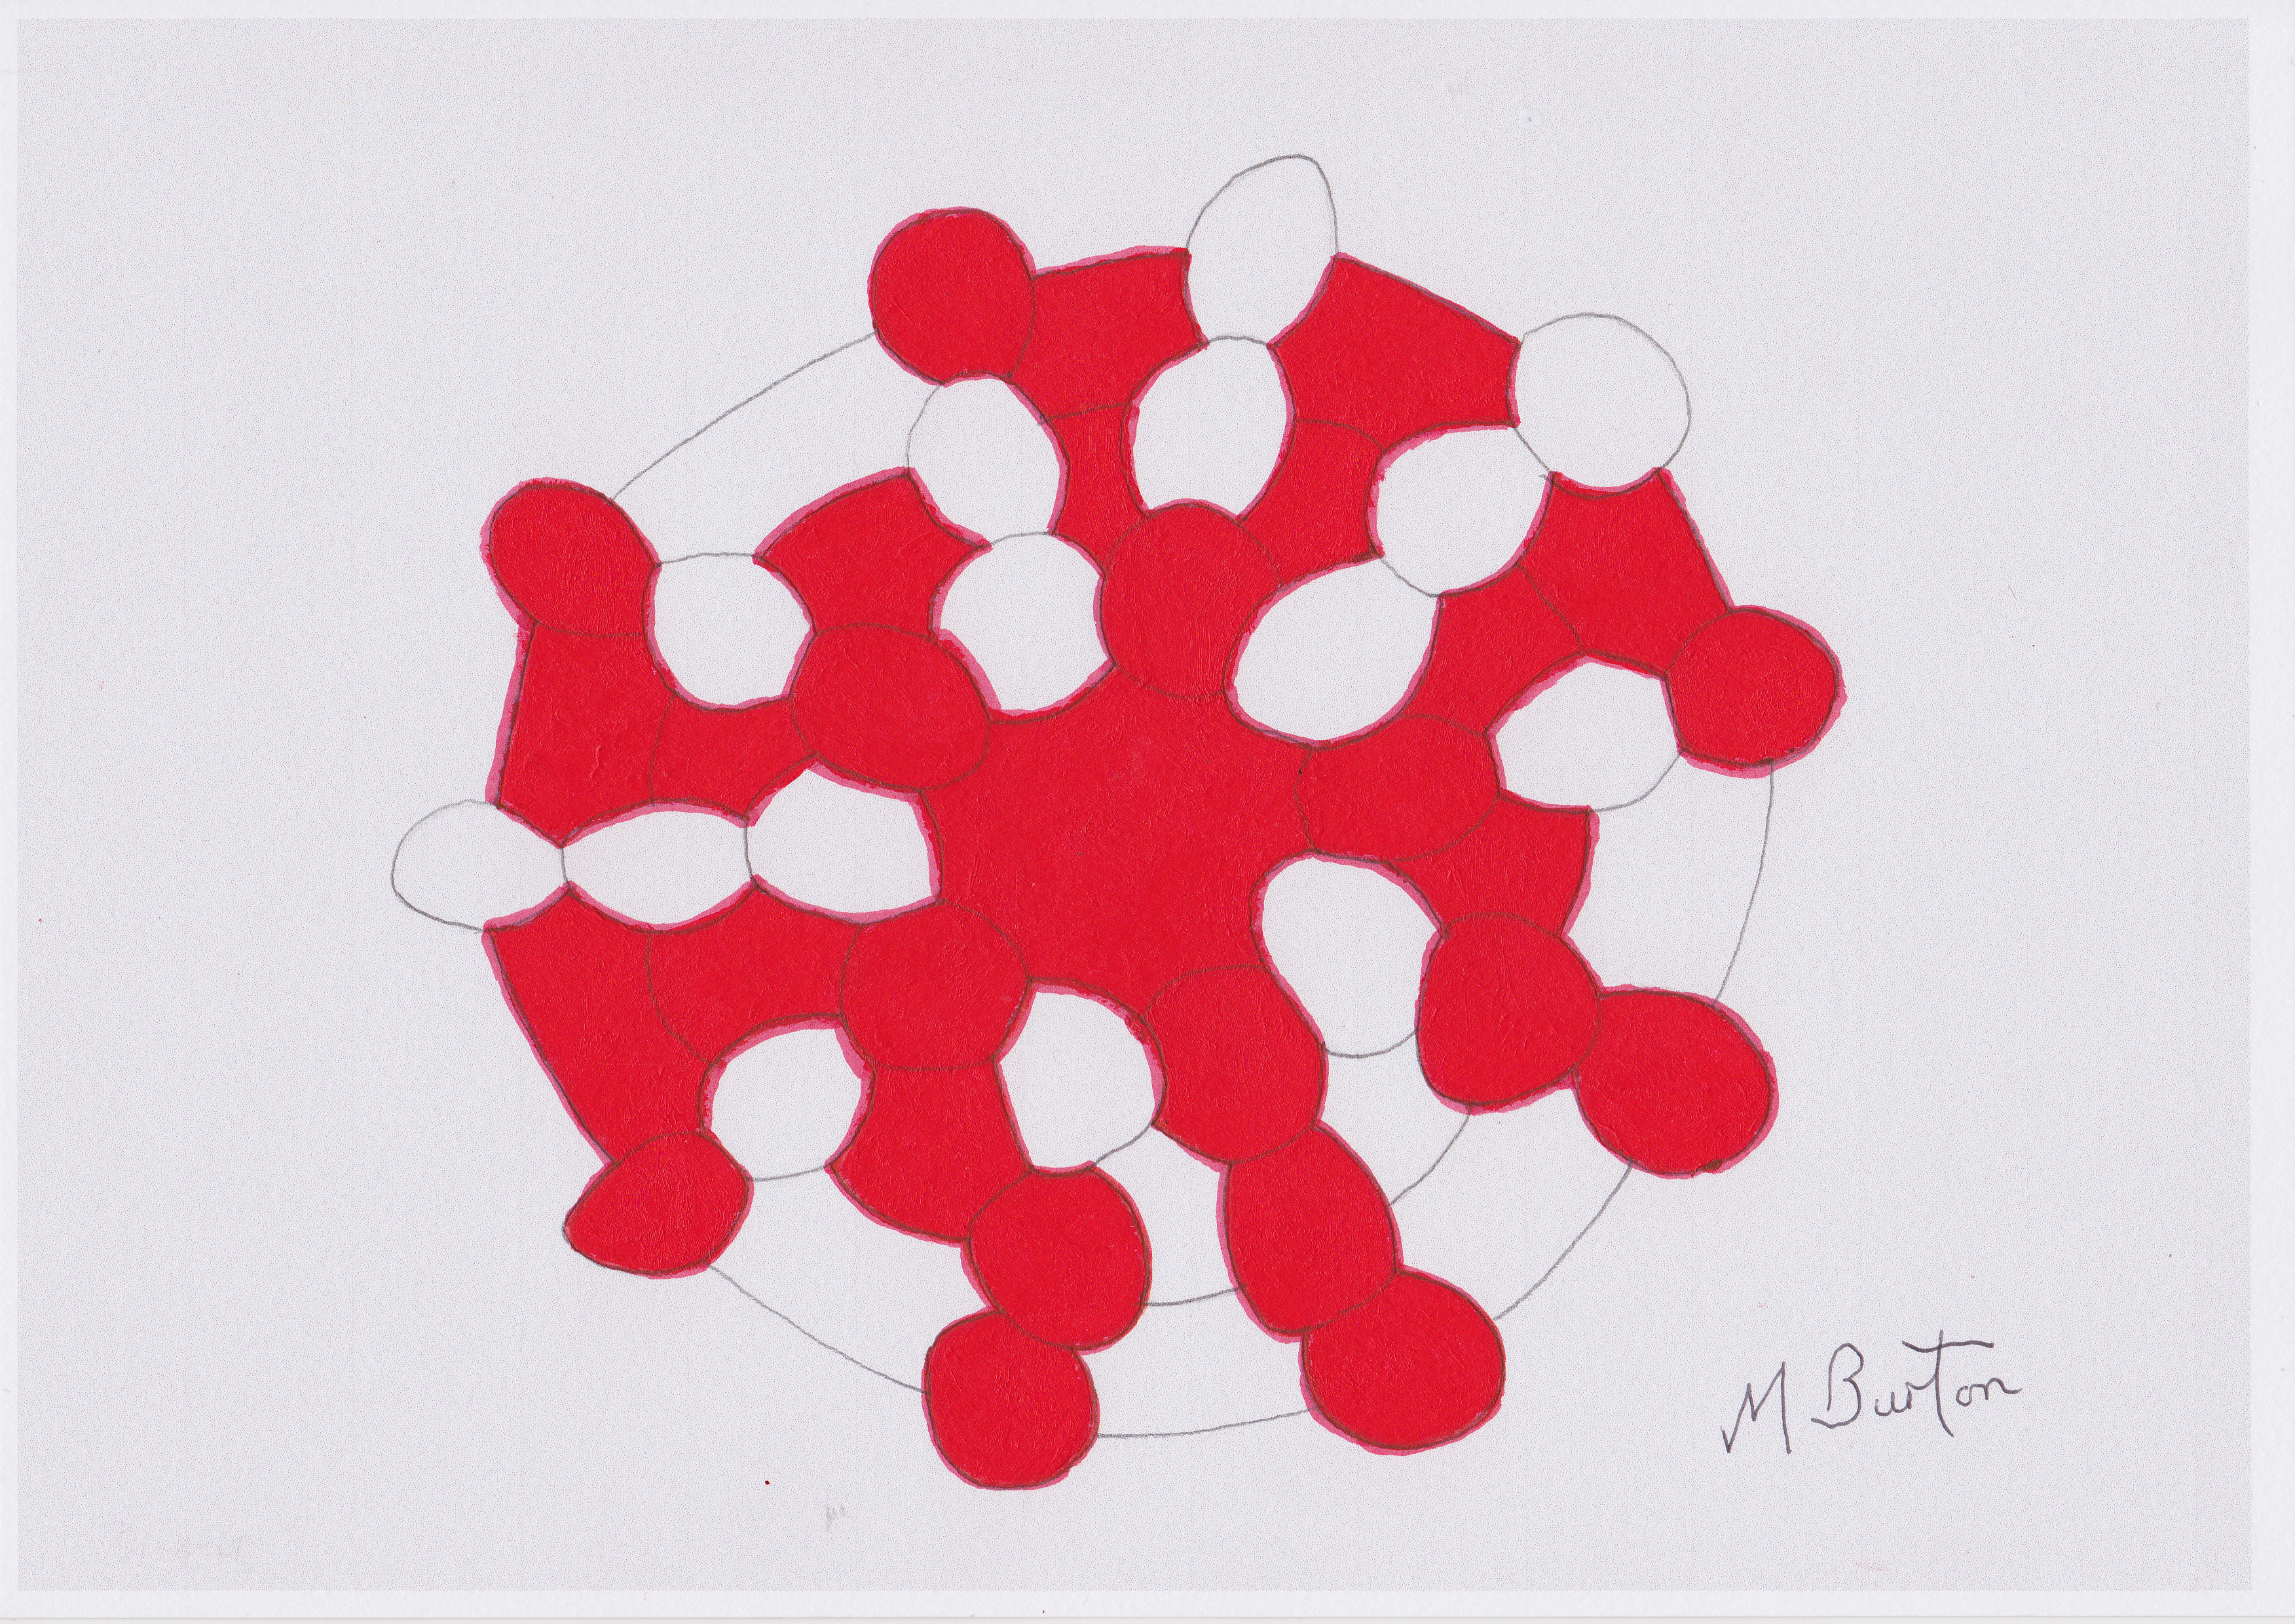
However, the colours shown already demonstrate the natural balance inherent in the Alternate Overdraw colour allocation.  The composition suggests to me an island with yellow “beaches” as well as reds within opposite “volcanic” zones.

There is a choice regarding background, which would naturally be the same colour as the light blue internal areas and result in a surrounding “sea”, or it could be left white as shown above.

I look forward to seeing the final version, which I am sure will be another splendid example of Vorticism.

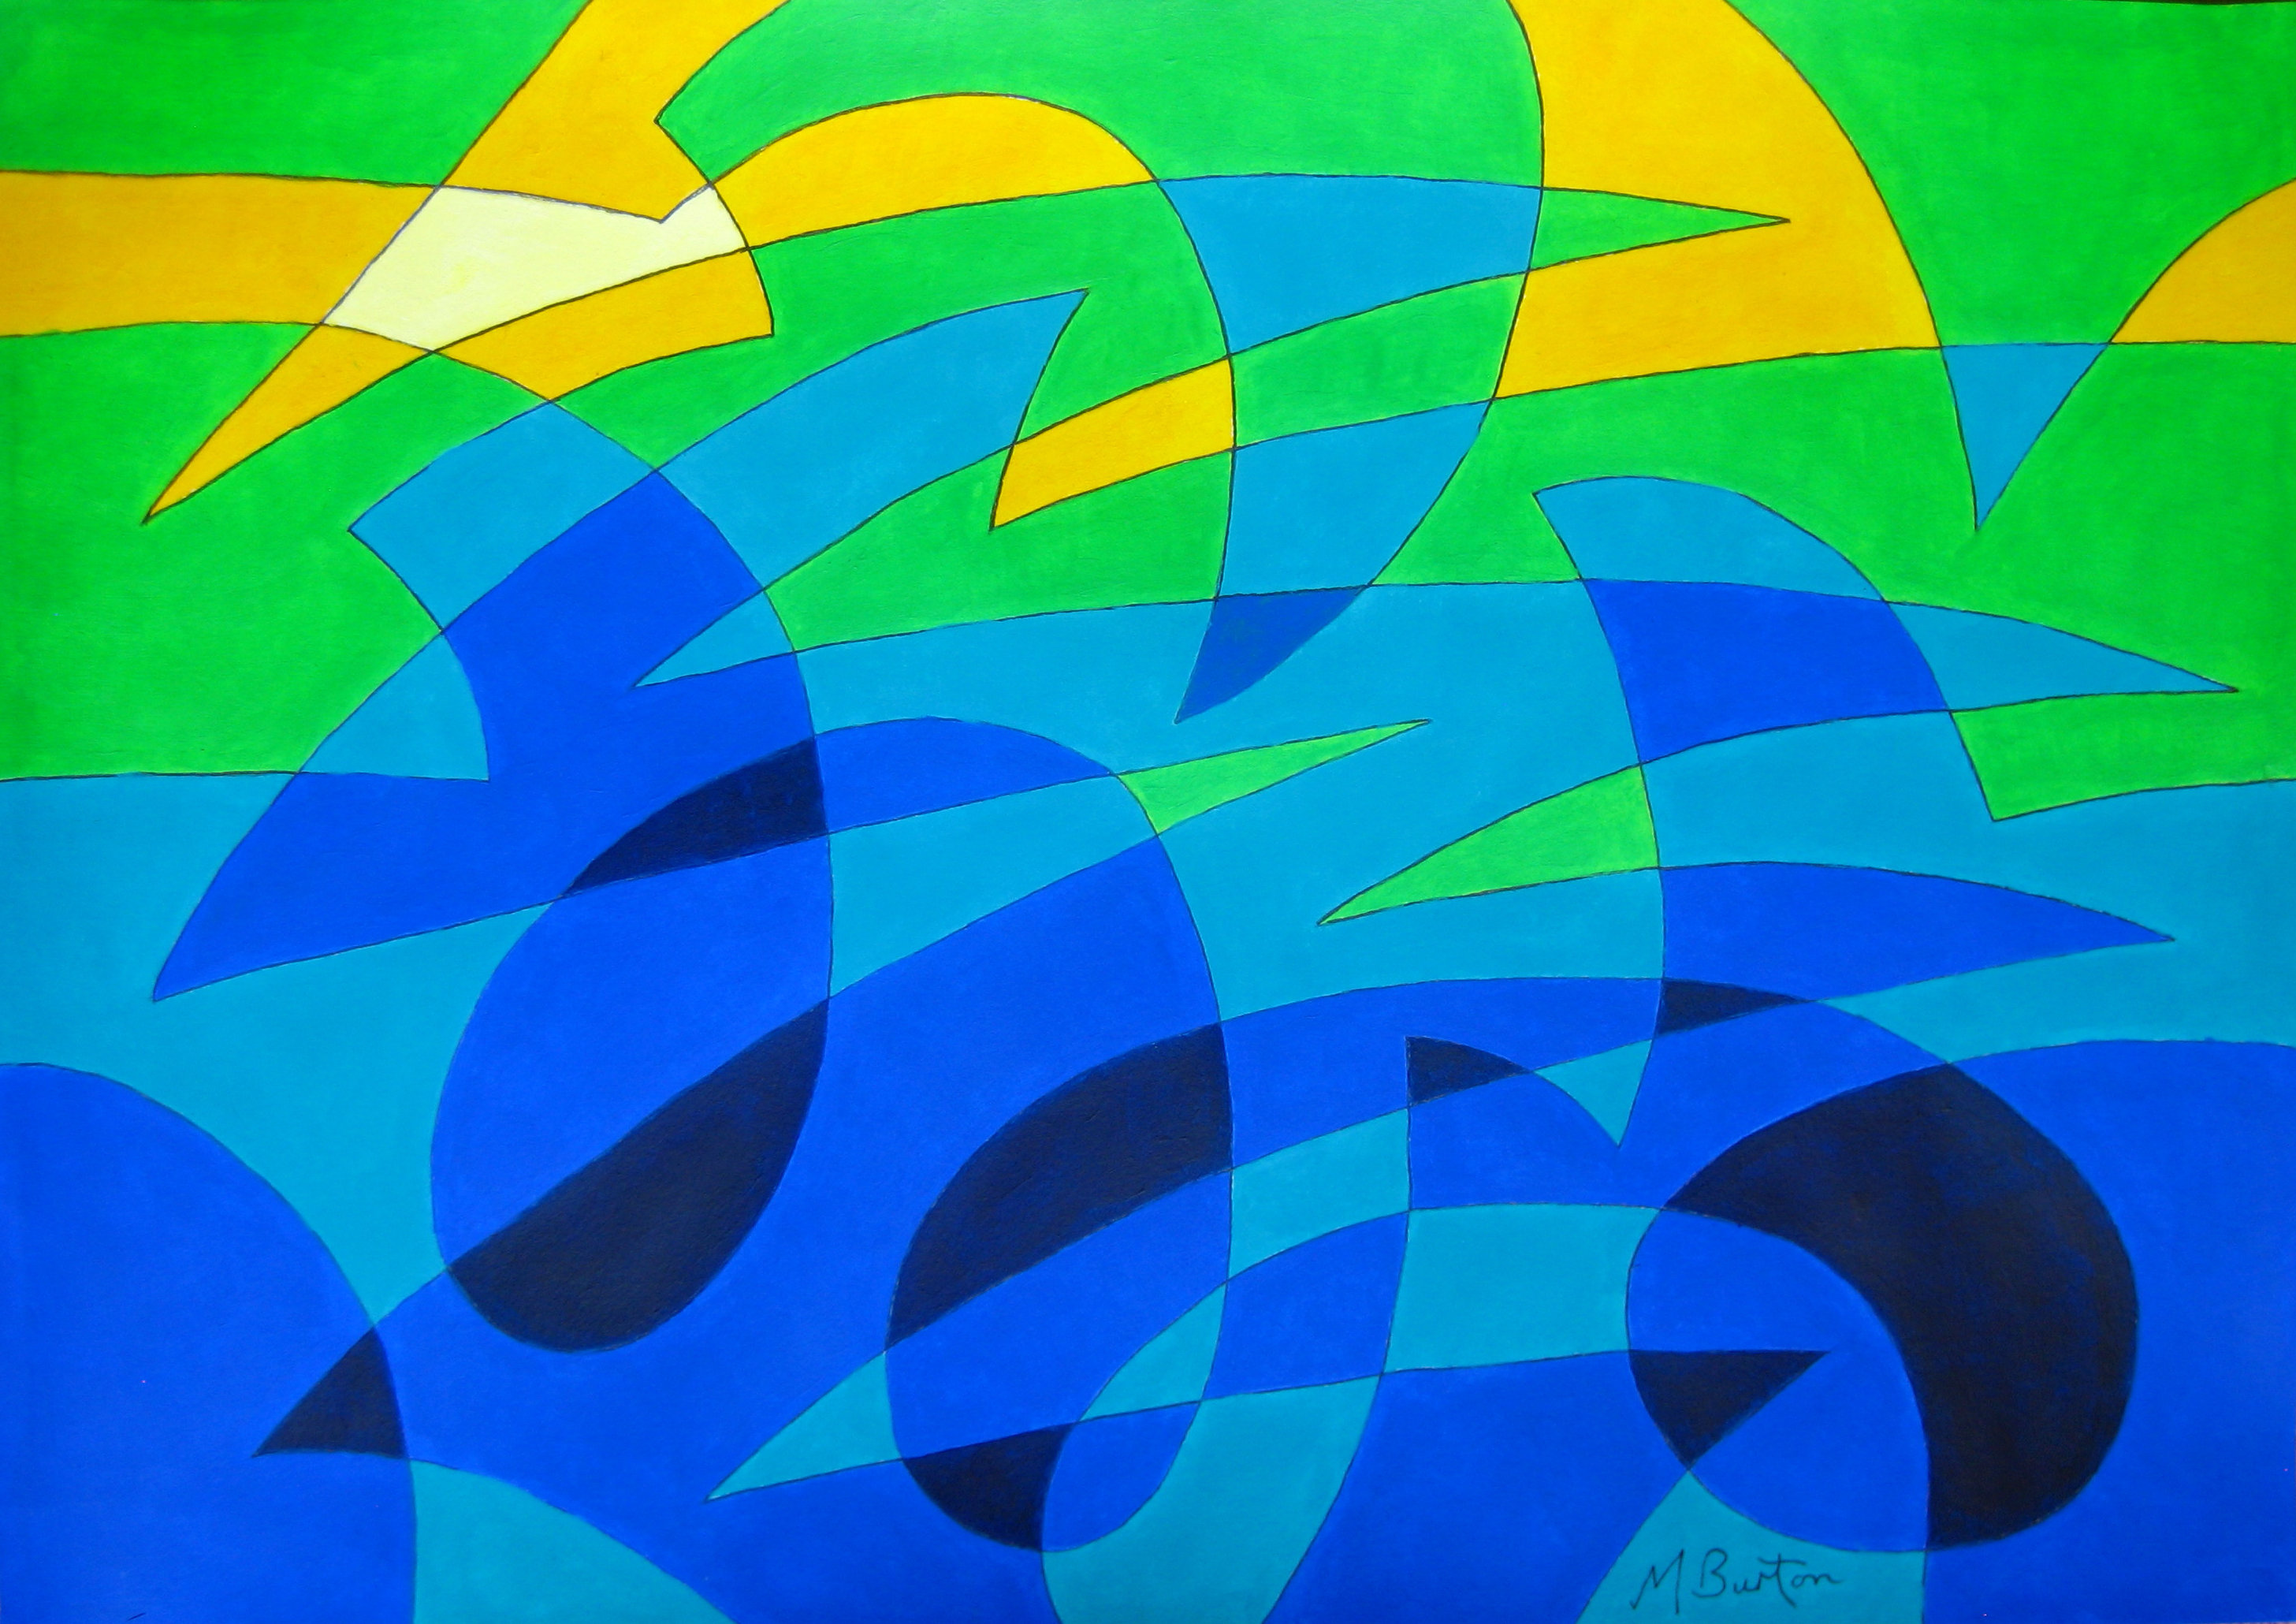
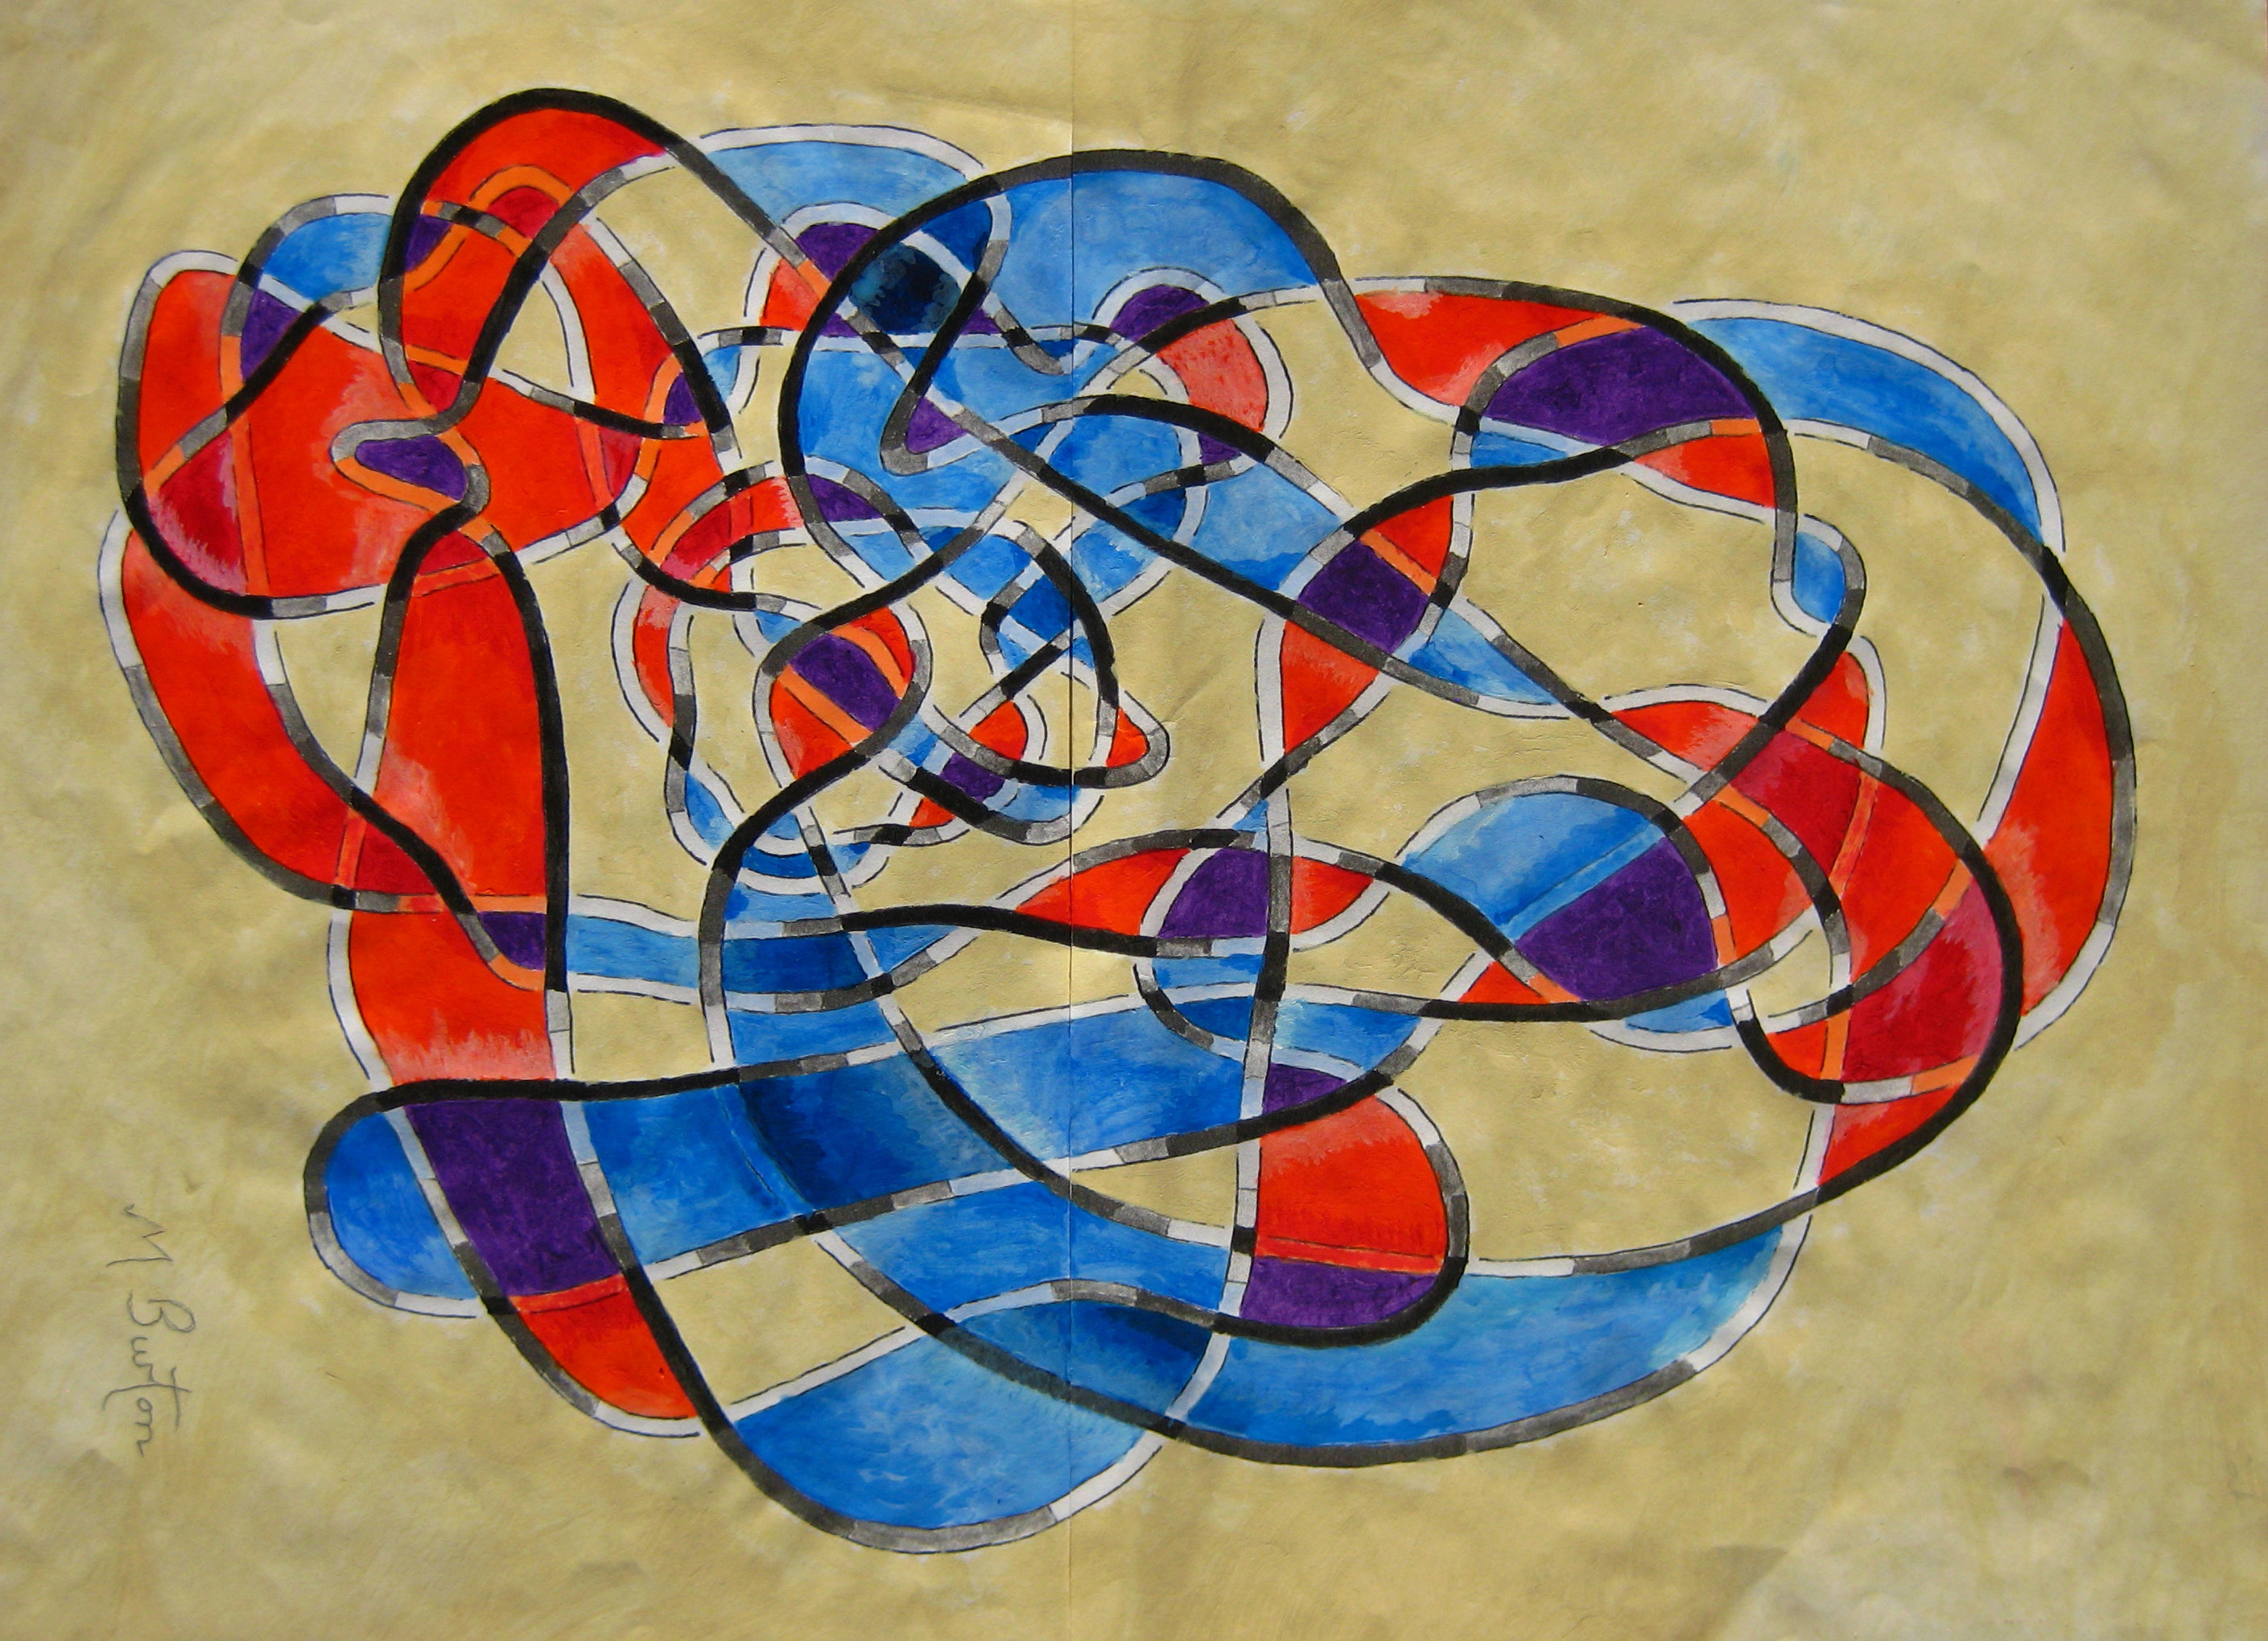
Another picture that caught my eye was his “The Pram” which is based on a magic rectangle.

“The Pram” by artist David Kilpatrick, from Atherton, Australia.   Based on a Magic Rectangle. 2015.    Mick Burton blog.

This pram picture has lots of line ends in it and makes me want to attempt one myself using a Continuous Line animal.  Such a design would make you want to connect up so many loose ends.  My Spherical pictures already do this to an extent, as I take a line out of the picture at one side and bring it back in at the corresponding opposite side.

I think that David chose the positions of the displaced squares in a sort of random way.  Maybe I would want to be confident that I could move them around, in the way you could on the movable squares game of my childhood, and get back to the actual original picture.

You can see much more of the art of David Kilpatrick on

https://www.redbubble.com/people/fnqkid

Nessie the cockapoo visits Gledhow Valley

img_0485

Nessie the cockapoo arrives with a favourite toy. How did she know my favourite colour range. Mick Burton, continuous line artist.

Nessie the cockapoo has come to stay for a week whilst Helen and Janet are in California.  She arrived waving one of her favourite toys, which just happens to have a range of colours similar to those in a recent painting of mine.

img_0224

“Knight’s Tour Fragments”, acrylic on canvas. Exhibited at Harrogate and Nidderdale Art Club Exhibition in November 2016. Mick Burton, continuous line artist.

Nessie is two and a half and lives in a village in Worcestershire in a house almost surrounded by common land.  Strangely, there are no cats in the village and no squirrels (although several years ago one appeared in the garden the day we arrived for a visit, and it was suggested that it had been a stowaway in our car).  Hens roam free in the garden – so where are the foxes?  No greater spotted woodpeckers, they are all green.

Nessie’s favourite spot in our house is by the French Windows at the back.  She watches the birds and squirrels endlessly, and it is good to lie down on the job.

img_0510

Nessie, the cockapoo, watching birds and squirrels. Why not take it easy?   Mick Burton, continuous line artist.

But Nessie is not used to seeing cats, and we have plenty of those.  Suddenly we hear barking and scraping at the window.

img_0519

Nessie spots a cat and all hell breaks loose.  Mick Burton, continuous line artist.

Hopefully one of the foxes will turn up whilst Nessie is here.  We often see one or more during the day, and we even had one on the garage roof marking its territory.  Here is a photo of one in the garden in late January 2017.

img_0334

A Gledhow Valley fox in the garden in January 2017.  Mick Burton, continuous line artist.

Nessie eats sensibly and feels that there my be more nurishment in the cardboard box than in the breakfast cereals themselves.

img_0498

Nessie tucking in to a cardboard box which had contained breakfast cereals.  Mick Burton, continuous line artist.

Of course the highlight of each day for Nessie is the walk through Gledhow Valley Woods to the lake.

img_0551

Nessie, the cockapoo, can’t wait to go to Gledhow Valley Woods, and the lake, with Joan and me.  Mick Burton, continuous line artist.

We are used to seeing the odd rat scamper across the path by the lake, as well as seeing how well they swim.  One rat dashing across suddenly realised that Nessie was passing and took off, missing Nessie’s nose by a whisker.  I am not good at taking photos of flying rats, so here is one nearby wondering what is going on.

img_0389

A rat peeping from behind a tree on the banks of Gledhow Valley Lake.  Mick Burton, continuous line artist.

Twenty ducks who were sitting on the bank and the path fly off when they see Nessie, and Joan has brought some oats to feed to the Swan.  There is only one swan left at the lake just now and it is still in its first year.

img_0536

Young swan, now living alone on Gledhow Valley Lake.  Mick Burton, continuous line artist.

We have been concerned for some months about the swans, particularly since the water level dropped after a digger cleared rubbish from the dam end. Large areas of silt have been on view where the swans nest.  Here are the adults and one youngster in late January 2017.

img_0358

Family of swans on Gledhow Valley Lake. Photo taken in late January 2017 before the adults abandoned the lake.  I hope the swans did not have to pull bread slices from this wrapper themselves.   Mick Burton, continuous line artist.

At the time of this photo, showing the two adults and the above young swan in late January 2017, the second youngster had been ostracized and was sitting in a corner of the lake.  When we were litter picking this Sunday on the monthly action day with Friends of Gledhow Valley Woods, they told us that soon after the photo foxes killed this young bird and then the adults left the lake.  One adult was found wandering in the Harehills area and the RSPCA took it to Roundhay Park lake.  A lady told us that the other adult was walking past her house in Oakwood, presumably heading for Roundhay Park lake too.  So we hope that things work out well for the adults at Roundhay and our young  survivor here in Gledhow.

img_0541

Nessie spots a cat she has not seen before. Henry adopts defensive mode.  Mick Burton, continuous line artist, Leeds.

On the way home from the lake, Nessie confronted a cat.  This is Henry and he stood sideways and seemed to double in size.  Nessie was on her lead, which was probable just as well for Nessie.

img_0543-copy

Henry the marmalade cat from Gledhow Valley.  Dogs beware.   Mick Burton, continuous line artist.

Anna and Emma, the children next door, went to the woods with Nessie today and had been looking forward to it for days.  Nessie gets on well with everyone.

She has enjoyed her holiday in Gledhow Valley and we are taking her back to the land of green woodpeckers.

Four Colour Theorem continuous line overdraw.

Continuous lines overdrawn on Skydiver formation design, using Four Colour Theory method. Mick Burton

Continuous lines overdrawn on Skydiver formation design, using Four Colour Theory method. Mick Burton

My recent post about the formation design used by the record breaking skydivers included a continuous line overdraw of their design (modified slightly be me to complete links which would have been present with more skydivers).  I said that I would explain how the overdraw (above) was completed.

The structure is made up of circles which have 3 way junctions throughout (3 handed in the case of skydivers ! ).  This can be regarded a map and so I will apply my Four Colour Theorem continuous line overdraw which I devised in the early 1970’s.

I was trying to prove the Four Colour Theorem, which states that no more than four colours are required to colour all the regions of a map.  My basic idea was that drawing a single continuous overdraw throughout a map would split it into two chains of alternate regions, which would demonstrate that only 4 colours were required.  If more than one continuous overdraw resulted then there were still only two types of chains of alternate regions.

As you will probably know, this theorem has many complexities which I will not attempt to cover here.  In the mid 1970’s I corresponded with two mathematicians at the Open University about my approach, Robin Wilson and Fred Holroyd, who were both very helpful and encouraging.  The theorem was proven in 1976 by Kenneth Appel and Wolfgang Haken, running one of the biggest computers for over 1000 hours.  I soon decided that it was time to go onto other things!  However, my journey had been fascinating with numerous amazing findings which have been so useful in my art.

I can keep to relatively simple methods for my pictures.

 Here is the design, used above, with my initial overdraws shown in red.

Assumed formation design used by Skydivers, with initial overdraws. Mick Burton four colour overdraw.

Assumed formation design used by Skydivers, with initial overdraws. Mick Burton four colour overdraw.

On final completion of the overdraws, every junction should have two of its three legs overdrawn and so the start decision (1) above overdraws two legs and this means that the third leg, which I call a “spar”, links to another junction where the other two legs must be overdrawn.

We then carry on making decisions which trigger other overdrawn lines across spars.  Usually there is a “knock on” effect where new overdraws connect with already overdrawn lines which then trigger more overdraws.

If we go wrong and a junction is triggered which has all three legs overdrawn, or none, we have to go back and change earlier decisions in a controlled process.  I usually photocopy the overdraws completed, every two or three stages, so that going back is not too time consuming.

Here is the situation after decision (3).  Decision (2) in blue had only triggered two overdraw sections but decision (3), in green, has triggered ten sections to be overdrawn in green.

Four Colour Overdraw decision 3 triggers 10 further overdraws, in green. Mick Burton, continuous line artist.

Four Colour Overdraw decision 3 triggers 10 further overdraws, in green. Mick Burton, continuous line artist.

Here is the completed overdraw.  It can be seen that some decisions still only trigger one or two overdraws, but decisions 5 and 7 triggered 13 and 12 overdraws respectively.  There are 80 junctions in the design and it took 11 decisions to complete the overdraws.

completed Four Colour Theorem overdraw, on design based upon Skydivers formation design. Mick Burton, continuous line artist.

completed Four Colour Theorem overdraw, on design based upon Skydivers formation design. Mick Burton, continuous line artist.

The completed overdraw has several continuous overdraws.  I tried other variations but had to accept that this design cannot be overdrawn with a Single Continuous overdraw.  This is due to the design having basically only two full rings of circles, which means that some tips of petals cannot be included in a continuous overdraw.

Continuous lines overdrawn on Skydiver formation design, using Four Colour Theory method. Mick Burton

Continuous lines overdrawn on Skydiver formation design, using Four Colour Theory method. Mick Burton

This situation can be overcome by adding links between the tips of the petals to produce that extra ring of areas.  Here is the expanded design and the stages of overdraw.  I managed to complete the Single Continuous overdraw in one sequence without having to go back to change any decisions.

Increased size design with successful Single Line Overdraw using Four Colour Theorem method. Overdraw decisions shown. Mick Burton.

Increased size design with successful Single Line Overdraw using Four Colour Theorem method. Overdraw decisions shown. Mick Burton.

Of course it looks better with one solid colour overdraw and no decision numbers.

Skydiver formation design with links between out petals completed, overdrawn with a Single Continuous Line using Four Colour Theorem method. Mick Burton.

Skydiver formation design with links between out petals completed, overdrawn with a Single Continuous Line using Four Colour Theorem method. Mick Burton.

I have said that the method of overdraw was developed with Four Colours in mind, and so you could use one pair of colours alternately within the above overdraw and another pair of colours on the outside of the overdraw (which can include the background).

I have found another interesting result in that if you use strong colours inside the overdraw, as it is the main image, and neutral colours outside (or even leave the outside blank) then the gaps between the “petals” show good use of space.  Here is the design simply coloured in strong red inside the overdraw, which creates a good contrast as the background seeps in. 

Solid colour within single continuous overdraw, with Four Colour method, showing good use of space. Mick Burton.

Solid colour within single continuous overdraw, with Four Colour method, showing good use of space. Mick Burton.

The chains of areas produced by the continuous overdraws can be coloured, not just in two pairs of colours to demonstrate Four Colours, but with a colour sequence or a mixture of sequence, alternate colours or even one colour.  In the last picture I have used colour sequence on main chains of areas related to the central space and, as a contrast,  light grey on the chains connected to the outside of the design.

Star Burst. Four Colour Theorem applied to a map of shell shapes wound round from the centre. Rainbow sequence of colours. Mick Burton, 1971

Star Burst. Four Colour Theorem applied to a map of shell shapes wound round from the centre. Rainbow sequence of colours. Mick Burton, 1971

This is one of the first paintings that I produced after discovering my Four Colour Theorem overdraw in 1971. I called the picture “Star Burst”, one of my first planetary pictures.


Skydivers in Ten Petal Flower Formation, link to Four Colour Theory continuous line.

164 Skydivers head down record in Illinois, 31 July 2015.

164 Skydivers head down record in Illinois, 31 July 2015.

Two weeks ago 164 skydivers, flying at 20,000 feet and falling at 240 miles an hour, set the “head-down” world record in Illinois. The international jump team joined hands for a few seconds, in a pre-designed formation resembling a giant flower, before they broke away and deployed their parachutes.

I was intrigued by the design of the formation. I have found many qualities in ten petal (or star) designs and, of course, I look for continuous lines in all sorts of designs that I find and in particular the possibility of a Single Continuous Line.

Here is my sketch of the skydivers formation.  It is made up of many linked circles, starting with a central ring of ten circles which radiate out to ten “petals”.  The plan seemed to involve six skydivers forming each circle by holding hands.  Some extra skydivers started links between petals.  I checked to see if I had included all the skydivers, which made my sketch look like a prickly cactus.

Cactus Count, 164 Skydivers all Present and Correct. Mick Burton, continuous line artist, August 2015

Cactus Count, 164 Skydivers all Present and Correct. Mick Burton, continuous line artist, August 2015

This was such a tremendous achievement by very brave men and women.  My only experience of heights is abseiling 150 feet down a cliff in the Lake District.  I realise that the jump would have been very carefully planned using the latest science and involved a lot of training, etc. but I am particularly interested in the part that the formation design played.

The hexagon appears to be an essential element so that hands can be joined at 3 way junctions.  A core circle of hexagons would naturally be 6, but more would be required for this jump.  The next highest near fit would be 10, which is fine given the variations in human proportions.  This also naturally allows linking between middle circles in the petals to complete a second ring of circles, which was partly done in this jump.

Every participant would need to know exactly where their place would be in the design and yet it is so symmetrical that I struggle to get my sketch the right way up.  Also with the short time involved co-ordination of planned stages would be difficult.  This made me think of a flock (or murmuration) of starlings performing their remarkable patterns in the sky and how they manage to co-ordinate. Apparently each bird relates and reacts to the nearest birds around it.  Absolute simplicity and ruthless efficiency with no critical path.

If the skydivers have adopted a similar approach then the design is ideal. The design is basically 30 circles in sets of 3 in a row making up 10 petals. The process is fluid and adaptable, building outwards from the centre. Think 10 individuals linking hands to start off with, which then recognisably evolves into 10 petals, and think 6 individuals in each of the 30 circles.  Everyone is dropped (there were 7 aircraft I think) in an order which anticipates being able to take up a place a certain distance from the centre of the structure and within a specific circle. As they approach they can recognise the progress and assess whether they can link in as expected or whether a modified position may need to be taken up (and being guided by the people already in place). The last individuals to be dropped will not have  a planned position in any circle but will form the start of the links between the central of the 3 circles in the petals. They need to be prepared to become part of an outer circle which has not been completed.

I have done a sketch of how this may work, with the numbers indicating my thoughts on the expected order of arrival in the building of the formation.

Skydiver formation with possible roles and order of arrival of individuals. Mick Burton, continuous line artist.

Skydiver formation with possible roles and order of arrival of individuals. Mick Burton, continuous line artist.

I hope this was a useful exercise, in trying to work out how the formation worked, and not total tosh (if so my apologies to all concerned).

To help my attempt to apply my continuous lines to the design I have completed the links between middle circles, which was partially done this time and I suppose will be considered for the next larger attempt at the record (say 180 skydivers).  The Continuous Lines are intended to pass through every three handed junction once only (I normally would say three legged ! ).

The method I use to complete the overdraw was developed in the early 1970’s when I was working on trying to prove the Four Colour Theorem.   A single continuous overdraw throughout a map would split it into two chains of alternate colours which would demonstrate that only four colours were needed.  I will explain how this is done in a future post.

Continuous lines overdrawn on Skydiver formation design, using Four Colour Theory method. Mick Burton

Continuous lines overdrawn on Skydiver formation design, using Four Colour Theory method. Mick Burton

This overdraw has resulted in several continuous lines and no alternative would produce a Single Continuous Line. This is due to the lack of width going around the structure.

Consequently, I have extended the design further by adding linking lines between all outer petals and succeeded in drawing a Single Continuous Line on that. A future Skydiver jump completely assembling this design would require about 220 participants (I am not suggesting that this be attempted) !

Skydiver formation design with links between out petals completed, overdrawn with a Single Continuous Line using Four Colour Theorem method. Mick Burton.

Skydiver formation design with links between out petals completed, overdrawn with a Single Continuous Line using Four Colour Theorem method. Mick Burton.

Spherical Continuous Line Abstract with Colour Sequence.

Spherical continuous line with colour sequence. Flypast Over Rolling Hills. Mick Burton 2015.

Spherical single continuous line drawing with colour sequence. Flypast Over Rolling Hills. Mick Burton, continuous line artist 2015.

I have modified my Spherical approach to continuous line from the method I described in my Continuous Line Blog post of 9 July 2014, which did not quite reflect the reality I was seeking.

I have kept the idea that when you draw out of one SIDE of the paper you need to return at the opposite SIDE at the corresponding point, so that the pattern matches vertically and after colour sequence the colours also match if you pull the paper round into a tube shape.  This is similar to the equator on a globe of the world matching.

Previously I had said that when going out of the top of the drawing you also need to return at the corresponding place at the bottom.  I was correct to say that the colours would not match, which would be equivalent to the poles on the globe of the world not meeting, but the treatment of the lines needed to be modified.

I realised that the bunching effect of the top being pulled together totally separately to the bottom being pulled together was fine regarding separate sets of colours but matching the line patterns from top to bottom was the wrong approach.

So, when I go out at the TOP now I need to come BACK IN AT THE TOP at the corresponding distance from the other end of the top.   Similarly if I go out at the bottom I come back in at the bottom.  You could then imagine that folding the picture vertically down the middle would mean that both pattern and colour sequence would now match at the top and bottom respectively (don’t actual fold it and spoil the picture ! ).

I recently drew the following for a demonstration/workshop at Stainbeck Arts Club in Leeds.  I started drawing the line a couple of inches in from the top left side and did a few rolling curves diagonally down from left to right, followed by several exits and returns to the picture – initially out at the lower right side and back in at the lower left side, then down and out at the bottom left and back in at the bottom right.

Spherical continuous line drawing with rolling and jagged lines. Mick Burton 2015.

Spherical single continuous line drawing with rolling and jagged lines. Mick Burton, continuous line artist 2015.

I later tried some “shark fin” curves and a couple of large jagged sequences.

All the time I tried to draw the line cleanly through existing shapes (avoiding going near previous junctions) and being aware of areas I had not visited much.  Finally I needed to work out how to get back to my start point without spoiling the composition too much (here going out and back in can be handy).

I hope you can check the route of the line through the whole picture fairly easily.  I then applied my Colour Sequence to produce the picture at the top of this post.

The first stage is my usual alternate overdraw of the line (if you are overdrawing a section as you go out of the picture you need to continue to overdraw as you re-enter, or if not overdrawing going out it’s not overdrawing when you re-enter).  See my post of 10 September 2014 for the full ALTERNATE OVERDRAW process and my post of 27 September 2014 for the COLOUR SEQUENCE process.

I have used a series of 6 colours from Pale Yellow through greens to Prussian Blue which I have tried to work out in steps of tone.  This is partly to highlight the overlap effect of continuous lines and the natural depth of the abstract.  As always, there is choice of direction of colours – light to dark or dark to light.  Here it seemed best to have the single lightest area at the top and several darker areas across the lower part of the picture.  The picture also has an Optical Art look about it.

Printing the picture in Monotone is usually a good way of checking the steps of colour and light to dark.  So here it is.

Monotone of Spherical Continuous Line

Monotone of Spherical Single Continuous Line Drawing “Flypast Over Rolling Hills”. Mick Burton 2015.

I also produced another similar abstract for the Demonstration at Stainbeck Arts Club to show the Spherical approach with a different flow of lines and colours.  I had coloured the drawing with a sequence from Yellow through Reds to dark Brown.

Spherical Continuous Line with Colour Sequence. Forest Fire. Mick Burton 2015.

Spherical Single Continuous Line Drawing with Colour Sequence. Forest Fire. Mick Burton 2015.

Here is the Monotone of this picture.

Monotone of Spherical Continuous Line

Monotone of Spherical single continuous line drawing “Forest Fire”. Mick Burton 2015.

How do you construct Haken’s Gordian Knot?

After completing my drawings of Haken’s Gordian Knot, which I covered in my previous continuous line blog post, I decided that I needed to find out more about how this unknot was created.  It is one thing me portraying the route of the two strands running through a completed structure, but possible something very different if I construct it from scratch.

A Google search for Haken’s Gordian Knot took me to a page of MathOverflow website, where a question that appeared “Are there any very hard unknots?” posed by mathematician Timothy Gowers, in January 2011.  In an update after many answers he said that he had arrived at Haken’s “Gordian Knot”.

Haken's Gordian Knot, from Ian Agol. A simple circle of string (an Unknot) formed into a complicated continuous line.

Haken’s Gordian Knot, from Ian Agol. A simple circle of string (an Unknot) formed into a complicated continuous line.

Timothy said that, after studying the knot for some time, “It is clear that Haken started by taking a loop, pulling it until it formed something close to two parallel strands, twisting those strands several times, and then threading the ends in and out of the resulting twists”. This approach is something like the suggestions I made in my last post on the basis of my Twisting, Overlapping, Envelope painting of the Haken Knot.

Twisting, overlapping colouring of Haken's Gordian Knot. Mick Burton painting.

Twisting, overlapping colouring of Haken’s Gordian Knot. Mick Burton single continuous line drawing painting.

Timothy then added that “The thing that is slightly mysterious is that both ends are “locked” “.  When I started to build the structure from scratch I began to realise what “locked” may mean.

Constructing Haken's Gordian Knot. Stages 1 & 2. Mick Burton.

Constructing Haken’s Gordian Knot. Stages 1 & 2. Mick Burton.

After leaving the looped end at the start, the ongoing route first meets its earlier self at Stage 2.  However instead of the ongoing route going through the earlier one, the initial loop goes back through the later one. This must be what is meant by the first “lock”.

Constructing Haken's Gordian Knot. Stages 3 to 7. Mick Burton

Constructing Haken’s Gordian Knot. Stages 3 to 7. Mick Burton

Continuing, things were as expected up to Stage 7.  I now realised that the route could be simplified to one line, as the Twists were not affecting progress but the feed through points were crucial.  I switched to drawing the route by using a simple line (to represent the twin twisting strands) and showed Feed Through points as Red Arrows.

Haken's Gordian Knot, Simplified Route showing Feed Points. Mick Burton.

Haken’s Gordian Knot, Simplified Route showing Feed Points. Mick Burton.

You can see that after point “C”, where the reverse Feed occurs, there are 12 expected Feed Through points until you arrive at point “E”.  Here instead of Feeding through an earlier part of the route, Haken indicates that you are expected to Feed through the End Loop at “E” which is too soon. This must be the other “Lock”.

At this stage, of course, I had no idea what to do.  Timothy did not seem to be using a lot of paper like me, but a “twisted bunch of string” and a small unknot diagram.  So I found some string, but was at a loss to make much sense of anything using that.  Timothy, however, was disappointed that it was so easy with his string initially, but delighted when it became more difficult !

What I did realise about the sections of route lying beyond point “E”, which I have coloured Green, is that they all lie beneath the rest of the structure.

This would allow the Green Area to be constructed separately before you sort of sweep it underneath as a final phase.  When I say “separately” I can only assume that you would need to do all this first, feed the result through the final loop and encapsulate the result.  You would then take this bundle to the start and use it to spearhead the building of the structure, leaving the loop at the other end of the two stranded string back at the start.

Haken's Gordian Knot, Prior action for the Green Route, before starting main structure. Mick Burton.

Haken’s Gordian Knot, Prior action for the Green Route, before starting main structure. Mick Burton.

Timothy said that he would love to put a picture of the process on the website and asked for suggestions.

Even though I am an artist and not a mathematition, I had already done two pictures of Haken’s knot before I found the MathOverflow website and was fascinated by the production process of the knot and so did some extra diagrams of my own.

I will ask if my drawings match Timothy’s thoughts in any way.

Haken’s Gordian Knot and the Twisting, Overlapping, Envelope Elephant.

I constantly look for Continuous Lines in many fields of art, history, mathematics – anywhere, as I just do not know where they are going to crop up.  Currently I am casting an eye on Islamic Art and Celtic art and am developing ideas on those.

Recently I glanced through a book called “Professor Stewart’s Cabinet of Mathematical Curiosities” and came across Haken’s Gordian Knot, a really complicated looking knot which is really an unknot in disguise – a simple circle of string (ends glued together) making a closed line. Here it is.

Haken's Gordian Knot, from Ian Agol. A simple circle of string (an Unknot) formed into a complicated continuous line.

Haken’s Gordian Knot, from Ian Agol. A simple circle of string (an Unknot) formed into a complicated continuous line.

When I looked at the Knot, it reminded me of my “Twisting, Overlapping, Envelope Elephant” continuous line in that it has a lot of twists. I realised straight away that a narrow loop on the outside (left lower) seemed to lead into the structure with its two strands twisting as it went, each time in a clockwise direction.  I followed the two twisting lines throughout the drawing until they ended in a loop on the outside (left higher).

I wanted to draw and paint this knot. My first drawing was of the line on its own. The depth of some of the lines reminded me of one of my earliest paintings “Leeds Inner Ring Road Starts Here”, which was based upon a sign board which appeared near Miles Bookshop in 1967 informing us of the route the new road would carve through the City. This was several years before Spagetti Junction was built near Birmingham. My picture had lines swirling all over at various heights in one continuous line.

Leeds Inner Ring Road Starts Here. Use of varying thickness of continuous line, overs and unders. Pre dates Spagetty Junction near Birmingham. Mick Burton, 1967.

Leeds Inner Ring Road Starts Here. Use of varying thickness of single continuous line drawing, overs and unders. Pre dates Spagetty Junction near Birmingham. Mick Burton, 1967.

My first picture of the Gordian Knot, in black and white, concentrated on the heights of the lines following the overs and unders shown by Haken.

Depth of lines in black and white, in Haken's Gordian Knot. Mick Burton, continuous line drawing.

Depth of lines in black and white, in Haken’s Gordian Knot. Mick Burton, single continuous line drawing.

But my main aim now was to use blue and red to show the twisting nature of the pair of lines running between the starting loop and the end loop.  This was intended to allow the viewer to more easily follow the loop and the twists throughout the structure.

Twisting, overlapping colouring of Haken's Gordian Knot. Mick Burton continuous line.

Twisting, overlapping colouring of Haken’s Gordian Knot. Mick Burton single continuous line drawing.

Just like viewing my “Twisting, Overlapping, Envelope Elephant”, from my previous post, imagine that you have a strip of plastic which is blue on the front and when you twist it over it is painted red on the back.  Where blues cross each other you have darker blues, and correspondingly with reds.  Where blue crosses red you have violet.  I show the strips feeding through each other, like ghosts through a wall.  There are some darks and lights in there as well.  Most usefully, the background shines through to help make the strips stand out.

You can now get more of a feel for what is going on.  I counted 35 clockwise twists and two anti-clockwise (numbers 19 and 26).  Continued twists in the same direction tie in the ongoing loop, when it feeds through the two strands of its earlier route at least 12 times.  

This is a preparatory painting, in acrylic but on two sheets of copy paper sellotaped together.  When I exhibit these pictures they will be hung as portrait, rather than the landscape shown here for comparison with Haken (as you will note from where my signature is).  I think they look a bit like the head of the Queen in portrait mode !

Having got this far, I realised that I should find out more about the Haken knot (or unknot), beyond Professor Stewart’s brief introduction.  How did Haken construct the knot and why?

Please see my next post, on this continuous line blog, to see how I got on.

Escher Islamic Mosaic Change to One Continuous Line. STAGE 5.

Escher painting 1922 of Islamic Mosaic tile at the Alhambra. WikiArt. Continuous line study by Mick Burton.

Escher painting 1922 of Islamic Mosaic tile at the Alhambra. WikiArt. Continuous line study by Mick Burton.

In my post of 4 April 2015, Continuous Lines in Escher Islamic Mosaic painting, STAGE 1, I mentioned that the original Islamic artist had deliberately created two Continuous Lines, when he could have just as easily created one, because he wanted to retain overall symmetry of design and border connections.

I stated that I had examined the design and worked out how to make a change to the border connections of lines to create one continuous line throughout the design, and this is how it’s done.

Here is the chart from STAGE 2 again, which shows the Main Continuous Line in Red and the Minor Continuous Line in Blue and the colours are also shown as the connections loop outside the Border.  The change has to be done without changing the Alternate Overdraw in the main design and this is done by linking a Red Overdraw with a Blue Overdraw at the same time as linking two not overdrawn lines.

Minor Continuous Line, Alternate Overdraws in Red and Blue. Mick Burton Escher Mosaic study.

Minor Continuous Line, Alternate Overdraws in Red and Blue. Mick Burton Escher Mosaic study.

We need a crossover on the Border involving a Red loop and a Blue loop.  If we part them at that junction and re-join the Red with the Blue, and then join both not overdrawn ends as well, we have united the Main and Minor continuous lines.  See Below.

Joining of Main Red Continuous Line to Minor Blue, leaving both non Alternate Overdraw lines joined at the former junction. Mick Burton Escher Mosaic study.

Joining of Main Red Continuous Line to Minor Blue, leaving both non Alternate Overdraw lines joined at the former junction. Mick Burton Escher Mosaic study.

To show how this change is reflected in the Border, here is a before and after “Spot the difference” comparison which I have drawn.

Change of Border on Escher Mosaic to enable one continuous line. Mick Burton study.

Change of Border on Escher Mosaic to enable one continuous line. Mick Burton study.

As you can see, the difference between having two continuous lines and one is just a couple of flicks of a pen. Obviously, the artist would have known there was a one continuous line option and that he could have done it without losing any design or colouring options.

Presumably, the artists were required to retain overall symmetry above all else, including in the Border.  Eric Broug has also informed me that continuous line drawing is very rare in Islamic geometric design. 

I think that the Artist chose two continuous lines in the Mural Mosaic to demonstrate that he was only one step from having one line, and he made sure that the Border was drawn so that this change opportunity (which occurs on each of the four sides)  was as simple as possible.  He is saying “I could easily have drawn One Continuous Line ! “

After completing my research into the Escher painting, and explaining the one continuous line alternative, I realised that I needed to draw the single continuous line myself.  Here it is.

One Continuous Line Drawing, including Border signals, based on Escher Islamic Mosaic. Mick Burton, March 2015.

One Continuous Line Drawing, including Border signals, based on Escher Islamic Mosaic. Mick Burton, March 2015.

 
This completes my five STAGES of explaining my thoughts on Escher’s terrific painting, in 1922, of the Islamic Mural Mosaic in the Alhambra.  I hope you found this abstract continuous line it to be interesting and stimulating.

Finally, I would like to thank Margaret Graves, Assistant Professor of Islamic Art and Architecture at Indiana University, for her encouragement and guidance after I completed my research.

Escher Islamic Mosaic Continuous Lines, Create and Change Border. STAGE 4.

A key part of the Mural Mosaic tile painting by Escher in 1922, is that he has included the Border in detail. The Border gives an indication of what happens to the lines when they hit the sides and where they feed back into the design. In the quarter section detail of the mural below you can see marks on the Border.

A line leaving the design either joins the border (so that you can follow where it goes) or goes under the border (and you can deduce where it re-emerges).  It is not easy to work all these paths out at first, but there is a logic to it.  If in doubt between two choices, one of them usually has a clear answer leaving only one option for the other.  Another aid to us is that each side of the Border is identical in the same direction around the design, so if the marks are not clear on one side you can check at a corresponding point on another side.

Detail to show Border. Escher mural mosaic in the Alhambra. WikiArt. Mick Burton study.

Detail to show Border. Escher mural mosaic in the Alhambra. WikiArt. Mick Burton study.

.
When I first started this research I did a basic hand copy showing all the lines hitting the sides and then showed each one as a loose end outside the square.  I then studied the border on the Mosaic to work out how all the loose ends should be joined up and charted them – this initial chart was in STAGE 1, and I show it again at the end of this post.

That was relatively easy, observing the result of what artist had done.  The hard bit is working out  from scratch which loose ends to tie up to produce continuous lines in a way which would still enable the colours to be allocated by the Alternate Overdraw (or equivalent process used by the artist).

According to Eric Broug in his demonstration video’s, the tile rectangle containing the design would be selected out of a larger pattern area.  In my own art, when I have drawn a large continuous line pattern and completed the Alternate Overdraw (so that I know the colour sequence everywhere) I can pick out a small section to display which of course already has the Alternate Overdraws.  Similarly, the Islamic artist producing the Mosaic would know the full colouring etc for the tile section.

I show below the design with all the loose ends and Alternate Overdraws in Red.  At this stage the artist would not know how many continuous lines would occur in the tile section on its own.  He will have also needed to produce a straight edge on the corners and other parts of the perimeter to block unwanted lines which encroached from the outside pattern.

Section of larger pattern with Alternate Overdraws and loose ends showing whether overdrawn. Mick Burton study.

Section of larger pattern with Alternate Overdraws and loose ends showing whether overdrawn. Mick Burton study.

You will see from the loose ends that half of them are overdrawn in Red and half not. If you connect up pairs of the overdrawn, and pairs of the not overdrawn, loose ends then there will be continuous lines throughout the design and the Alternate Overdraw Template will be unaffected. If I connect up the not overdrawn pairs around each corner of the design, then working along the sides both overdrawn pairs and not overdrawn pairs work out consecutively. This matches the line direction message in the Border on the Mosaic design.  Here is a chart (previously in STAGE 1) showing all the loose end connections.  We know from STAGE 1 that there are two continuous lines, which makes the case strong regarding the artist using Alternate Overdraw, but it would not have mattered if there were more than two.

Escher Islamic Tile. Basic line structure, with border connections. Mick Burton continuous line study.

Escher Islamic Tile. Basic line structure, with border connections. Mick Burton continuous line study.

Having looked at Borders in detail, that prepares us for the final STAGE 5 where I show how we can turn this into a Single Continuous Line design.  

I will also give you my opinion on what the original Artist thought about a Single Continuous Line and why I think he is definitely an Artist and not just a craftsman.

Mick Burton Continuous Line Blog.

Colour Sequence Allocation on Escher Islamic Mosaic Continuous Lines, STAGE 3.

Now that we have applied my Alternate Overdraw to the Continuous Lines in the Escher Islamic design, I can show how I allocate colours.  We can then compare the result with the colours on the original Islamic design painted by Escher in 1922.

My basic method of allocating colours is covered in my Post on 27 September 2014 entitled “Colour Sequence on Continuous Line Drawing”.

I will start with that same basic process where colour “0” is the outside of the drawing and this is alternated with “1” in its channel or channels.  When we cross through an overdraw from a “1” area we allocate “2” to this adjacent area on the other side and then alternate this with “3” (if there are any) in that channel.  In the negative direction, if we go from a “0” area through an overdraw we will allocate “(-)1” and alternate with “(-)2” in that channel.

Five colour number allocation on continuous lines for Escher Mosaic. Mick Burton study.

Five colour number allocation on continuous lines for Escher Mosaic. Mick Burton study.

There are no areas coloured “3” and so we have 5 colours allocated, compared to only 4 colours used in the original Mosaic.

At this stage things did not look promising.  Trying to equate the 4 original colours in the Mosaic to my 5 numbers produced a best set of matches of 156 out of 313 (I won’t go into much detail here) which is just under 50%.

One thing that I did observe was that YELLOW matched “1” on 76 occasions and “(-)1” on 88 occasions.  This reminded me that I occasionally allocate colours positively by ignoring (-) signs.  When switched to simply using “0”, “1” and “2” I had 3 numbers to compare with the 4 original colours on the mosaic.  This now produced a best match of 241 colours out of 313 which gives 77% and was much more respectable.  Here is the 3 colour allocation.

Colour sequence allocation of 3 colours to continuous lines on Escher Mosaic. Mick Burton study.

Colour sequence allocation of 3 colours to continuous lines on Escher Mosaic. Mick Burton study.

Of course the fourth colour GREEN used in the mosaic does not appear at all in mine.

As with a lot of art, including craft, there may be processes (or even rules) which get you a long way in a design but you have to know when, and how, to break away from them.  I may be a bit rigid with my Continuous Lines but my studies of Picasso and Dali doing them demonstrates that nothing is certain.

This Islamic artist, who I regard as very special, probably used a method equivalent to mine to allocate most of his colours but probably made the following over riding decisions to finish the colouring off –

a.   GREEN was allocated to the 8 areas surrounding each of the 8 planets, and nowhere else.

b.  Each of the 8 planets was coloured PURPLE, instead of black, to mirror its use for the centres of the Suns.

c.  Each Purple junction block at the middle of each side has three directional areas surrounding it which are coloured PURPLE instead of black.  I originally considered these to be decorative.

Allocation of all green colours and changes of black to purple on Escher Mosaic. Mick Burton study.

Allocation of all green colours and changes of black to purple on Escher Mosaic. Mick Burton study.

If the above decisions were made first, then the remaining allocations would be made totally on my 3 colour allocation.  That is 229 areas remaining where my allocation matches 100% with the original Escher Mosaic colours.

229 colour sequence areas matching original Escher Mosaic colouring. Mick Burton study.

229 colour sequence areas matching original Escher Mosaic colouring. Mick Burton study.

So there we are. I hope you have found my attempt to explain how this Escher Islamic Mosaic contains two continuous lines, which I believe was deliberate by the artist, and how most colours matched a colour sequence directly linked to the continuous lines.

The basic elements in the design largely match the template produced by my Alternate Overdraw method and, after specific allocation decisions were made by the artist, there was a total match of all other colours allocated by my method using the template.  Whether of not the artist used a similar method to myself, there is a direct link between the colour sequence and the two continuous lines.

In my searches through other forms of art, on the look out for continuous lines, I have not found any other example of art which contained both continuous lines and a related colour sequence, or signs of possible use of Alternate Overdraw with its Template.

There is a modern mathematical theory called “The Winding Number Theory” which could allocate colours in an equivalent way to my initial 5 colours, but it is not as much fun.

I will do a FURTHER POST (STAGE 4) on how the artist could have used Alternate Overdraw to help him to connect up the loose ends on the borders when actually constructing his continuous lines.

Mick Burton Continuous Line Blog.