Tag Archives: Continuous Line

Continuous Line Artist view of Haken’s Gordian Knot.

Depth of lines in black and white on Haken Gordian   Knot.  Mick Burton, continuous line.

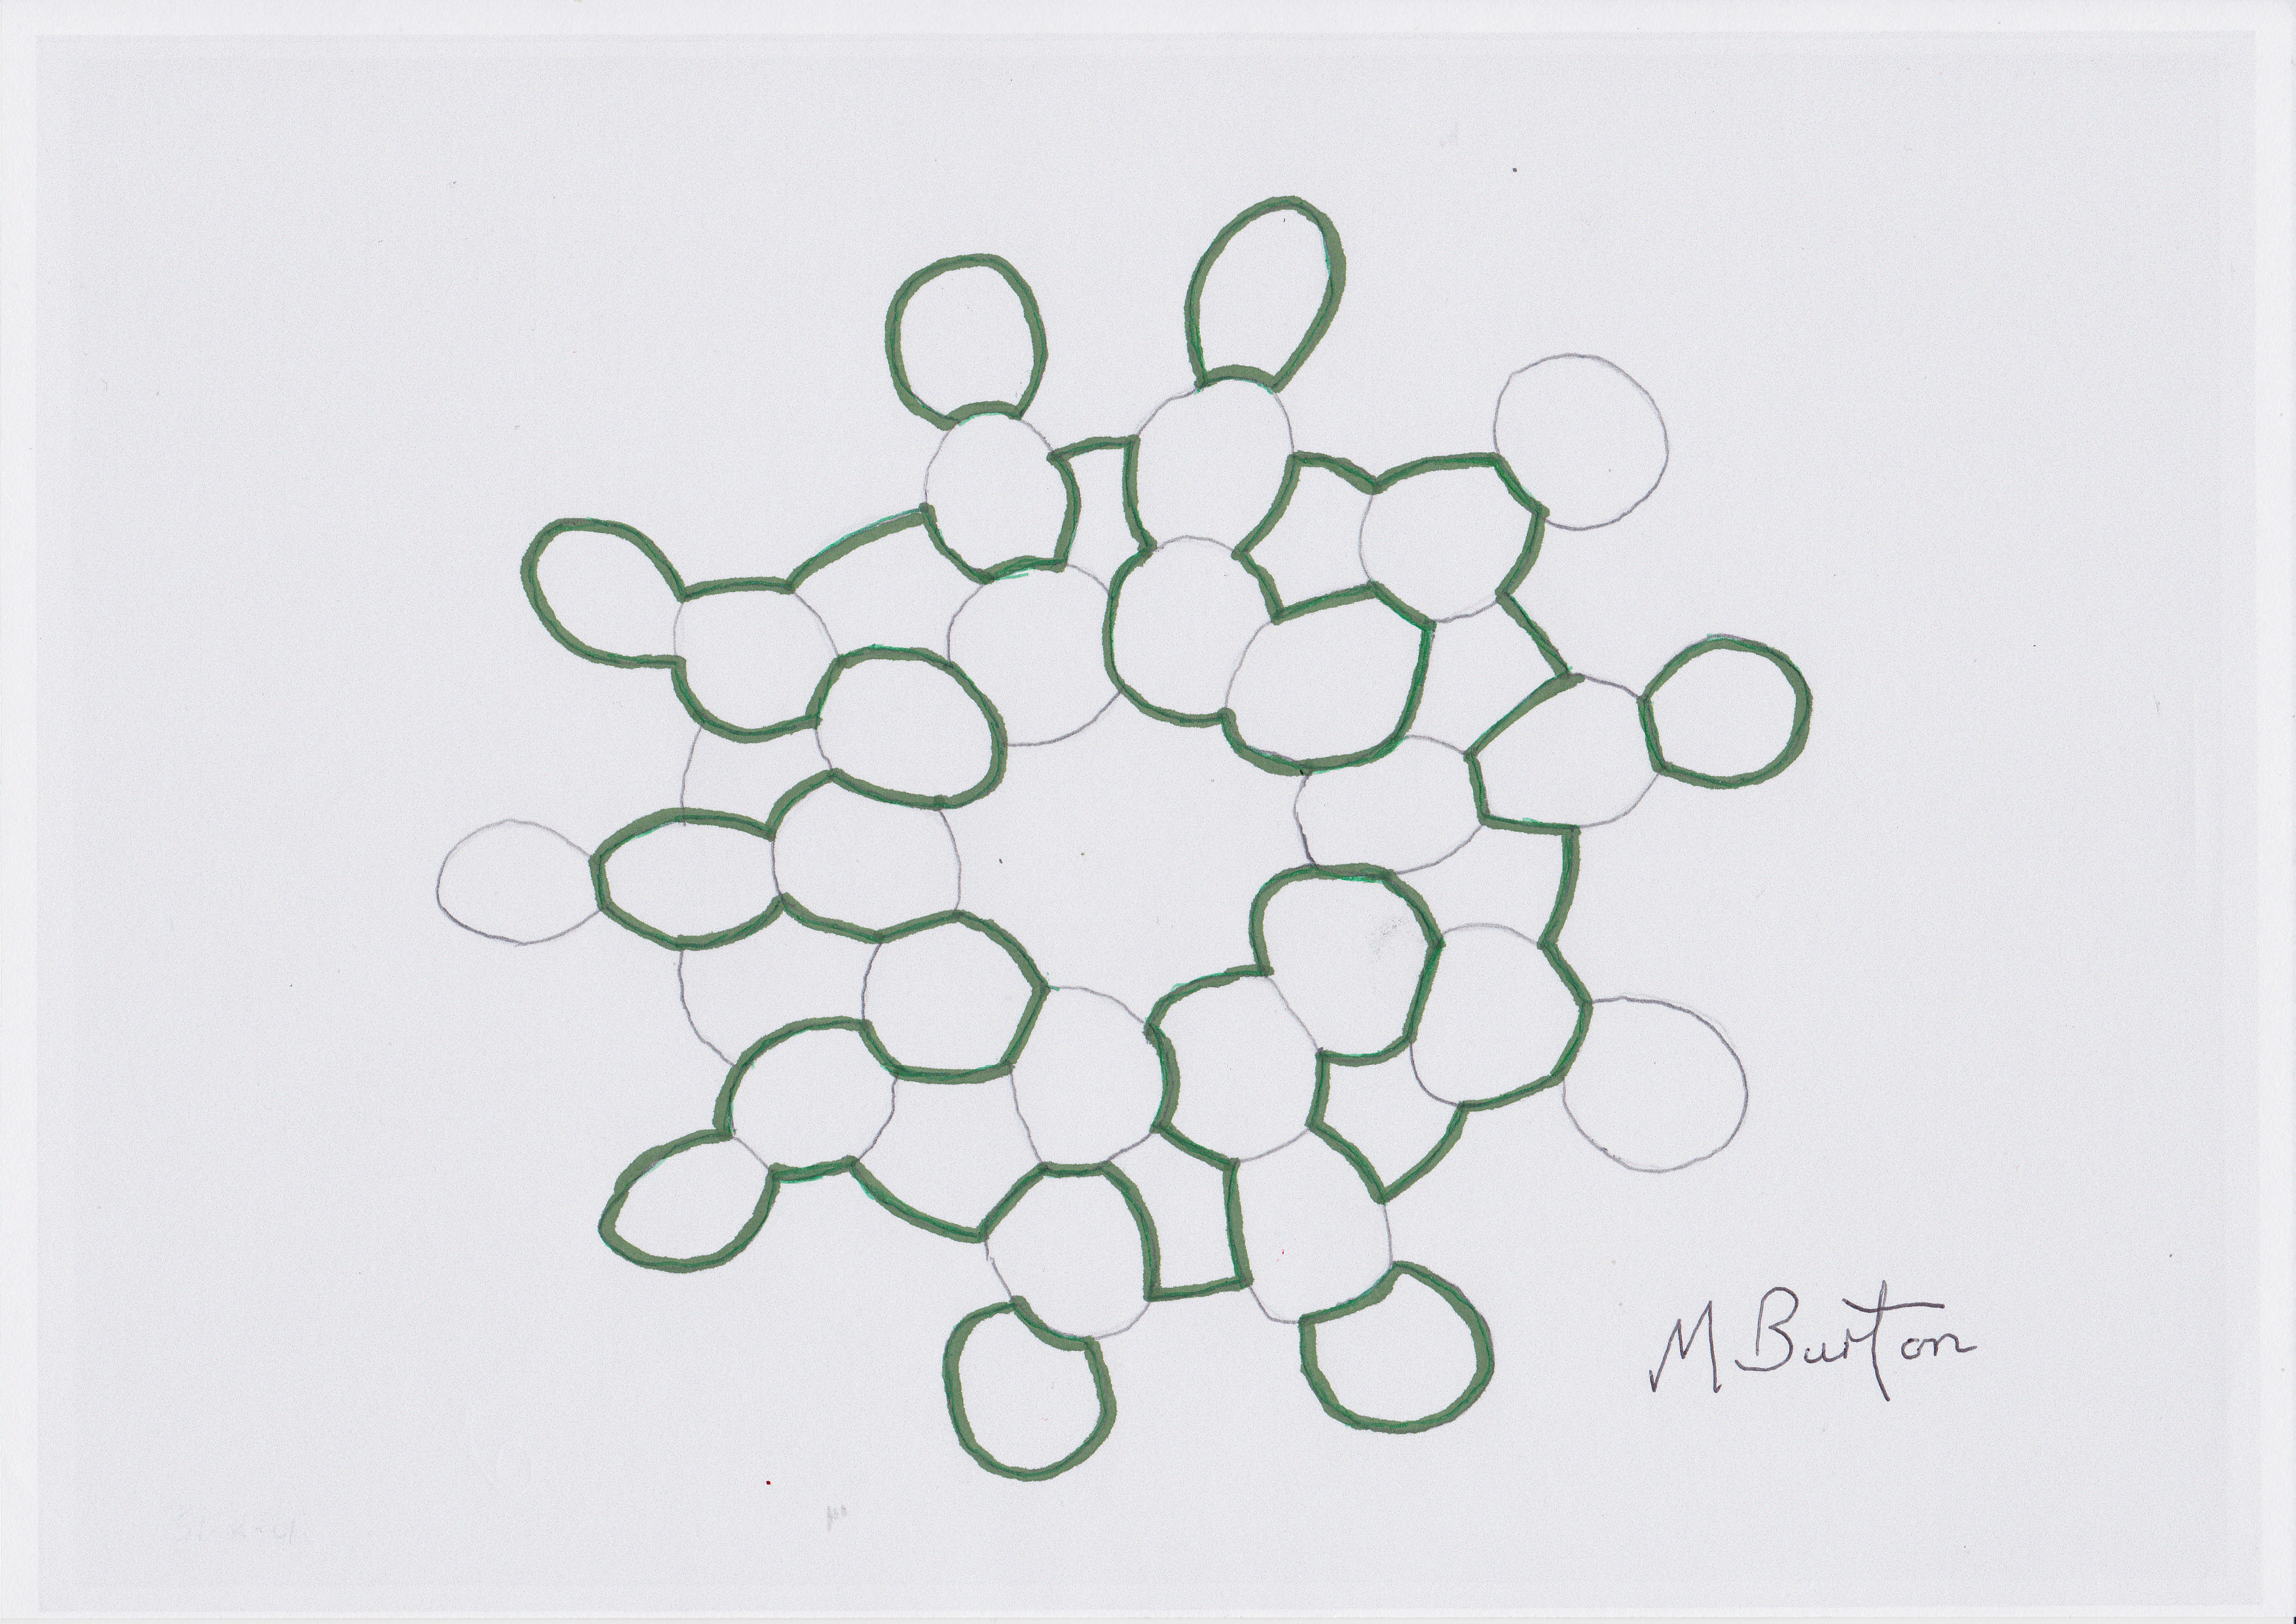
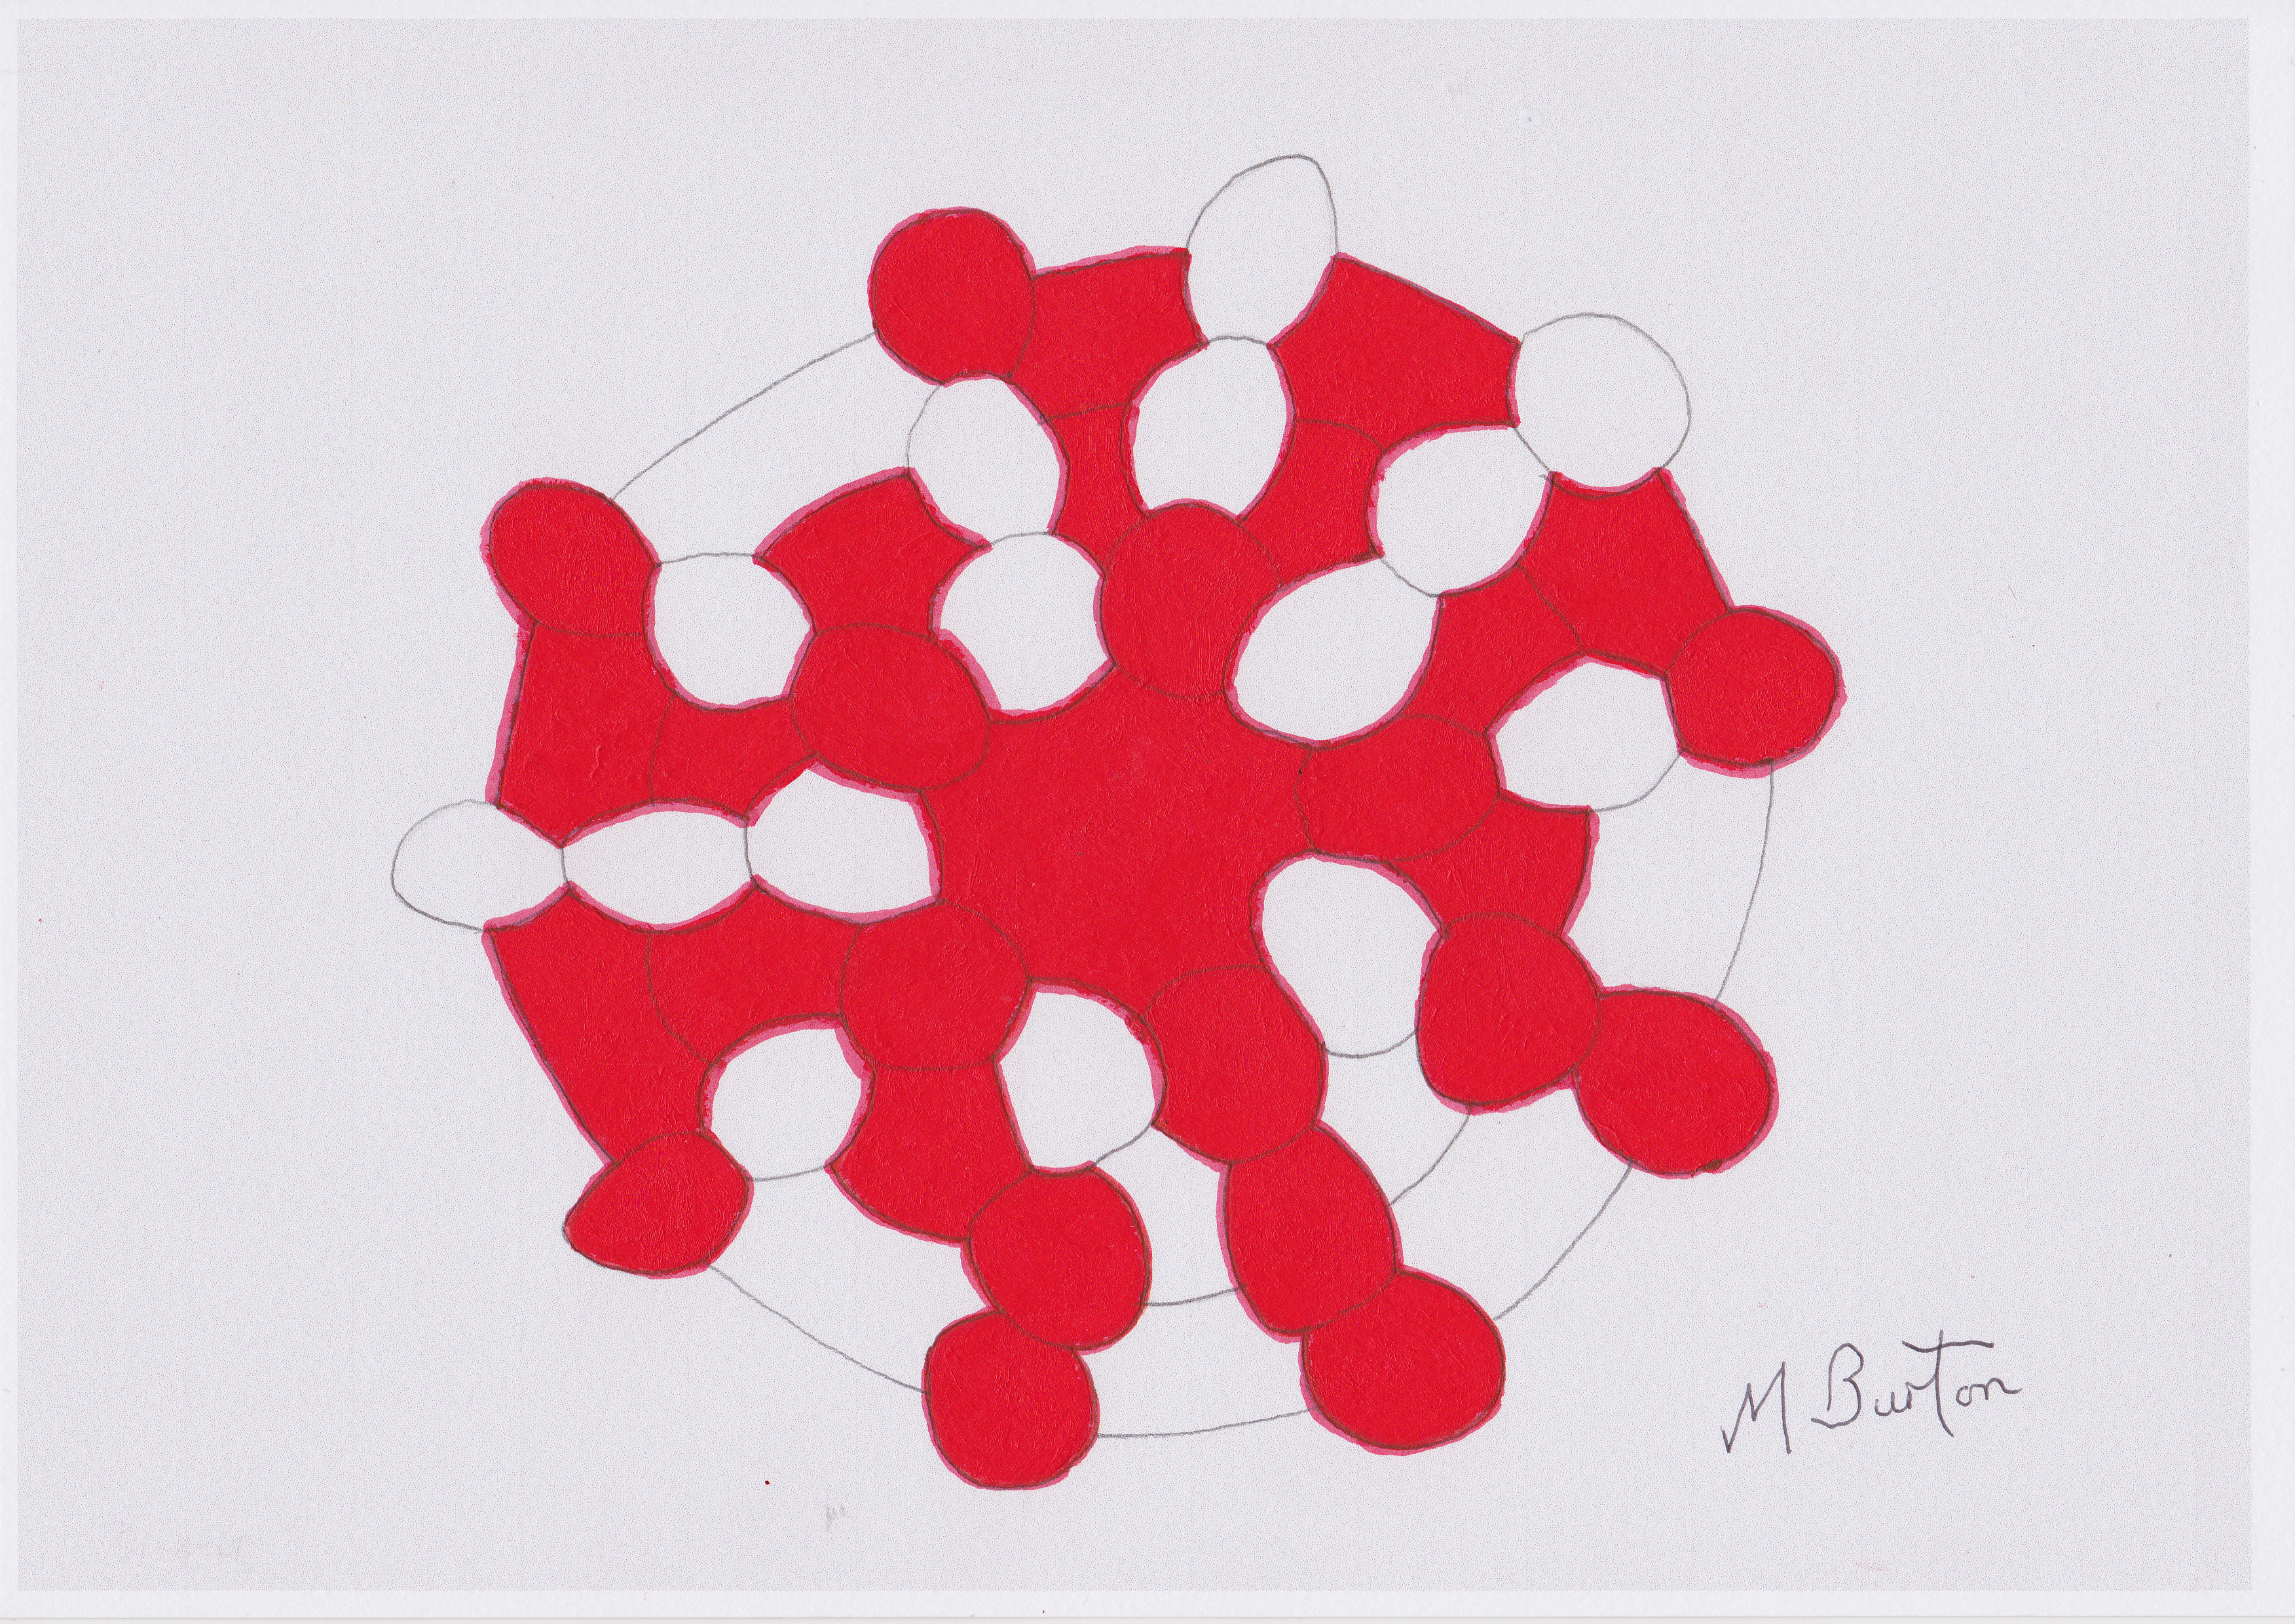
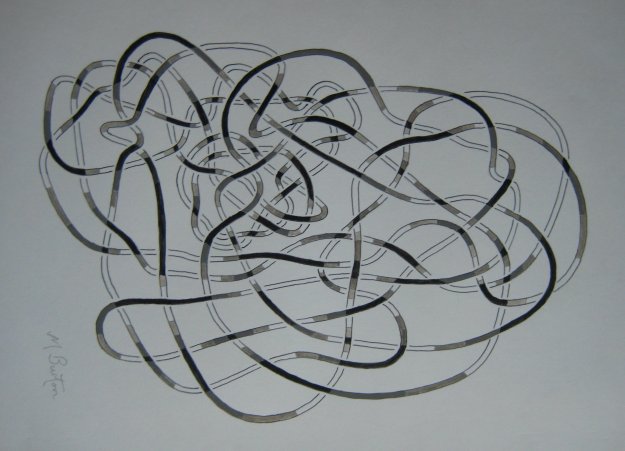
Depth of lines in black and white, in Haken’s Gordian Knot. Mick Burton, single continuous line drawing 2015.

Here is an update on posts which I did in May and June 2015 regarding the above Knot and the interest these posts have since generated.

As a Continuous Line Artist I have looked at many angles of what my lines may mean and what they can do.  

One such examination was triggered by Haken’s Gordian Knot, a complicated looking knot which is really an unknot in disguise – a simple circle of string (ends glued together) making a closed line, which I saw in a book called “Professor Stewart’s Cabinet of Mathematical Curiosities”.   The drawing above is my version of Ian Agol’s illustration of the Haken Knot (see it in my post of 31 May 2015).  I used dark and light shades to emphasize the Overs and Unders shown for the line. 

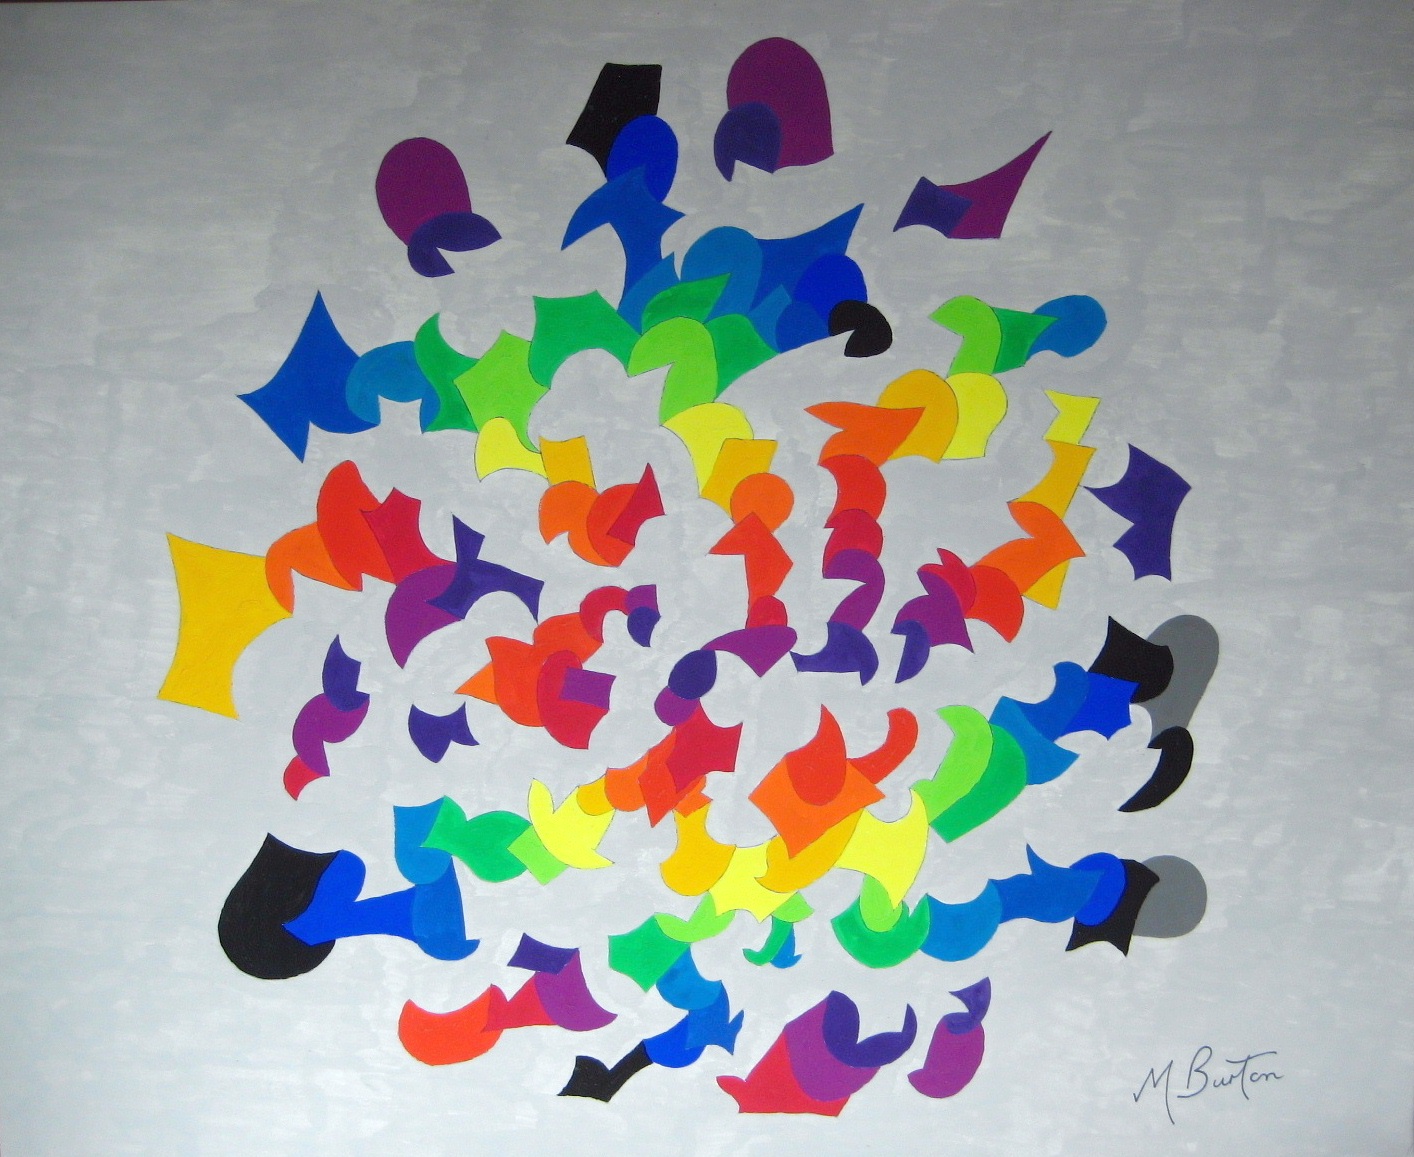
The reason that I was so interested was that it reminded me of my “Twisting, Overlapping, Envelope Elephant” (see below).

Twisting, overlapping, envelope elephant. Continuous line.

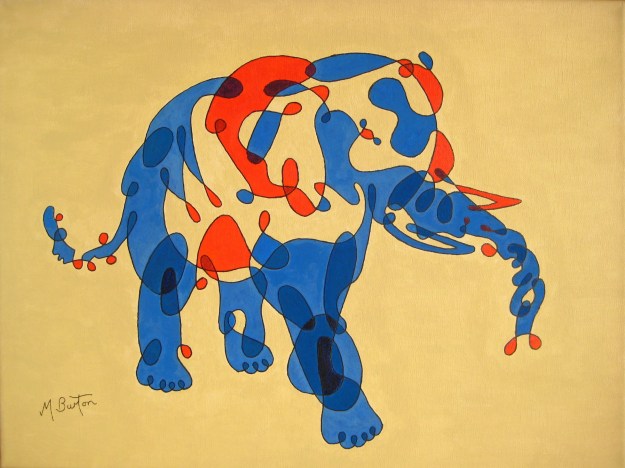
This single continuous line drawing is coloured to represent a “Twisting, Overlapping, Envelope Elephant”, which is Blue on one side and Red on the other. Mick Burton, 2013.

How this elephant line works is explained in my post of 31 May 2015.  In essence, you need to imagine that the composition is made up of a flexible plastic sheet which is Blue on the front and Red on the back.  Each time there is a twist, on an outer edge in the drawing, you see the other colour.

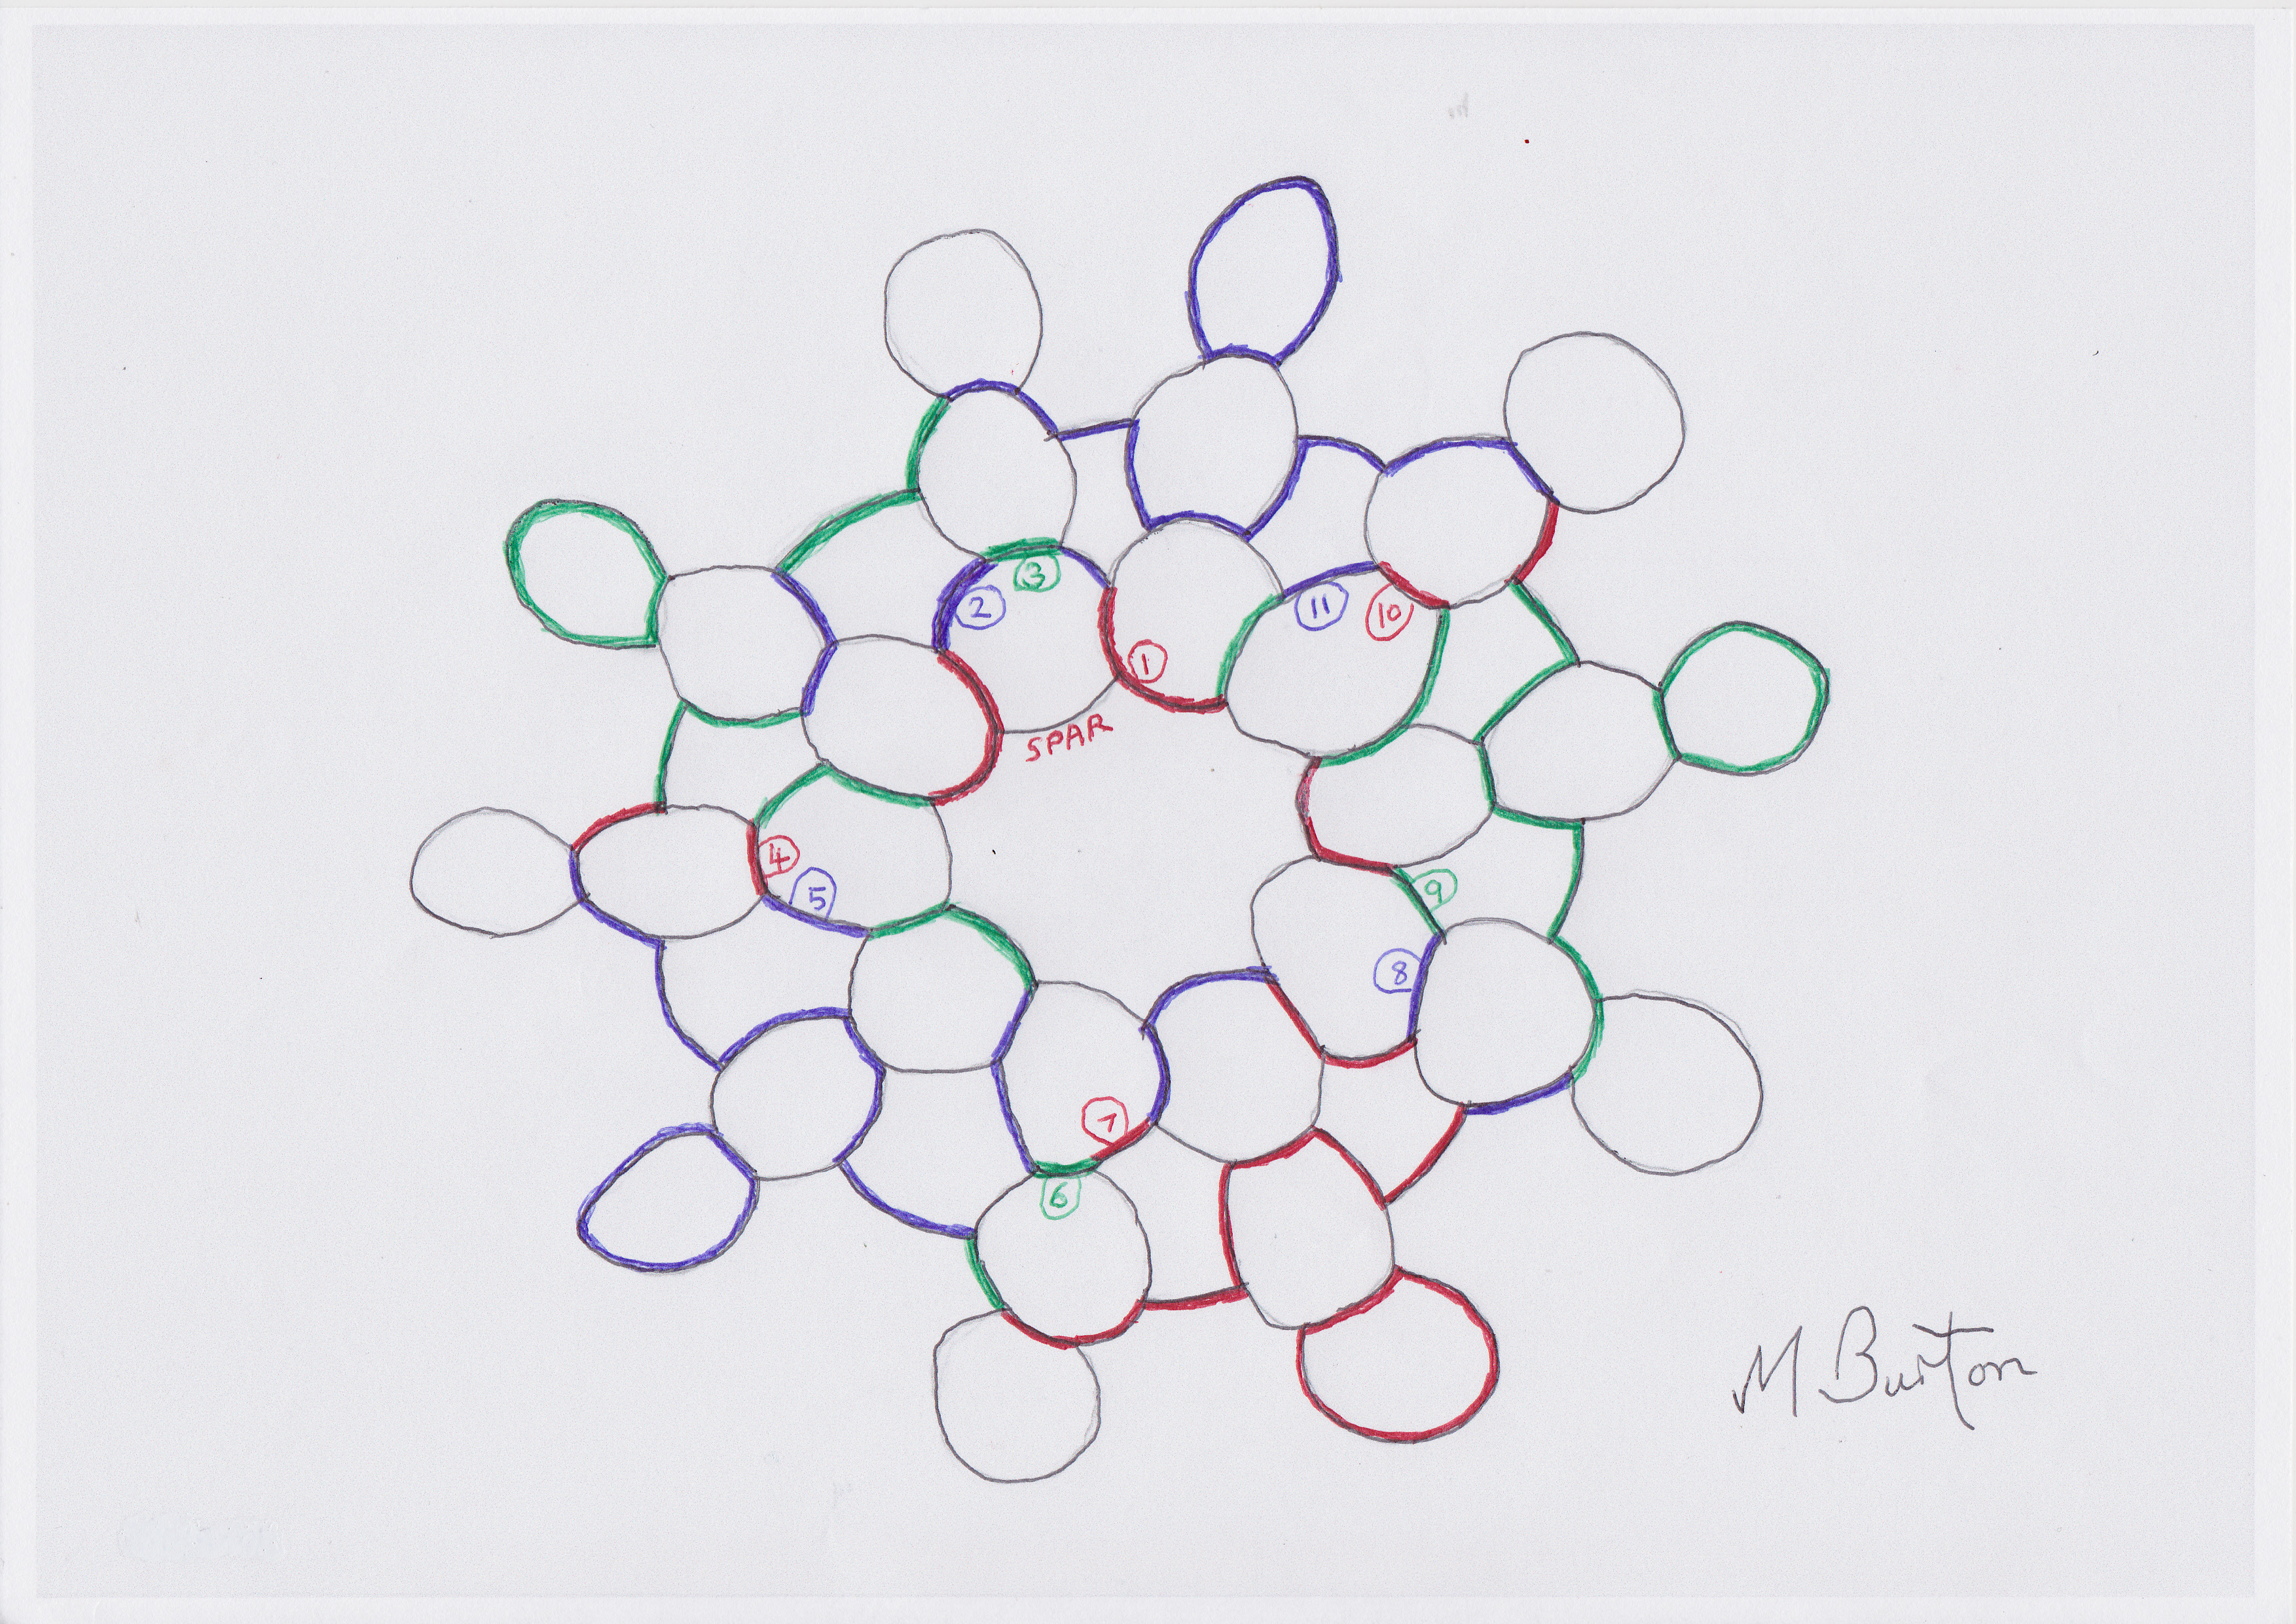
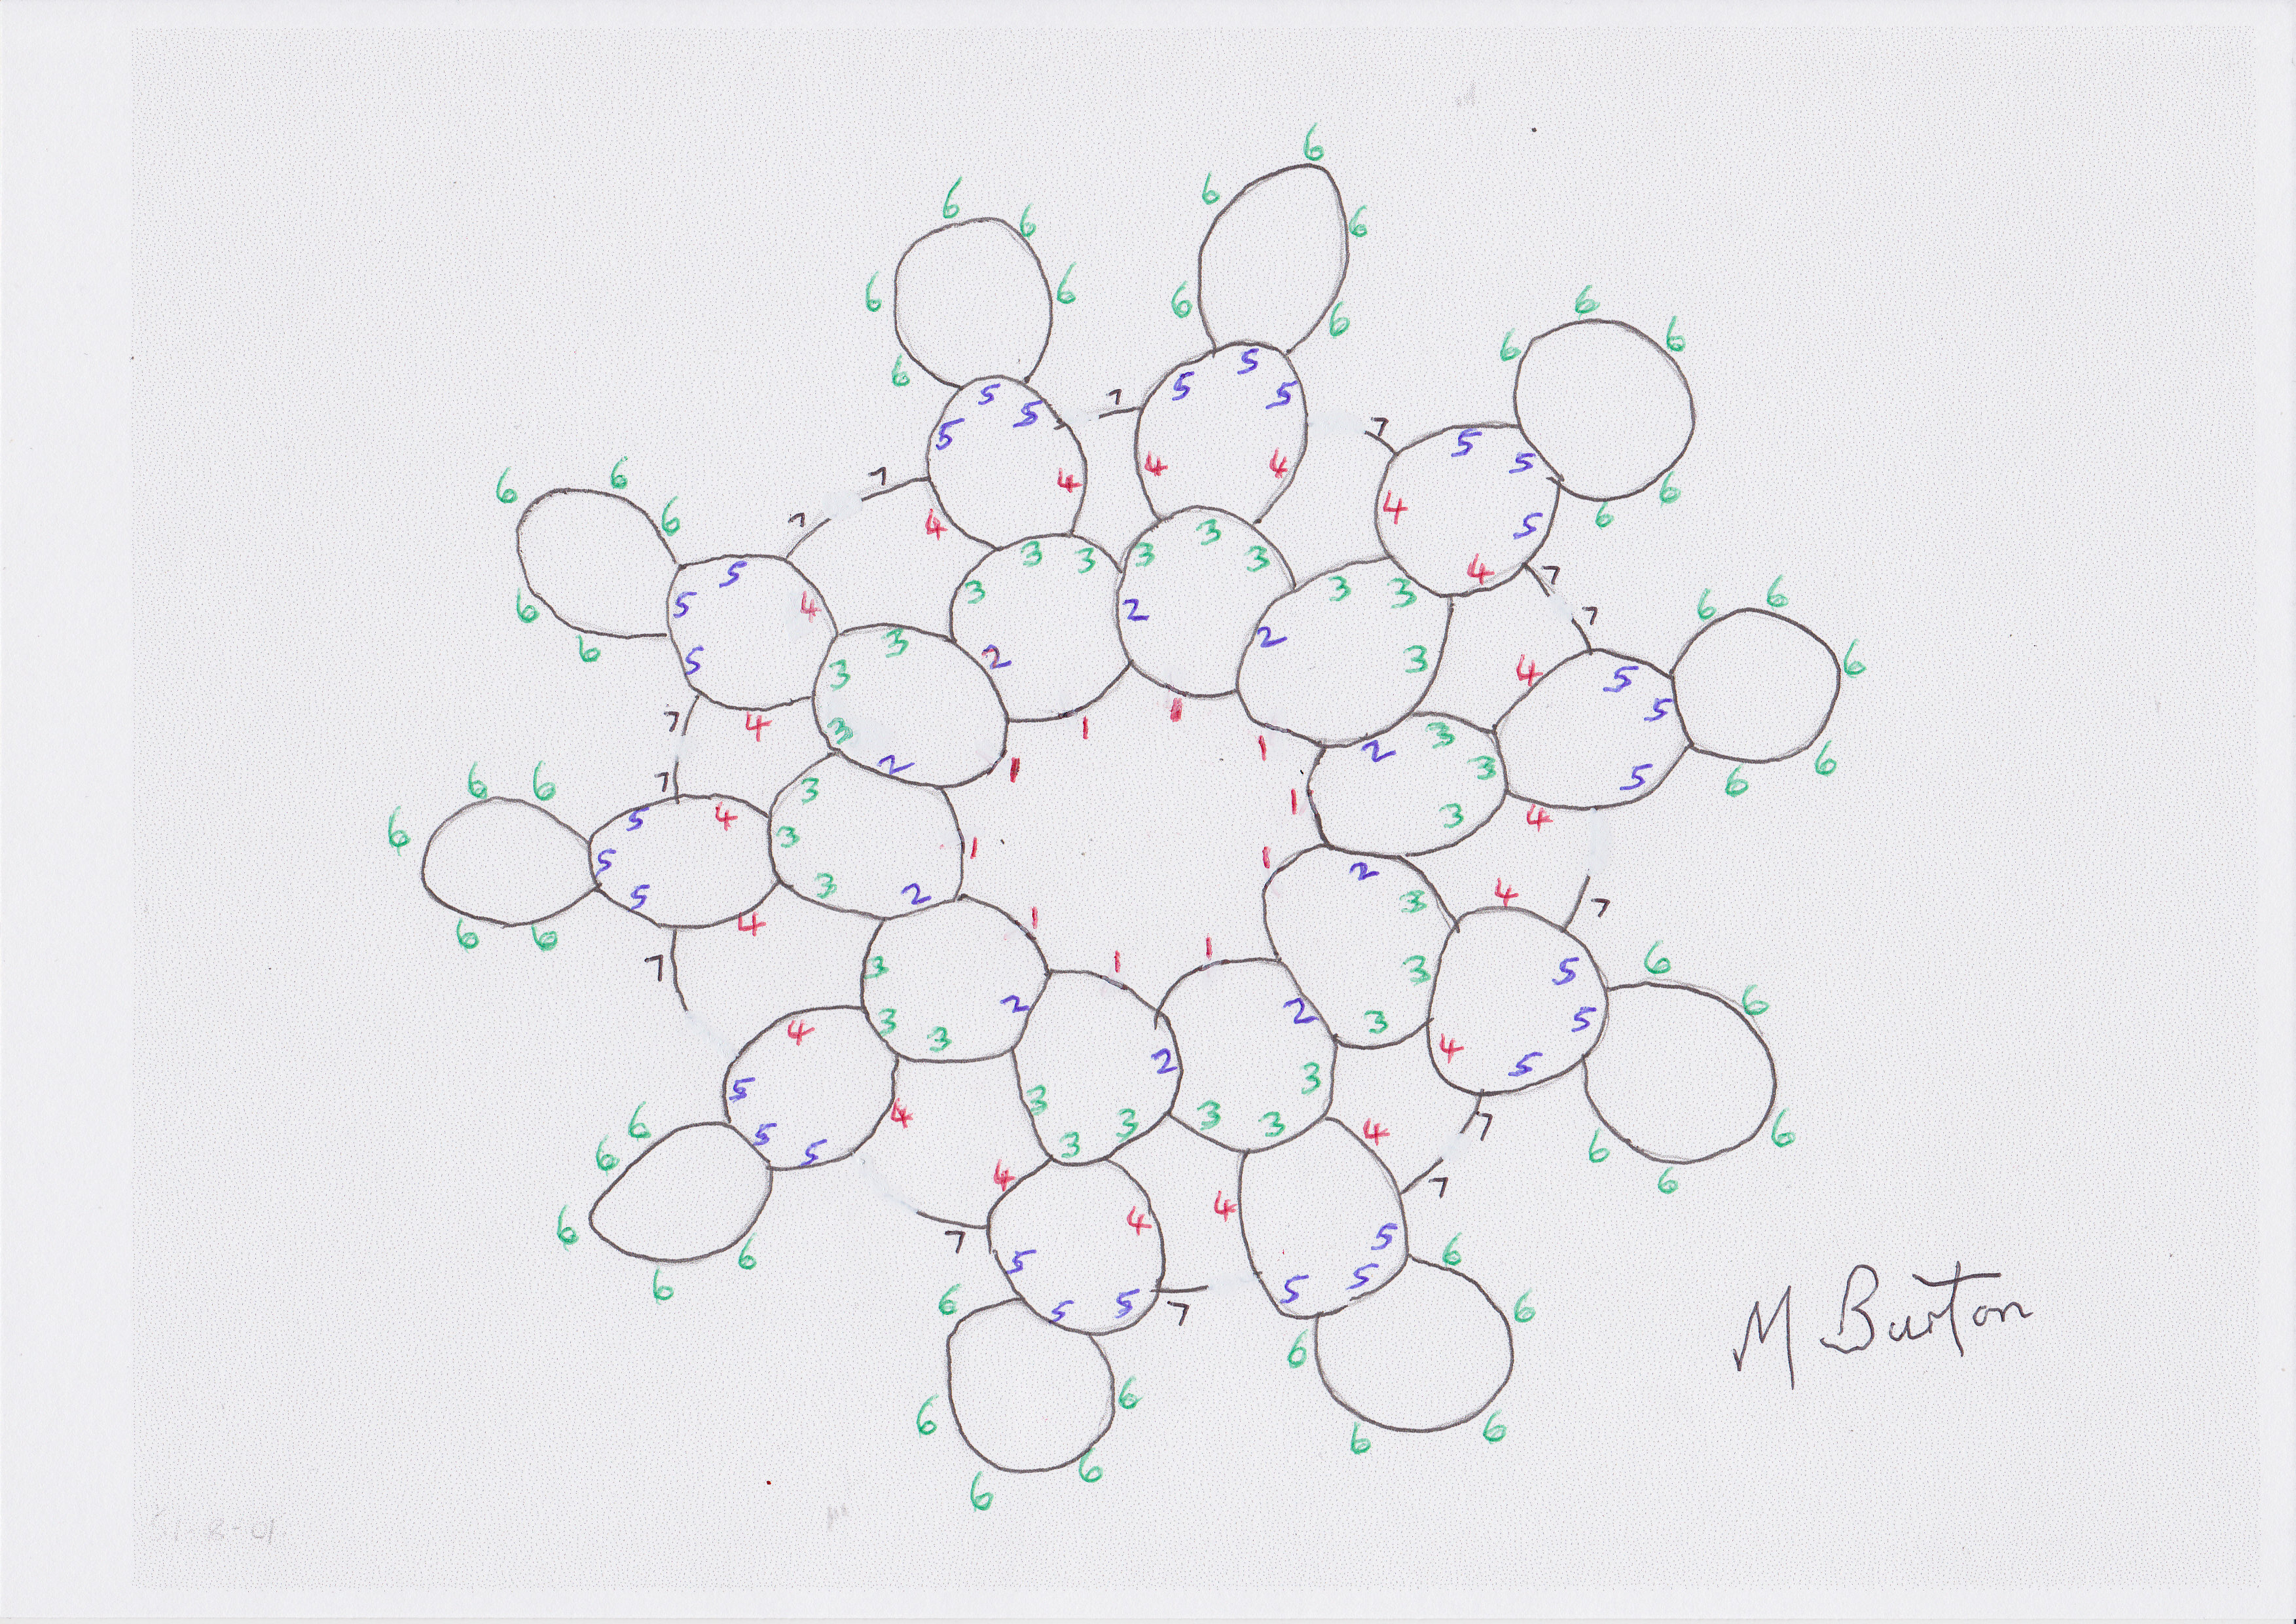
In the Gordian Knot, I spotted that there is a narrow loop starting on the outside (lower left on first illustration above)  which seemed to lead into the structure, with its two strands twisting as it went, each time in a clockwise direction.  I followed the two twisting lines throughout the drawing until they ended in a final loop on the outside (left higher).  I counted 36 clockwise twists and one anticlockwise.  My thoughts are explained in full in my post of 2 June 2015.

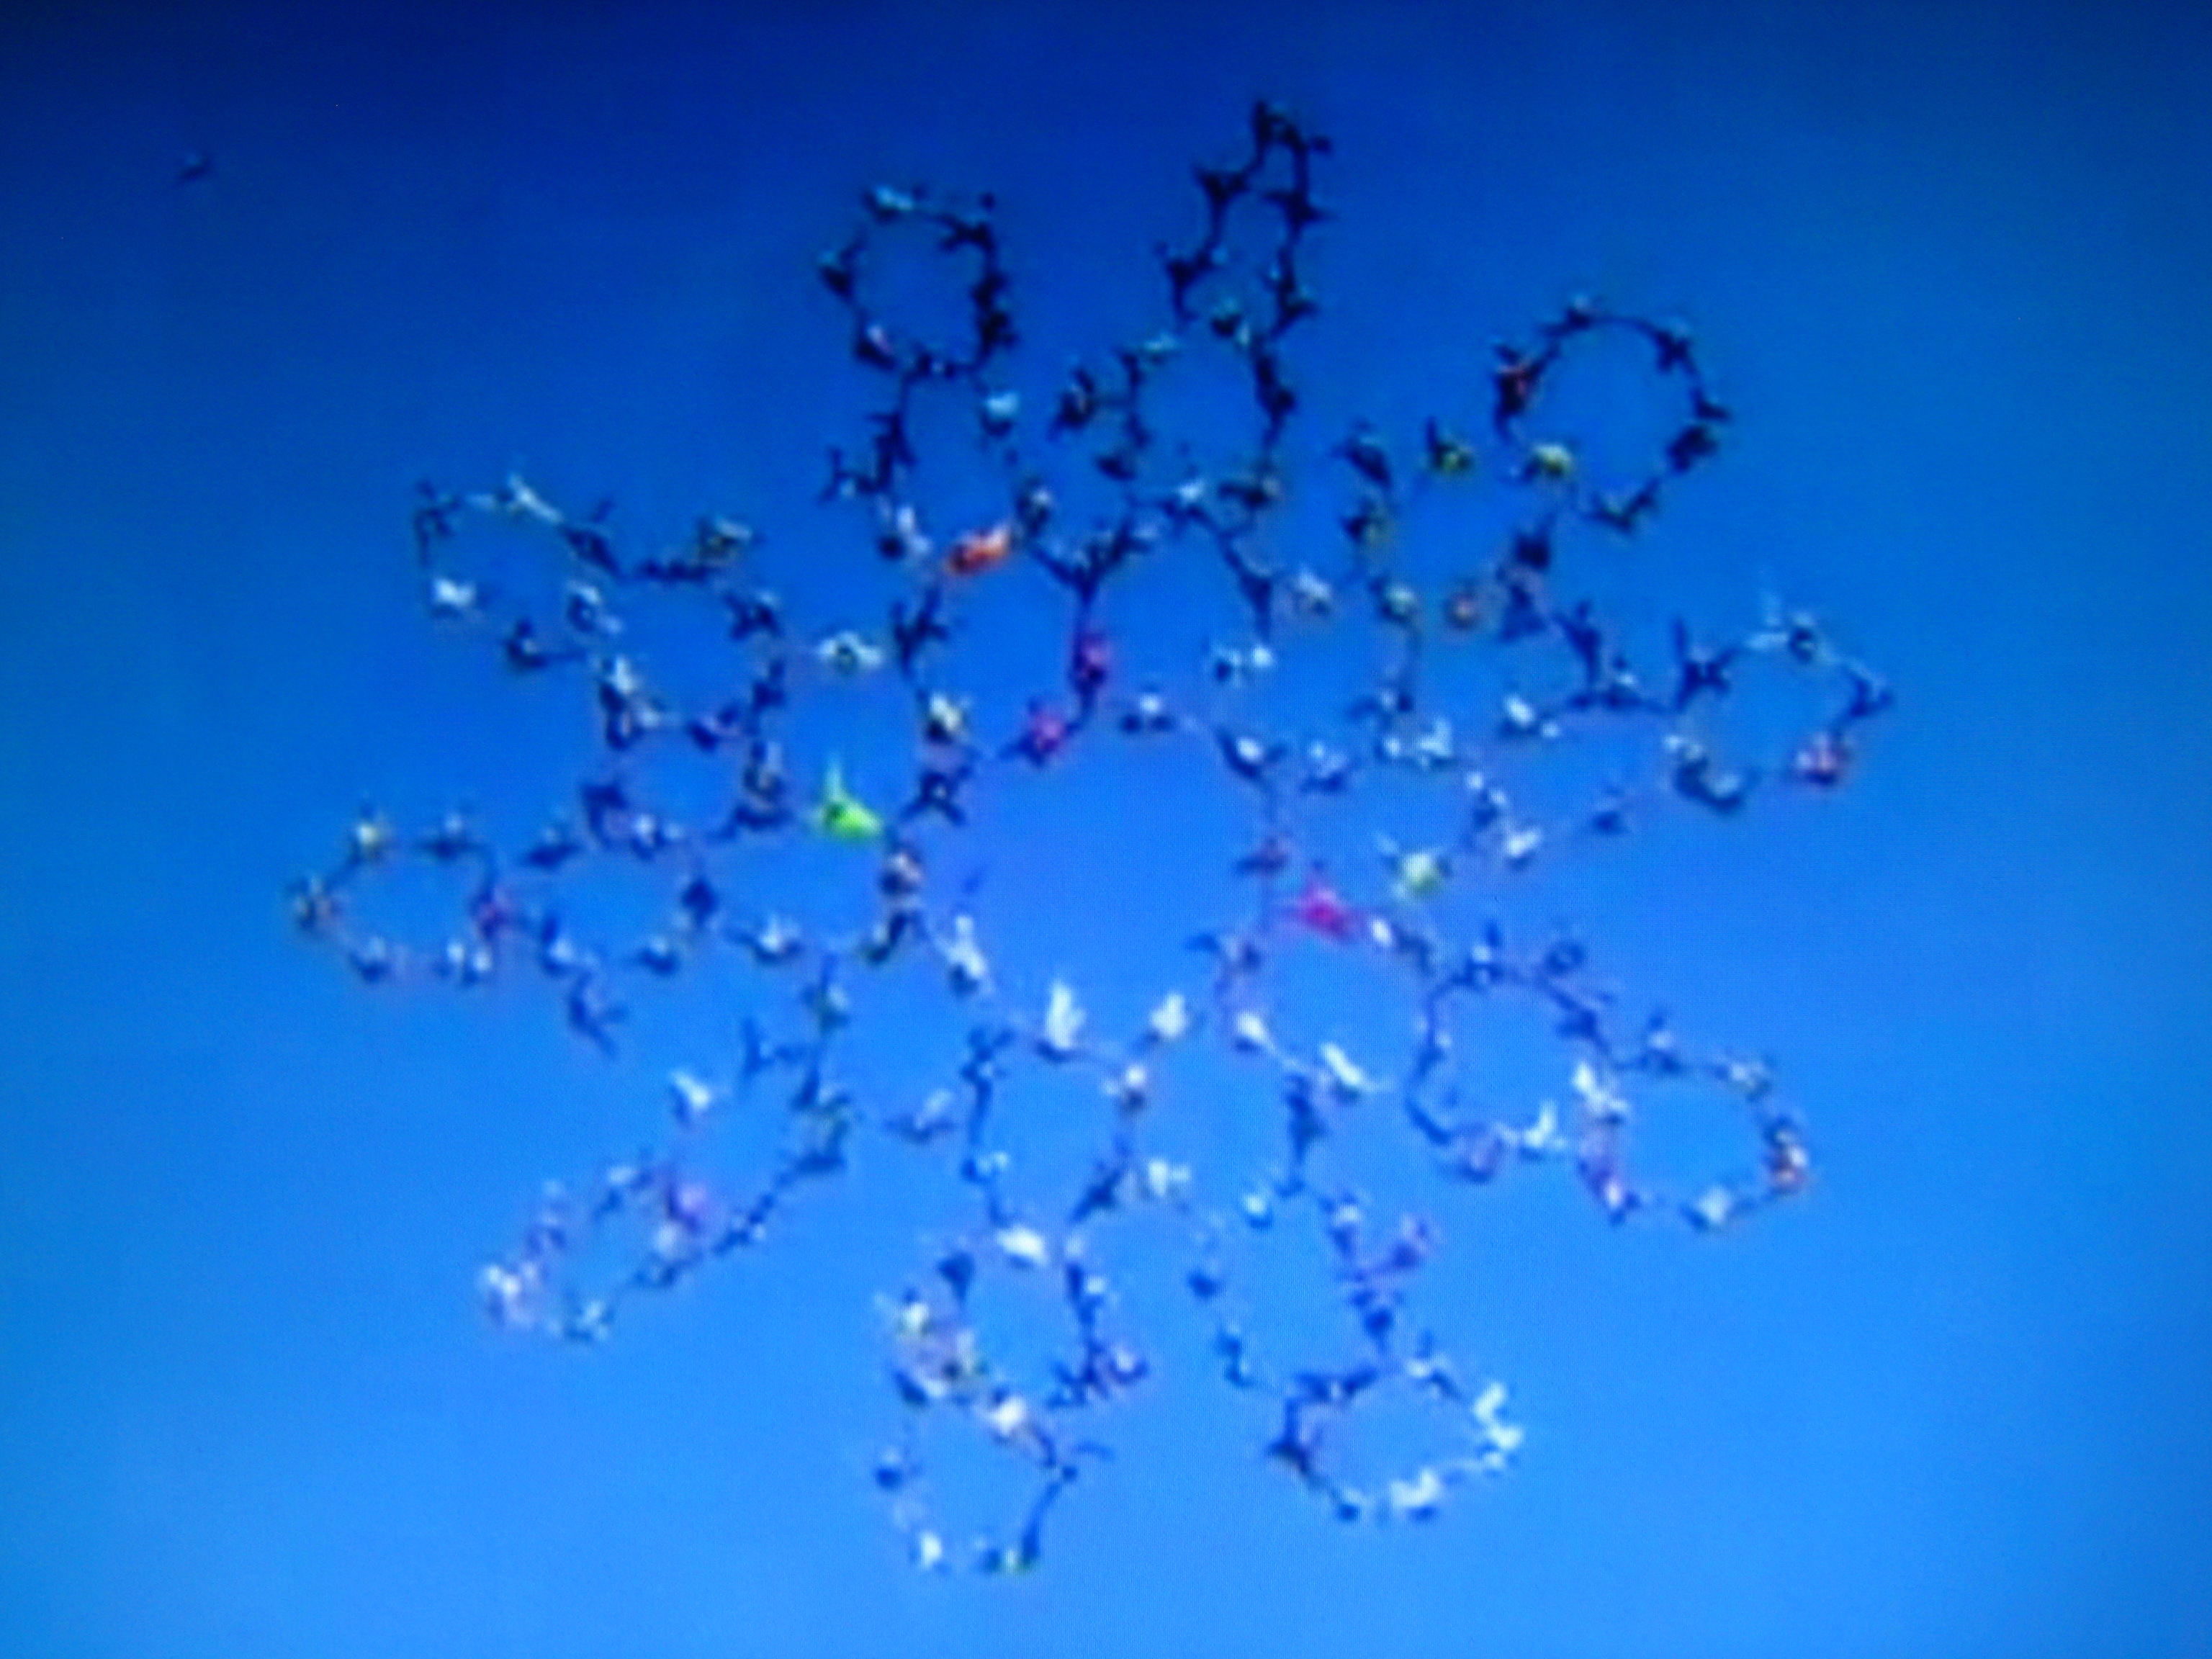
To aid the explanation I completed a painted version, where I used the same Blue and Red colours, as for the above elephant, to emphasize the twists.

Twisting, overlapping colouring of Haken Gordian Knot.  Mick Burton, continuous line.

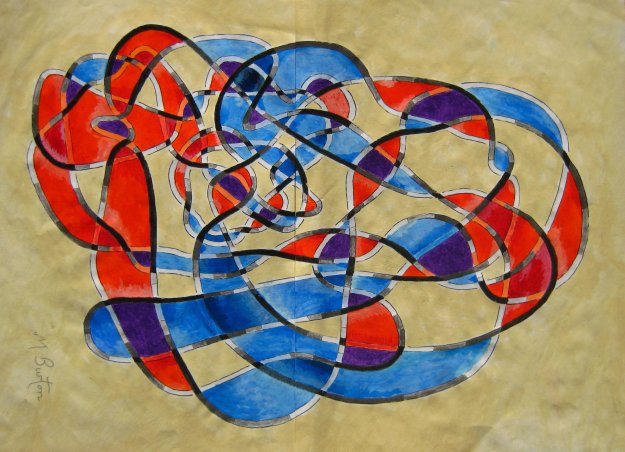
Twisting, overlapping colouring of Haken’s Gordian Knot. Mick Burton, single continuous line drawing painting 2015.

Note that the colours in the Elephant define two sides of a surface, but in the Unknot the colours are illustrating the twist of two lines travelling together.  The twin lines go through other loops continually so there are no real surfaces.

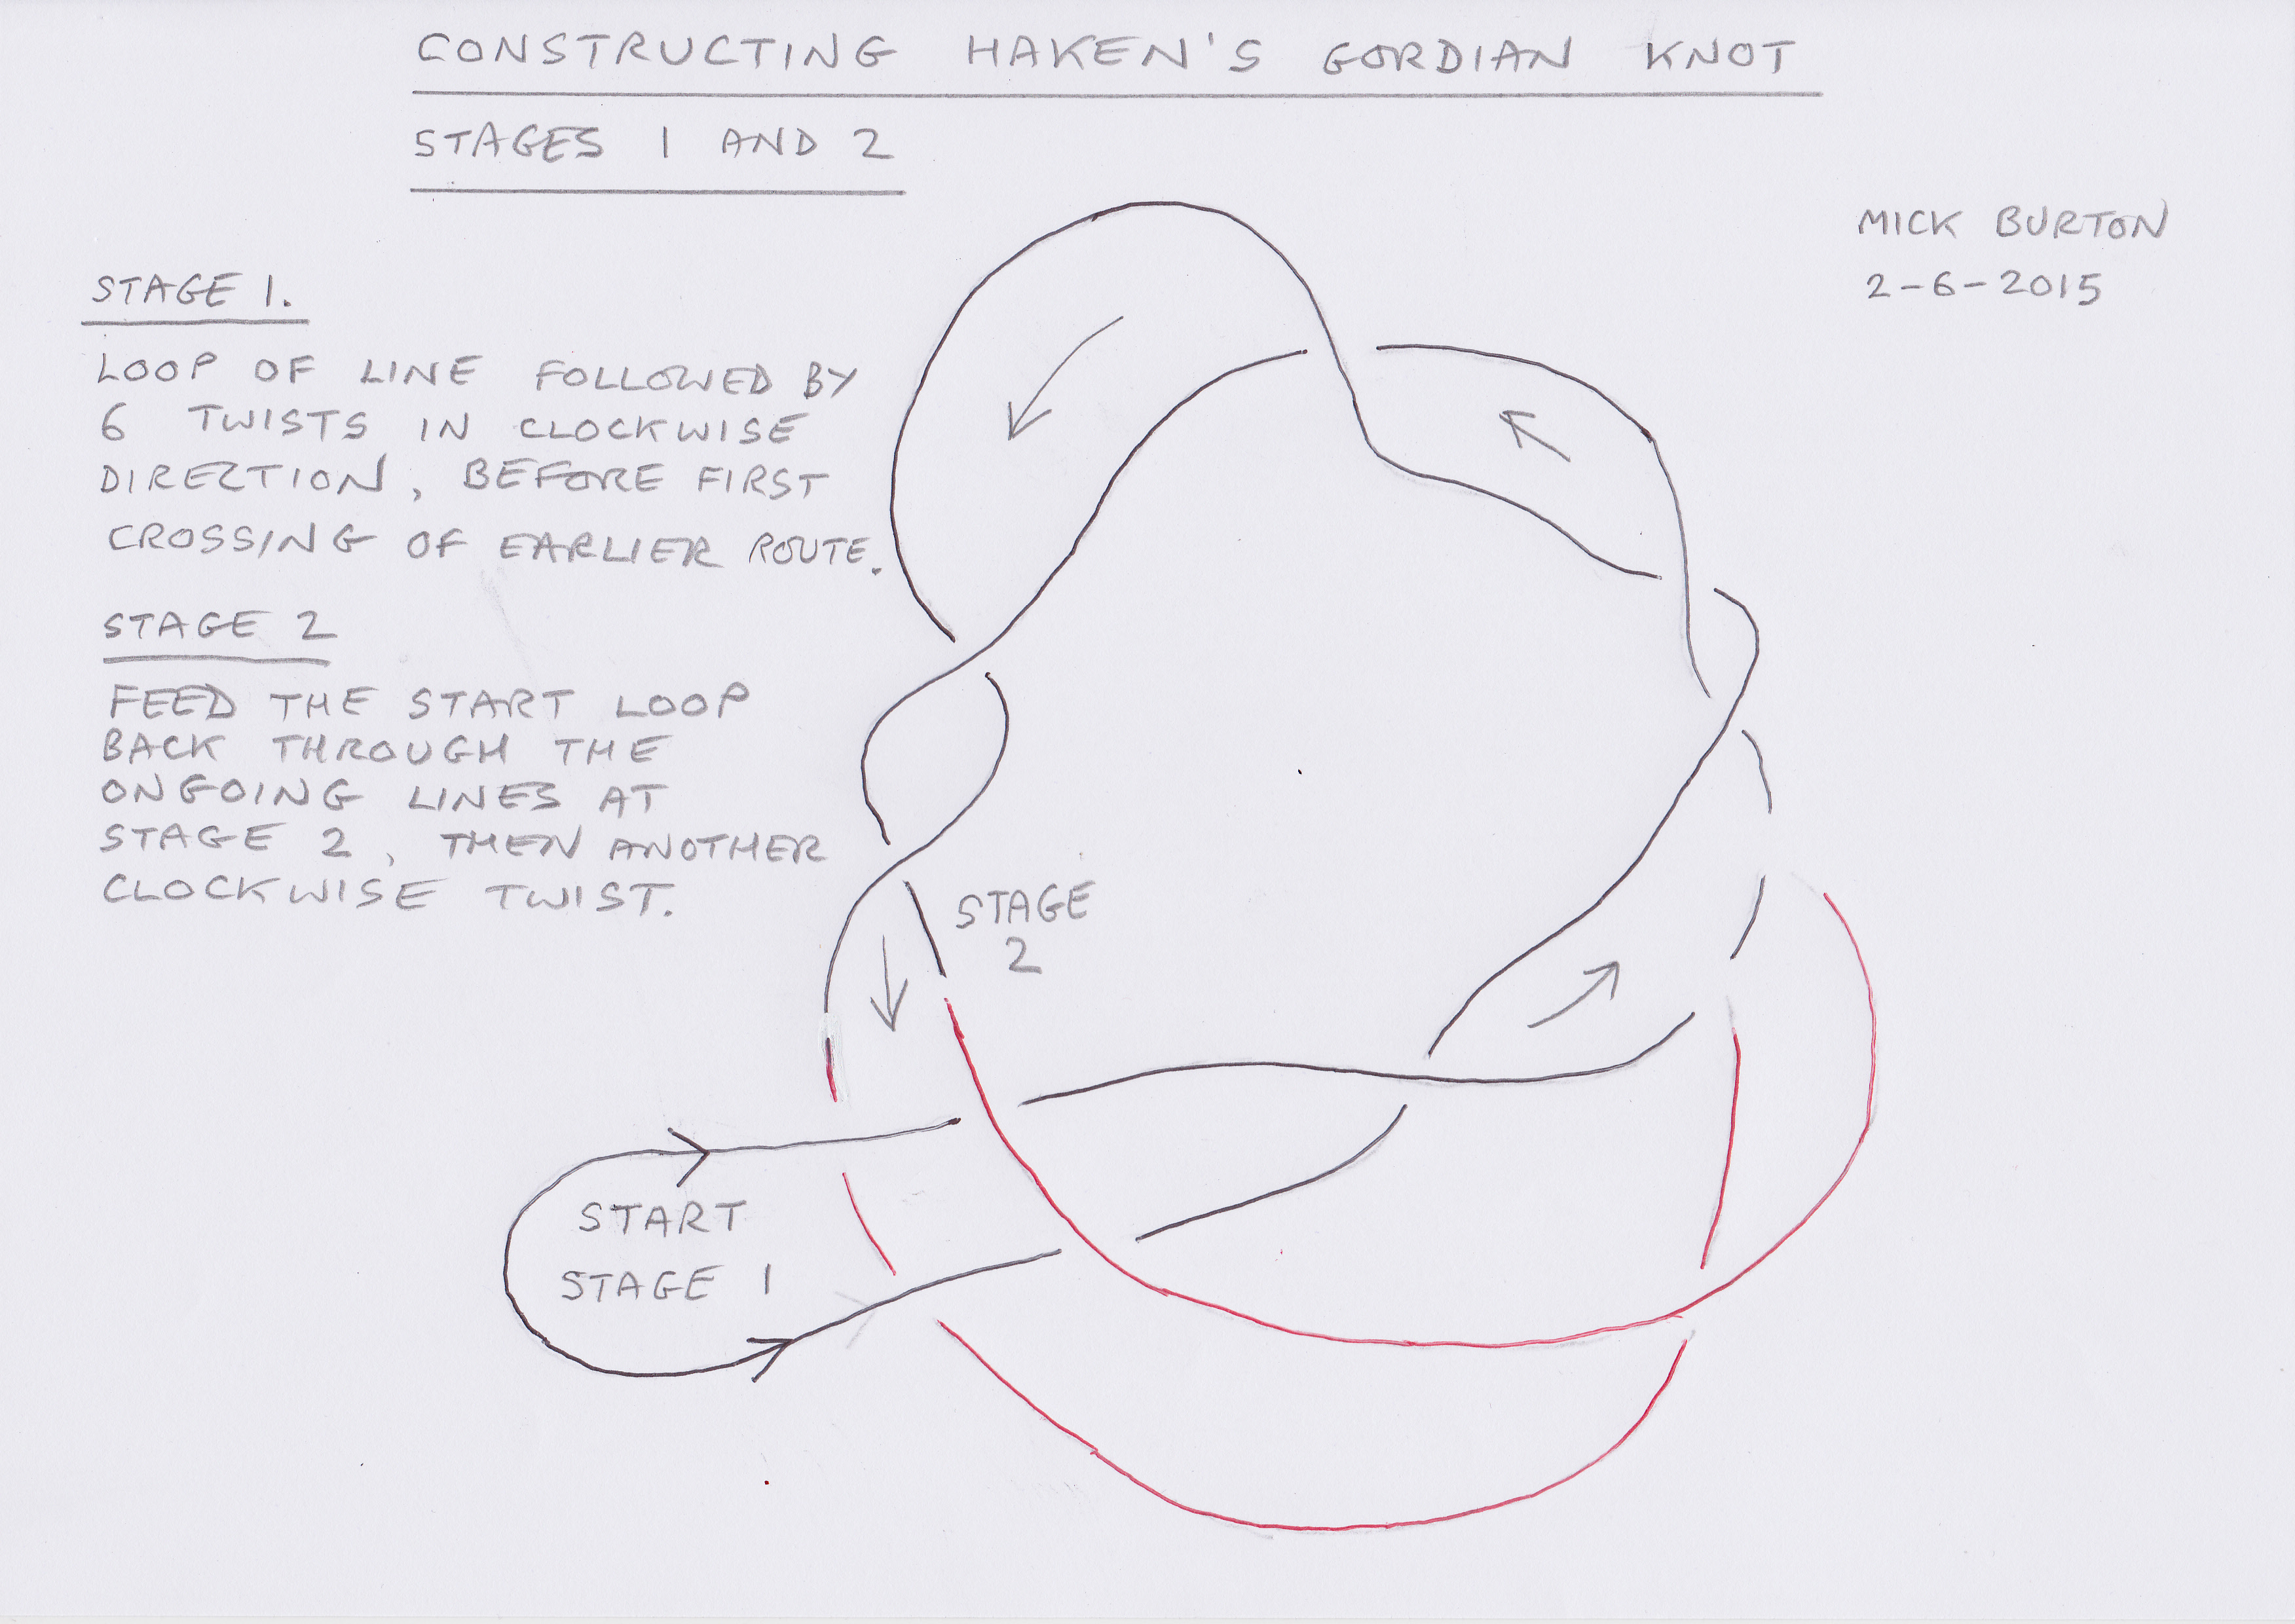
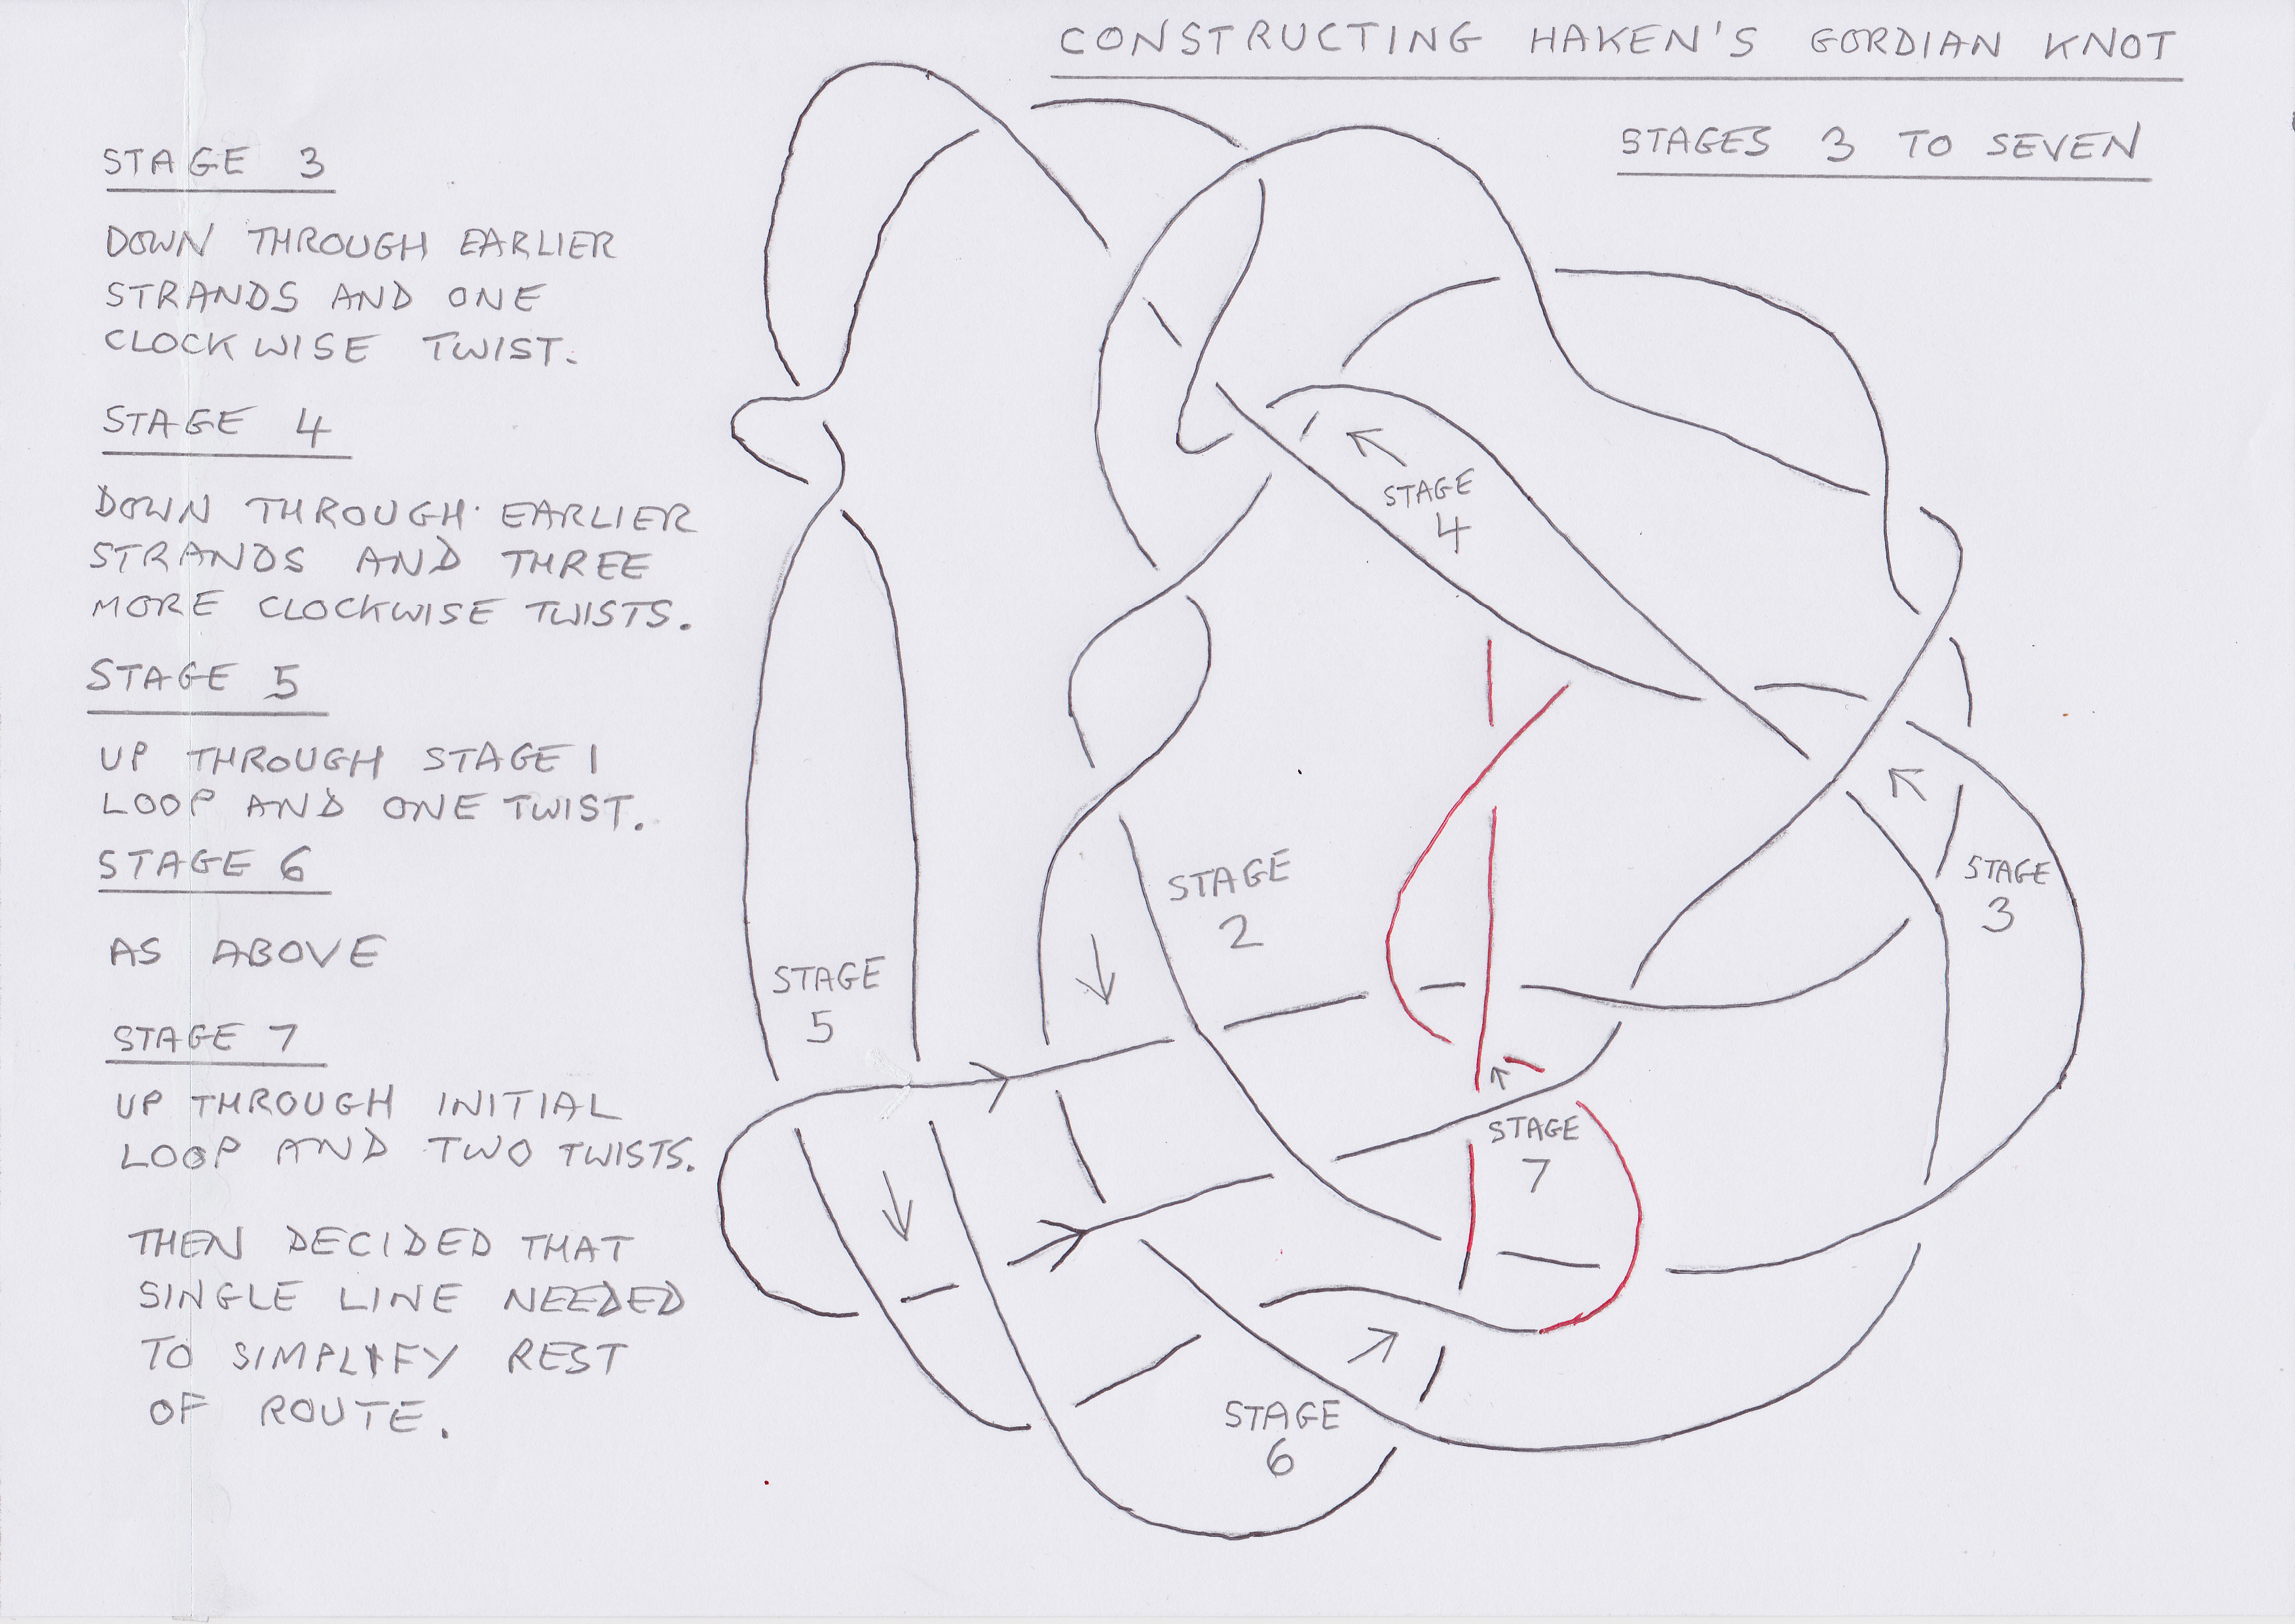
After completing the above two posts, I decided that I would try and find out more about the Knot and came across a question posed by mathematician Timothy Gowers, in January 2011, on the MathOverflow website.  He had asked for examples of very hard unknots and after many answers he had arrived at Haken’s “Gordian Knot”.  He described the difficulties he was having.  Timothy said that he would love to put a picture of the process on the website and asked for suggestions.

As I had already done two pictures before I read his post I decided to respond.  The work that I did on this is detailed in my post of 5 June 2015 entitled “How do you construct Haken’s Gordian Knot?”.

My response duly appeared on the MathOverflow website in early 2015, but within a day or two it had been taken down and a notice appeared stating that only mathematicians of a certain status should post on the site.

That’s fine as my only maths qualification is General Certificate of Education at school.  At Harrogate Technical College I was thrown out of Shorthand and, with only three months to go to GCE exams they put me in for Maths and Art.  I owe many thanks to the Shorthand teacher, who thought my only skill was picking locks when someone forgot their locker key.  Also I have never had any discussion face to face with a mathematician about my art or my maths.

Following this setback I decided to set it all down in my Blog, in the three posts up to 5 June 2015.

Although I have not actually talked directly to a mathematician, I did correspond with Robin Wilson and Fred Holroyd at the Open University in the mid 1970’s about my ideas on the Four Colour Map Theorem.  I set out my ideas briefly in my post of 18 August 2015 “Four Colour Theorem continuous line overdraw”.

When Fred Holroyd responded to my write up, he used my own expressions and definitions which was very impressive.  He said that I had proved a connected problem, only proved in the world as recently as 16 years previously.   When I asked Robin Wilson about the announcement from a mathematician who said that he had proved the Four Colour Theorem, Robin said not to worry as he thought that this one was unlikely to be validated.  He said that he would prefer that my theory could be proved as it was elegant and also that they could use it.

The theorem was proven in 1976 by Kenneth Appel and Wolfgang Haken, involving running one of the biggest computers for over 1000 hours.  After this I decided to go onto other things, leaving my art and maths behind for almost 40 years.

Yes, its the very same Wolfgang Haken, who devised the Gordian Knot!

Ok, lets move on.  In February 2016 I received an e-mail from Noboru Ito, a mathematician in Japan, saying that he had read my article of 5 June 2015 “How do you construct Haken’s Gordian Knot?” and it was very helpful.  He would like to add it to the reference of his new book “Knot Projections”.

Of course I agreed and he later confirmed that he had referenced my work to the preface of his book.

Here is a picture of my copy of his book which was published in December 2016.

Knot Projections

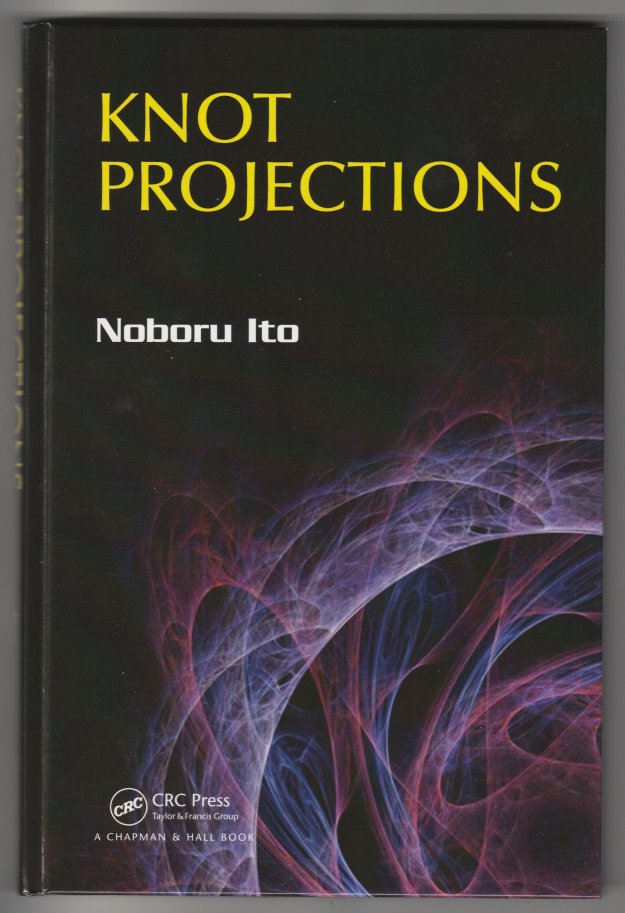
“Knot Projections” by Noboru Ito, published December 2016 by CRC Press, a Chapman & Hall Book.


Additionally, in November 2017 I received an e-mail from Tomasz Mrowka, a mathematician at the Massachusetts Institute of Technology.  He said that he was interested in acquiring a copy of my Twisting, Overlapping colouring of Haken’s unknot.  “It’s really quite striking and I would love to hang it in my office”.

I was delighted to send him a photo which he could enlarge and frame.


Mallard steams by towing eight ducklings in a continuous line.

Mallard steams by towing eight ducklings in a continuous line. Photo Mick Burton, 7.8.2016, Well House Drive, Gledhow Valley, Leeds.

Mallard steams by towing eight ducklings in a continuous line. Photo Mick Burton, 7.5.2016, Well House Drive, Gledhow Valley, Leeds.

After a couple of hours digging rocks and roots in the back garden, I emptied the roots into the brown bin and glanced towards the road at the front. There was a gap between the car and the gate post and I glimpsed a line of ducklings going by on the other side of the road.  What were the chances of that happening?

View across the road where a line of ducklings went by. Photo Mick Burton, continuous line artist,7.5.16.

View across the road where a line of ducklings went by. Photo Mick Burton, continuous line artist,7.5.16.

I rushed inside the house for my camera and ran to catch up with the female Mallard mother marching down the road with her brood in tow.  There were some kids in gardens not yet aware and cars going up and down the road.  I took the photo which appears at the top of this post.

But what was this Mallard mother doing coming down our road with her ducklings, when I knew of no streams or ponds in the streets higher up?

Anyway, I knew where she was likely to be going.  If she turned right at the bottom of the road she was on Gledhow Valley Road and the houses along there all had the Gledhow Beck flowing through their gardens.  She started to move out towards the curb to assess when to cross the road.

Mallard mum starting to move out towards the curb. Photo Mick Burton, continuous line artist.

Mallard mum starting to move out towards the curb. Photo Mick Burton, continuous line artist.

I took another closer view of the bird as she headed along parallel to the curb.  There is an eighth duckling just out of shot at the back.

Closer view of female Mallard with seven ducklings in the picture. Photo Mick Burton, continuous line artist, 7.5.16, Gledhow Valley.

Closer view of female Mallard with seven ducklings in the picture. Photo Mick Burton, continuous line artist, 7.5.16, Gledhow Valley.

Looking at these photos reminds me of my  train spotting days as a youth when I saw the  A4 pacific steam engine “Mallard” at speed pulling many carriages.  No wonder they decided to name the fastest ever steam locomotive after such a sleek bird.  Here is a photo I took of the “Mallard” steam engine at the National Railway Museum in York three years ago, along with my son Matthew.

Mallard, the fastest ever steam engine, at York National Railway Museum along with my son Matthew. Photo Mick Burton, continuous line artist.

Mallard, the fastest ever steam engine, at York National Railway Museum along with Matthew Burton.  Photo Mick Burton, continuous line artist.

Now back to the ducks and the dangerous task of crossing the road.  The road seemed clear so Mum decided to cross.  A car was signalling to turn left into our road and I flagged it down just as it was turning, which gave me little time to get a photo of the ducks in the middle of the road.  The result was a bit shaky.

Mallard Mum and eight ducklings crossing the road in front of a waiting car in Gledhow Valley. Photo Mick Burton, continuous line artist.

Mallard Mum and eight ducklings crossing the road in front of a waiting car in Gledhow Valley. Photo Mick Burton, continuous line artist.

When you are a very small duckling it’s not easy to mount a pavement you can’t really see over, and there’s not much sympathy from Mum.

Ducklings struggle to mount a pavement higher than they are. Photo Mick Burton, continuous line artist.

Ducklings struggle to mount a pavement higher than they are. Photo Mick Burton, continuous line artist.

Pause to regroup and a crowd of kids is starting to gather.

Ducklings regroup on the pavement after mounting to kerb. Photo Mick Burton, continuous line artist.

Ducklings regroup on the pavement after mounting to kerb. Photo Mick Burton, continuous line artist.

The worst is over and the female Mallard turns right into Gledhow Valley Road.

Mallard and ducklings turn right into Gledhow Valley. Photo Mick Burton, continuous line artist.

Mallard and ducklings turn right into Gledhow Valley. Photo Mick Burton, continuous line artist.

The Mallard Mum and her train of ducklings can speed up as they enter the home straight.  I am sure now that they will turn right into a drive soon.

The train of Mallard ducklings speed up as they enter the home straight. Photo Mick Burton, continuous line artist.

The train of Mallard ducklings speed up as they enter the home straight. Photo Mick Burton, continuous line artist.

The crowd of kids is becoming a bit intrusive and I ask them to keep their distance, but without much effect.

Kids arriving from all directions are beginning to crowd the ducks. Photo Mick Burton, continuous line artist.

Kids arriving from all directions are beginning to crowd the ducks. Photo Mick Burton, continuous line artist.

The Mallard Mum’s preferred garden is a bit further along I think, but she decides that she will turn into this drive anyway to escape the kids and go down to the stream.

The Mallard and her brood turn down a drive to escape the kids and to head for their stream. Photo Mick Burton, continuous line artist.

The Mallard and her brood turn down a drive to escape the kids and to head for their stream. Photo Mick Burton, continuous line artist.

Just another incident with wildlife in the valley.  Not long ago Joan and I helped a family of swans to cross Gledhow Valley Road, whilst policemen held up traffic from both directions, but that’s a story for another day.

Barn Owl continuous line drawing at Harrogate and Nidderdale Art Exhibition

Continuous line drawing of Barn Owl onto Wet on Wet watercolour. Mick Burton.

Single continuous line drawing of Barn Owl onto Wet on Wet watercolour. Mick Burton continuous line artist, 2015.

This Barn Owl painting will be one of my eight pictures on display at  the Harrogate and Nidderdale Art Club Autumn Exhibition in Ripley Town Hall, near Harrogate, on 21 & 22 November 2015.  I then intend to submit it to the next Association of Animal Artists Exhibition.

Harrogate and Nidderdale Art Club exhibition at Ripley Town Hall, near Harrogate, 21 & 22 November 2015.

Harrogate and Nidderdale Art Club exhibition at Ripley Town Hall, near Harrogate, 21 & 22 November 2015.

Visiting demonstrators at art clubs are amazingly varied and it is usually useful to attempt whatever they ask the club members to do.  I have done some workshops myself and appreciate the efforts of club members who really have a go at continuous line drawings, and associated things I show, even though to is unlikely that any of them will take up my technique as a main style.  Hopefully people can pick up things which can apply to other styles, such as building abstract patterns, using colour sequences, drawing key identifying parts of a subject and trying to manage a picture which sometimes appears to be drawing itself !

Charles Kelly from Bradford, who I have seen doing demonstrations before, came to Stainbeck Arts Club a couple of months ago and said he was doing a workshop this time.  Watercolour tends to be the most popular topic at art clubs, but Charles has a spectacular approach to “wet on wet” and this time we were doing it too.  Here is an example of his work from a demonstration to Alwoodley Art Group in 2013.

A Pair of Geese, painted by Charles Kelly in a demonstration at Alwoodley Art Group in 2013.

A Pair of Geese, painted by Charles Kelly in a demonstration at Alwoodley Art Group in 2013.

My usual style of strong lines and flat colours (acrylic or poster colour) are poles apart from watercolour but I always learn something.  I have to say that using a big brush to coat large proportions of the paper with water in advance (up to selected boundaries of course) and then squeezing brush loads of watercolour in dollops all over is a bit “hairy”.  Then picking up the paper and waving it about so that the colour swishes around, like tides on a beach, reminds me of relatives of mine “panning” for gold in Victoria in the 1850’s.

Charles had brought many reference pictures which we could use and I chose one of a barn owl.  I thought that I could do washes up to the outline of the owl and also within the owl and later put a continuous line on top which more or less matched the washes.  Here is a copy of the wash I did initially, helped by some tips from Charles along the way.

Copy of Wet on Wet watercolour of Barn Owl, before I attempted the continuous line drawing. Mick Burton.

Copy of Wet on Wet watercolour of Barn Owl, before I attempted the continuous line drawing. Mick Burton.

Later, at home, I worked on the continuous line on top of the above copy.  I started by putting key lines along the outline of the owl, feathering and other features – to match the borders of colours as far as I could.  Then I added more connecting pattern and finally joined everything up and made sure I had a continuous line.

Once I was satisfied with this I traced the continuous line down onto my watercolour painting and drew over the lines in acrylic pen making final changes as I saw how the firm line was developing.

I think that the translucent effect of the feathering has worked well, although this view may not be appreciated by a victim mouse in its last moments.

Red Squirrel continuous line and Grey Squirrel photographs

Red Squirrel, continuous line with colour sequence. Mick Burton, Leeds artist.

Red Squirrel, single continuous line drawing with colour sequence. Mick Burton, Leeds continuous line artist.

This continuous line Red Squirrel, completed with colour sequence, is one of my pictures to be hung at the Leeds Art Exhibition and Sale put on for the 15th year by St Gemma’s Hospice.

St Gemma's Leeds Art Exhibition. 29 - 31 October 2015

St Gemma’s Leeds Art Exhibition. 29 – 31 October 2015

This colour sequence squirrel is the last of a series which began with my attempt to produce a continuous line drawing with a shimmering fur effect for the squirrel.

Continuous line squirrel from 1970, with shimmering effect of fur. Mick Burton, Leeds artist.

Single continuous line drawing of squirrel from 1970, with shimmering effect of fur. Mick Burton, Leeds continuous line artist.

I have a treasured memory of seeing a Red Squirrel, when I was four, sitting on a wall next to our cottage at Arncliffe Hall, in the North Riding, where my Dad was Head Gardener to Sir Hugh Bell just after the War.  I thought that completing alternate shading with copper paint would best reflect this colour in this picture from 1970.  My daughter Kate said on the phone today that she remembered this picture being in the hall when she was young.

Red Squirrel with copper alternate shading from 1970. Mick Burton, Leeds artist.

Red Squirrel, single continuous line drawing with copper alternate shading from 1970. Mick Burton, Leeds continuous line artist.

I have many clear memories of living at Ingleby Arncliffe from the age of nearly two, to four and a half when we left.

Falling out of my pram outside the local shop and crawling up the step was the earliest. There was a three legged cat, then at Sunday School one of the stamps I collected was “The Light of the World” by William Holman Hunt (my first taste of the Pre-Raphaelites) and I won the child’s sprint on sports day on the cricket ground.

In the famous terrible winter of 1947, I remember Dad helping to dig a trench in the snow drifts down to the village.  It was amazing to walk along the trench and not be able to see out.

 I once watched a pig being killed in the yard by the cottage and the workman laughed as he squirted me with the pig’s bladder.  This memory came back years later when, as a young police constable, I attended my first post mortem (of a coal miner who had been in an underground tunnel collapse).  My sergeant stood with me and assured me that it would be just like a newly killed pig being cut up, if I had ever seen one.  I said “Yes, I saw one when I was four ! “

I only see grey squirrels now, mainly helping themselves to the bird seed Joan puts out.  With Gledhow Valley Woods at the end of the garden we can have five of them at a time.  Yesterday, a young squirrel was chased by a cat and ended up on the trellis a few feet from our dining room window.  Joan chased the cat away and called to me as the squirrel was too scared to move.

I took some quick photographs whist it was still there, but it became apparent that it was not going to move and was looking at me pleadingly.  So I went out and shepherded it into the bushes.  Here are some photos of a shimmering fur tail.

Young Grey Squirrel from Gledhow Valley Woods. Three feet from my window after being chased by a cat. Mick Burton, Leeds artist.

Young Grey Squirrel from Gledhow Valley Woods. Three feet from my window after being chased by a cat. Mick Burton, Leeds artist.

Young Grey Squirrel not daring to move, even though Joan had chased the cat away. Mick Burton, Leeds artist.

Young Grey Squirrel not daring to move, even though Joan had chased the cat away. Mick Burton, Leeds artist.

Young Grey Squirrel, imploring me to stop taking photos and do something about the cat. So I went out and shepherded it to the bushes. Mick Burton, Leeds artist.

Young Grey Squirrel, imploring me to stop taking photos and do something about the cat. So I went out and shepherded it to the bushes. Mick Burton, Leeds artist.

Leeds Carnival 2015 with photos by Mick Burton, continuous line artist.

Red Indian head dress costume, Leeds Carnival 2015. Photo by Mick Burton continuous line artist.

Red Indian head dress costume, Leeds Carnival 2015. Photo by Mick Burton continuous line artist.

This was the first costume in the parade, preceded by one of several mobile steel drum bands. We stood on the first bend, near Gledhow Valley, after the parade’s initial stretch from Potternewton Park.

Cockapoo with wet paws waits for the Leeds Carnival parade to approach. Photo by Mick Burton, continuous line artist.

Cockapoo with wet paws waits for the Leeds Carnival parade to approach. Photo by Mick Burton, continuous line artist.

It was a dull afternoon and drizzling. The Cockapoo loved the fuss from the crowd and waited for some action.

Red and blue costume in the Leeds Carnival matched the drizzle. Photo by Mick Burton, continuous line artist.

Red and blue costume in the Leeds Carnival matched the drizzle. Photo by Mick Burton, continuous line artist.

Yellow and orange costume which lit up the parade at the Leeds Carnival. Photo by Mick Burton, continuous line artist.

Yellow and orange costume which lit up the parade at the Leeds Carnival. Photo by Mick Burton, continuous line artist.

The drizzle had stopped and this costume, really lit up the parade.

Violet and yellow costume at the Leeds Carnival. Photo by Mick Burton, continuous line artist.

Violet and yellow costume at the Leeds Carnival. Photo by Mick Burton, continuous line artist.

Razzle and Dazzle at the Leeds Carnival. Photo by Mick Burton, continuous line artist.

Razzle and Dazzle at the Leeds Carnival. Photo by Mick Burton, continuous line artist.

Gold costume at the Leeds Carnival. Photo by Mick Burton, continuous line artist.

Gold costume at the Leeds Carnival. Photo by Mick Burton, continuous line artist.

Lion King at the Leeds Carnival. Photo by Mick Burton, continuous line artist.

Lion King at the Leeds Carnival. Photo by Mick Burton, continuous line artist.

Catherine wheel costume at Leeds Carnival. Photo Mick Burton, continuous line artist.

Catherine wheel costume at Leeds Carnival. Photo Mick Burton, continuous line artist.

Flamingo costume at Leeds Carnival. Photo by Mick Burton, continuous line artist.

Flamingo costume at Leeds Carnival. Photo by Mick Burton, continuous line artist.

Bolivian costumes, back view, at the Leeds Carnival. Photo Mick Burton, continuous line artist.

Bolivian costumes, back view, at the Leeds Carnival. Photo Mick Burton, continuous line artist.

Jamaican costume at Leeds Carnival. Photo Mick Burton, continuous line artist.

Jamaican costume at Leeds Carnival. Photo Mick Burton, continuous line artist.

Blue and Green costume at Leeds Carnival. Photo Mick Burton, continuous line artist.

Blue and Green costume at Leeds Carnival. Photo Mick Burton, continuous line artist.

Pink costume at Leeds Carnival. Photo Mick Burton, continuous line artist.

Pink costume at Leeds Carnival. Photo Mick Burton, continuous line artist.

Child with balloon in Leeds Carnival parade. Photo Mick Burton, continuous line artist.

Child with balloon in Leeds Carnival parade. Photo Mick Burton, continuous line artist.

Multi petal costume at Leeds Carnival parade. Photo Mick Burton, continuous line artist.

Multi petal costume at Leeds Carnival parade. Photo Mick Burton, continuous line artist.

So there we are. Another very entertaining Leeds Carnival parade. The colours lit up a dull afternoon until the sun came out.


Stainbeck Arts Club Exhibition at Chapel Allerton Arts Festival

Stainbeck Arts Club Exhibition at Chapel Allerton Arts Festival, Leeds.  on Saturday 5 September 2015.  Paintings by Mick Burton, continuous line artist, are included.

Stainbeck Arts Club Exhibition at Chapel Allerton Arts Festival, Leeds. on Saturday 5 September 2015. Paintings by Mick Burton, continuous line artist, are included.

Stainbeck Arts Club, my local art club which is based in Chapel Allerton in north Leeds next to Gledhow Valley, is holding its Annual Art Exhibition as part of the Chapel Allerton Arts Festival.  The Exhibition held in Chapel Allerton Methodist Church, which is situated at the lower end of the main Festival area, will be open from 10.00 to 16.00 on Saturday 5 September 2015.

There will be many quality pictures on display, so if you are attending the Arts Festival do pop in and have a look.  Admission is free.

Chapel Allerton Arts Festival 2015, front cover of brochure.

Chapel Allerton Arts Festival 2015, front cover of brochure.

The Chapel Allerton Arts Festival was started in 1998 by members of the local community in a small way, with a few stalls and two bands playing from the back of a lorry in the evening.

It now runs from Monday to Sunday and involves many parts of the community at lots of venues during the week, including a Short Film Festival and an Art Trail. At the weekend two streets are closed off and the central parking areas taken over for all the stalls and events, including a main stage for the many quality bands. The festival is still run entirely by volunteers.

This year the Festival starts on Monday 31 August and the main day will be Saturday 5 September when people will arrive from all over the place to attend one of the star attractions in the Leeds calendar.

Four Colour Theorem continuous line overdraw.

Continuous lines overdrawn on Skydiver formation design, using Four Colour Theory method. Mick Burton

Continuous lines overdrawn on Skydiver formation design, using Four Colour Theory method. Mick Burton

My recent post about the formation design used by the record breaking skydivers included a continuous line overdraw of their design (modified slightly be me to complete links which would have been present with more skydivers).  I said that I would explain how the overdraw (above) was completed.

The structure is made up of circles which have 3 way junctions throughout (3 handed in the case of skydivers ! ).  This can be regarded a map and so I will apply my Four Colour Theorem continuous line overdraw which I devised in the early 1970’s.

I was trying to prove the Four Colour Theorem, which states that no more than four colours are required to colour all the regions of a map.  My basic idea was that drawing a single continuous overdraw throughout a map would split it into two chains of alternate regions, which would demonstrate that only 4 colours were required.  If more than one continuous overdraw resulted then there were still only two types of chains of alternate regions.

As you will probably know, this theorem has many complexities which I will not attempt to cover here.  In the mid 1970’s I corresponded with two mathematicians at the Open University about my approach, Robin Wilson and Fred Holroyd, who were both very helpful and encouraging.  The theorem was proven in 1976 by Kenneth Appel and Wolfgang Haken, running one of the biggest computers for over 1000 hours.  I soon decided that it was time to go onto other things!  However, my journey had been fascinating with numerous amazing findings which have been so useful in my art.

I can keep to relatively simple methods for my pictures.

 Here is the design, used above, with my initial overdraws shown in red.

Assumed formation design used by Skydivers, with initial overdraws. Mick Burton four colour overdraw.

Assumed formation design used by Skydivers, with initial overdraws. Mick Burton four colour overdraw.

On final completion of the overdraws, every junction should have two of its three legs overdrawn and so the start decision (1) above overdraws two legs and this means that the third leg, which I call a “spar”, links to another junction where the other two legs must be overdrawn.

We then carry on making decisions which trigger other overdrawn lines across spars.  Usually there is a “knock on” effect where new overdraws connect with already overdrawn lines which then trigger more overdraws.

If we go wrong and a junction is triggered which has all three legs overdrawn, or none, we have to go back and change earlier decisions in a controlled process.  I usually photocopy the overdraws completed, every two or three stages, so that going back is not too time consuming.

Here is the situation after decision (3).  Decision (2) in blue had only triggered two overdraw sections but decision (3), in green, has triggered ten sections to be overdrawn in green.

Four Colour Overdraw decision 3 triggers 10 further overdraws, in green. Mick Burton, continuous line artist.

Four Colour Overdraw decision 3 triggers 10 further overdraws, in green. Mick Burton, continuous line artist.

Here is the completed overdraw.  It can be seen that some decisions still only trigger one or two overdraws, but decisions 5 and 7 triggered 13 and 12 overdraws respectively.  There are 80 junctions in the design and it took 11 decisions to complete the overdraws.

completed Four Colour Theorem overdraw, on design based upon Skydivers formation design. Mick Burton, continuous line artist.

completed Four Colour Theorem overdraw, on design based upon Skydivers formation design. Mick Burton, continuous line artist.

The completed overdraw has several continuous overdraws.  I tried other variations but had to accept that this design cannot be overdrawn with a Single Continuous overdraw.  This is due to the design having basically only two full rings of circles, which means that some tips of petals cannot be included in a continuous overdraw.

Continuous lines overdrawn on Skydiver formation design, using Four Colour Theory method. Mick Burton

Continuous lines overdrawn on Skydiver formation design, using Four Colour Theory method. Mick Burton

This situation can be overcome by adding links between the tips of the petals to produce that extra ring of areas.  Here is the expanded design and the stages of overdraw.  I managed to complete the Single Continuous overdraw in one sequence without having to go back to change any decisions.

Increased size design with successful Single Line Overdraw using Four Colour Theorem method. Overdraw decisions shown. Mick Burton.

Increased size design with successful Single Line Overdraw using Four Colour Theorem method. Overdraw decisions shown. Mick Burton.

Of course it looks better with one solid colour overdraw and no decision numbers.

Skydiver formation design with links between out petals completed, overdrawn with a Single Continuous Line using Four Colour Theorem method. Mick Burton.

Skydiver formation design with links between out petals completed, overdrawn with a Single Continuous Line using Four Colour Theorem method. Mick Burton.

I have said that the method of overdraw was developed with Four Colours in mind, and so you could use one pair of colours alternately within the above overdraw and another pair of colours on the outside of the overdraw (which can include the background).

I have found another interesting result in that if you use strong colours inside the overdraw, as it is the main image, and neutral colours outside (or even leave the outside blank) then the gaps between the “petals” show good use of space.  Here is the design simply coloured in strong red inside the overdraw, which creates a good contrast as the background seeps in. 

Solid colour within single continuous overdraw, with Four Colour method, showing good use of space. Mick Burton.

Solid colour within single continuous overdraw, with Four Colour method, showing good use of space. Mick Burton.

The chains of areas produced by the continuous overdraws can be coloured, not just in two pairs of colours to demonstrate Four Colours, but with a colour sequence or a mixture of sequence, alternate colours or even one colour.  In the last picture I have used colour sequence on main chains of areas related to the central space and, as a contrast,  light grey on the chains connected to the outside of the design.

Star Burst. Four Colour Theorem applied to a map of shell shapes wound round from the centre. Rainbow sequence of colours. Mick Burton, 1971

Star Burst. Four Colour Theorem applied to a map of shell shapes wound round from the centre. Rainbow sequence of colours. Mick Burton, 1971

This is one of the first paintings that I produced after discovering my Four Colour Theorem overdraw in 1971. I called the picture “Star Burst”, one of my first planetary pictures.


Gledhow Valley amazing cobwebs.

I must apologise for a silly thing that I did yesterday.  I photographed a spider using the sun to obtain glistening images of the spiders web.  Only when I had set it all up and published it did I remember that one of my main supporters does not like looking at spiders and may never, ever, look at my web site again if I left them up.

So I have removed them all and I hope that I have not upset search engines too much.  It should be alright to leave images of cobwebs only so here are some images from 2009.

Previously I have had the assistance of red brick dust when our kitchen was extended in 2009.  A total of eight cobwebs on three separate dining room window panes. 

Four cobwebs on dining room windows covered in red brick during work on kitchen extension in 2009. Mick Burton, continuous line artist.

Four cobwebs on dining room windows covered in red brick during work on kitchen extension in 2009. Mick Burton, continuous line artist.

Three cobwebs, on another dining room window, covered in red brick dust in 2009. Mick Burton, continuous line artist.

Three cobwebs, on another dining room window, covered in red brick dust in 2009. Mick Burton, continuous line artist.

Large cobweb, on third dining room window, covered in red brick dust after work on kitchen extension in 2009. Mick Burton, continuous line artist.

Large cobweb, on third dining room window, covered in red brick dust after work on kitchen extension in 2009. Mick Burton, continuous line artist.

Eventually the window cleaner came and sorted all the cobwebs out.

Skydivers in Ten Petal Flower Formation, link to Four Colour Theory continuous line.

164 Skydivers head down record in Illinois, 31 July 2015.

164 Skydivers head down record in Illinois, 31 July 2015.

Two weeks ago 164 skydivers, flying at 20,000 feet and falling at 240 miles an hour, set the “head-down” world record in Illinois. The international jump team joined hands for a few seconds, in a pre-designed formation resembling a giant flower, before they broke away and deployed their parachutes.

I was intrigued by the design of the formation. I have found many qualities in ten petal (or star) designs and, of course, I look for continuous lines in all sorts of designs that I find and in particular the possibility of a Single Continuous Line.

Here is my sketch of the skydivers formation.  It is made up of many linked circles, starting with a central ring of ten circles which radiate out to ten “petals”.  The plan seemed to involve six skydivers forming each circle by holding hands.  Some extra skydivers started links between petals.  I checked to see if I had included all the skydivers, which made my sketch look like a prickly cactus.

Cactus Count, 164 Skydivers all Present and Correct. Mick Burton, continuous line artist, August 2015

Cactus Count, 164 Skydivers all Present and Correct. Mick Burton, continuous line artist, August 2015

This was such a tremendous achievement by very brave men and women.  My only experience of heights is abseiling 150 feet down a cliff in the Lake District.  I realise that the jump would have been very carefully planned using the latest science and involved a lot of training, etc. but I am particularly interested in the part that the formation design played.

The hexagon appears to be an essential element so that hands can be joined at 3 way junctions.  A core circle of hexagons would naturally be 6, but more would be required for this jump.  The next highest near fit would be 10, which is fine given the variations in human proportions.  This also naturally allows linking between middle circles in the petals to complete a second ring of circles, which was partly done in this jump.

Every participant would need to know exactly where their place would be in the design and yet it is so symmetrical that I struggle to get my sketch the right way up.  Also with the short time involved co-ordination of planned stages would be difficult.  This made me think of a flock (or murmuration) of starlings performing their remarkable patterns in the sky and how they manage to co-ordinate. Apparently each bird relates and reacts to the nearest birds around it.  Absolute simplicity and ruthless efficiency with no critical path.

If the skydivers have adopted a similar approach then the design is ideal. The design is basically 30 circles in sets of 3 in a row making up 10 petals. The process is fluid and adaptable, building outwards from the centre. Think 10 individuals linking hands to start off with, which then recognisably evolves into 10 petals, and think 6 individuals in each of the 30 circles.  Everyone is dropped (there were 7 aircraft I think) in an order which anticipates being able to take up a place a certain distance from the centre of the structure and within a specific circle. As they approach they can recognise the progress and assess whether they can link in as expected or whether a modified position may need to be taken up (and being guided by the people already in place). The last individuals to be dropped will not have  a planned position in any circle but will form the start of the links between the central of the 3 circles in the petals. They need to be prepared to become part of an outer circle which has not been completed.

I have done a sketch of how this may work, with the numbers indicating my thoughts on the expected order of arrival in the building of the formation.

Skydiver formation with possible roles and order of arrival of individuals. Mick Burton, continuous line artist.

Skydiver formation with possible roles and order of arrival of individuals. Mick Burton, continuous line artist.

I hope this was a useful exercise, in trying to work out how the formation worked, and not total tosh (if so my apologies to all concerned).

To help my attempt to apply my continuous lines to the design I have completed the links between middle circles, which was partially done this time and I suppose will be considered for the next larger attempt at the record (say 180 skydivers).  The Continuous Lines are intended to pass through every three handed junction once only (I normally would say three legged ! ).

The method I use to complete the overdraw was developed in the early 1970’s when I was working on trying to prove the Four Colour Theorem.   A single continuous overdraw throughout a map would split it into two chains of alternate colours which would demonstrate that only four colours were needed.  I will explain how this is done in a future post.

Continuous lines overdrawn on Skydiver formation design, using Four Colour Theory method. Mick Burton

Continuous lines overdrawn on Skydiver formation design, using Four Colour Theory method. Mick Burton

This overdraw has resulted in several continuous lines and no alternative would produce a Single Continuous Line. This is due to the lack of width going around the structure.

Consequently, I have extended the design further by adding linking lines between all outer petals and succeeded in drawing a Single Continuous Line on that. A future Skydiver jump completely assembling this design would require about 220 participants (I am not suggesting that this be attempted) !

Skydiver formation design with links between out petals completed, overdrawn with a Single Continuous Line using Four Colour Theorem method. Mick Burton.

Skydiver formation design with links between out petals completed, overdrawn with a Single Continuous Line using Four Colour Theorem method. Mick Burton.

How do you construct Haken’s Gordian Knot?

After completing my drawings of Haken’s Gordian Knot, which I covered in my previous continuous line blog post, I decided that I needed to find out more about how this unknot was created.  It is one thing me portraying the route of the two strands running through a completed structure, but possible something very different if I construct it from scratch.

A Google search for Haken’s Gordian Knot took me to a page of MathOverflow website, where a question that appeared “Are there any very hard unknots?” posed by mathematician Timothy Gowers, in January 2011.  In an update after many answers he said that he had arrived at Haken’s “Gordian Knot”.

Haken's Gordian Knot, from Ian Agol. A simple circle of string (an Unknot) formed into a complicated continuous line.

Haken’s Gordian Knot, from Ian Agol. A simple circle of string (an Unknot) formed into a complicated continuous line.

Timothy said that, after studying the knot for some time, “It is clear that Haken started by taking a loop, pulling it until it formed something close to two parallel strands, twisting those strands several times, and then threading the ends in and out of the resulting twists”. This approach is something like the suggestions I made in my last post on the basis of my Twisting, Overlapping, Envelope painting of the Haken Knot.

Twisting, overlapping colouring of Haken's Gordian Knot. Mick Burton painting.

Twisting, overlapping colouring of Haken’s Gordian Knot. Mick Burton single continuous line drawing painting.

Timothy then added that “The thing that is slightly mysterious is that both ends are “locked” “.  When I started to build the structure from scratch I began to realise what “locked” may mean.

Constructing Haken's Gordian Knot. Stages 1 & 2. Mick Burton.

Constructing Haken’s Gordian Knot. Stages 1 & 2. Mick Burton.

After leaving the looped end at the start, the ongoing route first meets its earlier self at Stage 2.  However instead of the ongoing route going through the earlier one, the initial loop goes back through the later one. This must be what is meant by the first “lock”.

Constructing Haken's Gordian Knot. Stages 3 to 7. Mick Burton

Constructing Haken’s Gordian Knot. Stages 3 to 7. Mick Burton

Continuing, things were as expected up to Stage 7.  I now realised that the route could be simplified to one line, as the Twists were not affecting progress but the feed through points were crucial.  I switched to drawing the route by using a simple line (to represent the twin twisting strands) and showed Feed Through points as Red Arrows.

Haken's Gordian Knot, Simplified Route showing Feed Points. Mick Burton.

Haken’s Gordian Knot, Simplified Route showing Feed Points. Mick Burton.

You can see that after point “C”, where the reverse Feed occurs, there are 12 expected Feed Through points until you arrive at point “E”.  Here instead of Feeding through an earlier part of the route, Haken indicates that you are expected to Feed through the End Loop at “E” which is too soon. This must be the other “Lock”.

At this stage, of course, I had no idea what to do.  Timothy did not seem to be using a lot of paper like me, but a “twisted bunch of string” and a small unknot diagram.  So I found some string, but was at a loss to make much sense of anything using that.  Timothy, however, was disappointed that it was so easy with his string initially, but delighted when it became more difficult !

What I did realise about the sections of route lying beyond point “E”, which I have coloured Green, is that they all lie beneath the rest of the structure.

This would allow the Green Area to be constructed separately before you sort of sweep it underneath as a final phase.  When I say “separately” I can only assume that you would need to do all this first, feed the result through the final loop and encapsulate the result.  You would then take this bundle to the start and use it to spearhead the building of the structure, leaving the loop at the other end of the two stranded string back at the start.

Haken's Gordian Knot, Prior action for the Green Route, before starting main structure. Mick Burton.

Haken’s Gordian Knot, Prior action for the Green Route, before starting main structure. Mick Burton.

Timothy said that he would love to put a picture of the process on the website and asked for suggestions.

Even though I am an artist and not a mathematition, I had already done two pictures of Haken’s knot before I found the MathOverflow website and was fascinated by the production process of the knot and so did some extra diagrams of my own.

I will ask if my drawings match Timothy’s thoughts in any way.